Are you a Tumblr content creator and want to setup & activate Post+ feature to make money on this amazing microblogging platform? You’re in the right place.
In this tutorial we will guide you step-by-step on how to setup & activate Post+ feature in Tumblr to make money online.
NOTE: The Post+ feature has been discontinued and has been replaced by Tipping. Read More About Tipping: What is Tipping on Tumblr & How to Accept & Send Tips.
The Post+ feature allows you to create content for paid supporters/subscribers only. You can set your monthly subscription price that people can pay and subscribe. Once a Tumblr user becomes your supporter he will have access to your exclusive content and perks.
Who is eligible to avail the Post+ feature of Tumblr? Unfortunately, not everyone around the world is eligible to avail this feature. One must be the resident of one of the following countries:
- Australia, Canada, France, Ireland, United Kingdom
- Italy, New Zealand, Spain, Germany, United States
Apart from being the resident of one of the countries listed above, your Tumblr blog must NOT Be password-protected, flagged, and group blog, in order to be eligible for activating Post+ feature.
|| Looking for cute and aesthetic professional Tumblr themes? Find Here.
Following topics will be covered in this tutorial:
- How Much Money You Can Make As a Post+ Creator?
- What Is My Tumblr Username?
- How To Setup Post+ Feature In Tumblr
- How To Create Post+ Content In Tumblr
- How To Become a Post+ Supporter
RELATED:
- How To Setup Custom Domain On Tumblr | Beginners
- How To Monetize Tumblr Blog With Google Ads | AdSense
- How To Add Google Analytics ID In Tumblr | Measurement ID
- Tumblr SEO Settings & On-Page SEO Guide | Increase Traffic
- 30+ Websites to Buy Premium Tumblr Themes | Free Download
01. How Much Money You Can Make As a Post+ Creator?
Though there are many other ways through which you can make money on Tumblr like Affiliate Marketing, AdSense, Showcase eCommerce Store, Sponsored Content, etc, but Post+ is the builtin feature of Tumblr through which you can make money.
How much money you can make as a Post+ creator on Tumblr mainly depends on two factors like:
- Number of supporters/subscribers and their growth rate
- Whether your supporters like your content and remain as your loyal subscribers.
Post+ feature offers 4 pricing plans that you can choose and offer to Tumblr users i.e. $1.99/month, $3.99/month, $5.99/month, and $9.99/month.
Suppose you have 150 supporters and your Post+ subscription price is $3.99/month. Let’s do some calculations.
- Total Supporters X Subscription Price = 150 X $3.99 USD = $598.5 USD (Monthly Earnings).
- Monthly Earnings X 12 = $598.5 USD X 12 = $7,182 USD (Yearly Earnings).
So, from the above calculations you can get an idea on how much money you can make as a Post+ Tumblr creator depending upon your Pricing Plan and Number of Supporters.
02. What is My Tumblr Username?
Tumblr username will be used when you provide your business-website URL in Business Details in the next section. That’s why you should know How to get you Tumblr Username.
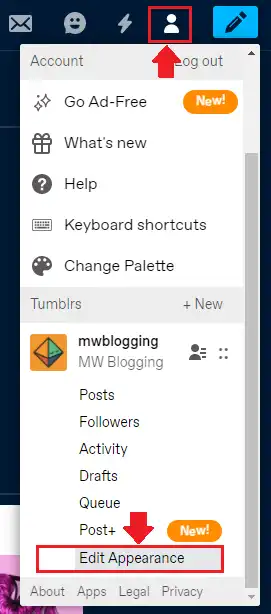
- Click the Account Icon, located at your top-right corner.
- Scroll down to bottom and click Edit Appearance.
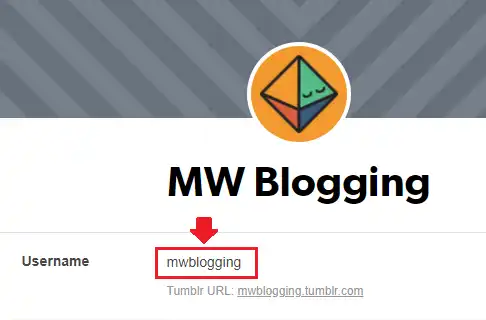
- You can get your username from the Username section.
03. How To Setup Post+ Feature In Tumblr
In this section you will learn how to setup (1) Personal and deposit details (2) Subscription Price (3) Post+ Profile.
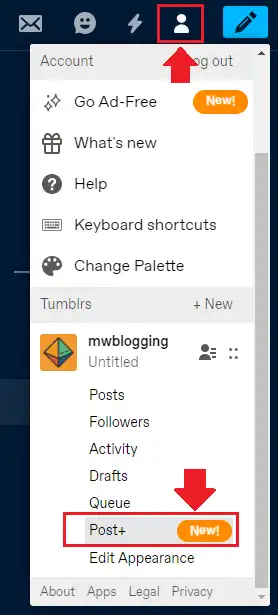
- Click the Account Icon located at your top-right corner.
- Scroll down and click Post+.
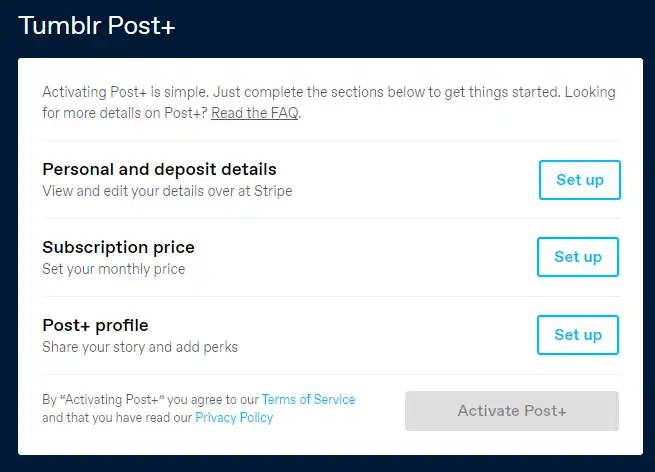
- Click Setup Post+ to begin the process.

Now you have to complete these three sections one-by-one. We will go from top to bottom.
- Click Set up button of Personal and deposit details.
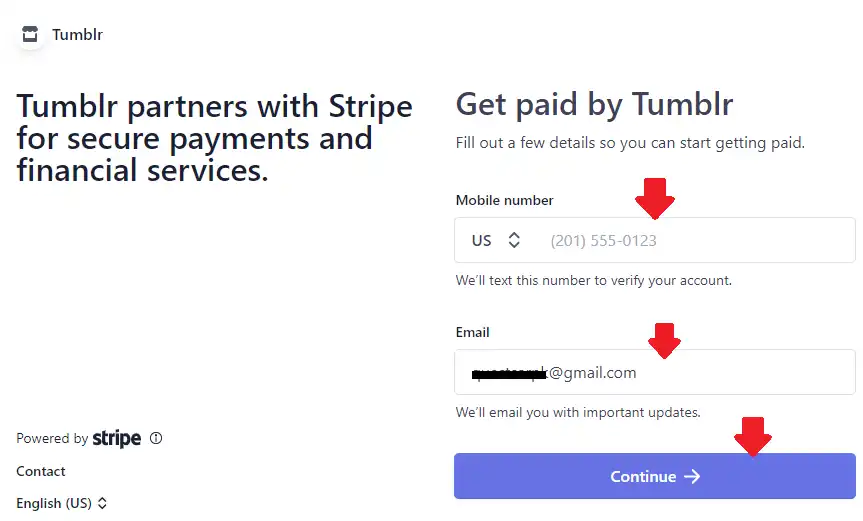
- It will redirect you to Stripe configuration page where you have to fill the required information, as shown in the next sub-section. Stripe is a payment method through which you will receive your Post+ earnings.
01. Personal and deposit details
In this section you will configure Stripe to receive your Post+ revenue.
- Enter your Mobile number.
- Enter your Email.
- Click Continue.
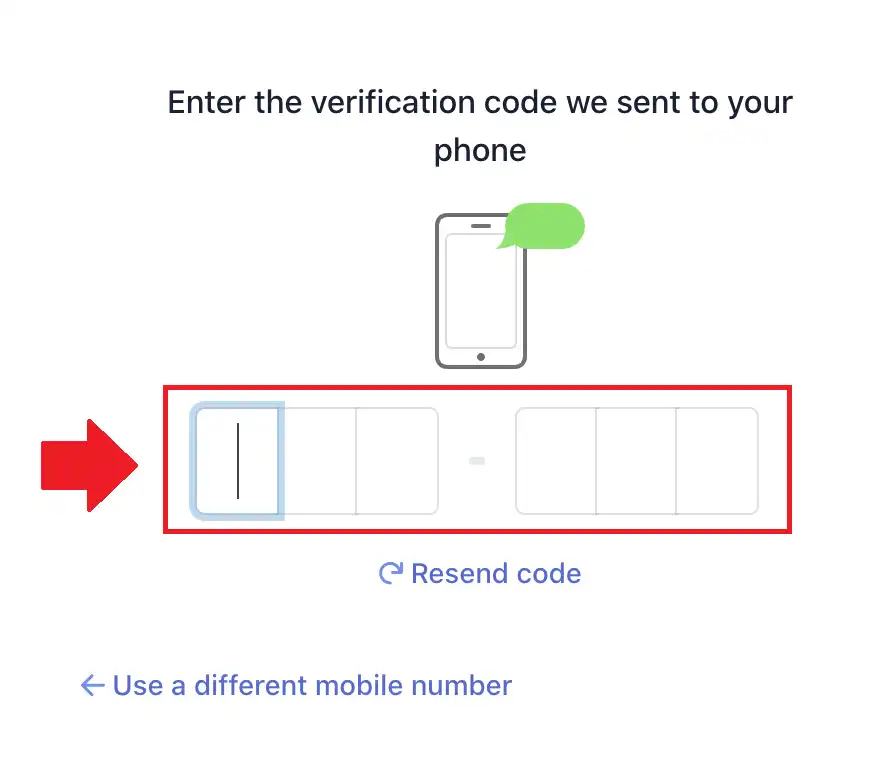
- Enter the verification code that Stripe will send to your mobile phone.
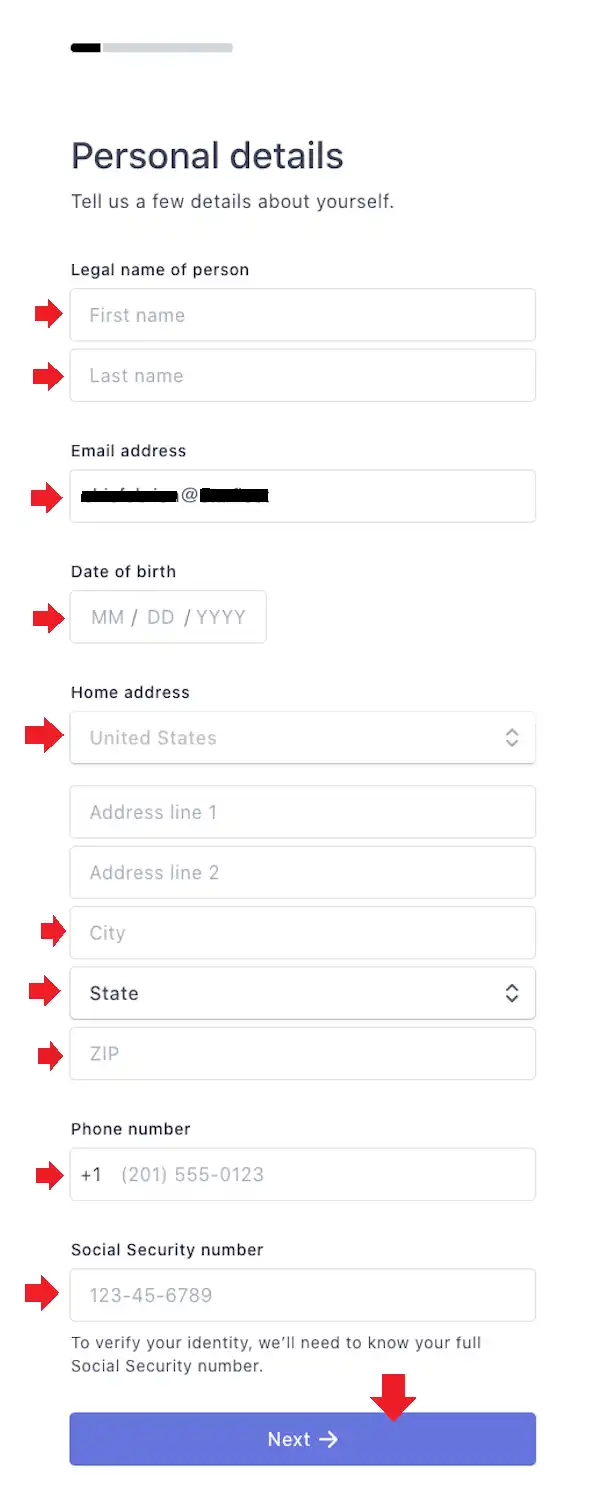
Provide your Personal details.
- In First & Last name provide your legal name mentioned in your birth certificate or government identity card.
- Email Address will be the same as given above.
- Enter your Date of birth mentioned in your legal documents like birth certificate, government identity card, etc.
- Enter your complete residential address in Home address like Country, Street, Sector, House No, City, State/Province, ZIP code of city.
- Enter your Phone number.
- Enter your Social Security Number. It is a unique identity number provided by Government that identifies you as a citizen of a country. In UK it is called NIN (National Insurance Number).
- Click the Next.
Provide Business details.
- Choose your Industry which is most relevant to your blog or content.
- In Business website provide your Tumblr creator-profile URL. Normally it is auto-filled with your Tumblr creator-profile URL. If it is not auto-filled then follow the below guidelines.
URL Format: “https://tumblr.com/creator/your_tumblr_username”. Replace “your_tumblr_username” with your Tumblr username. In our case it would be “https://tumblr.com/creator/mwblogging”.
In the Section 1 above, we have already guided on how to get your Tumblr username.
- Click the Next.

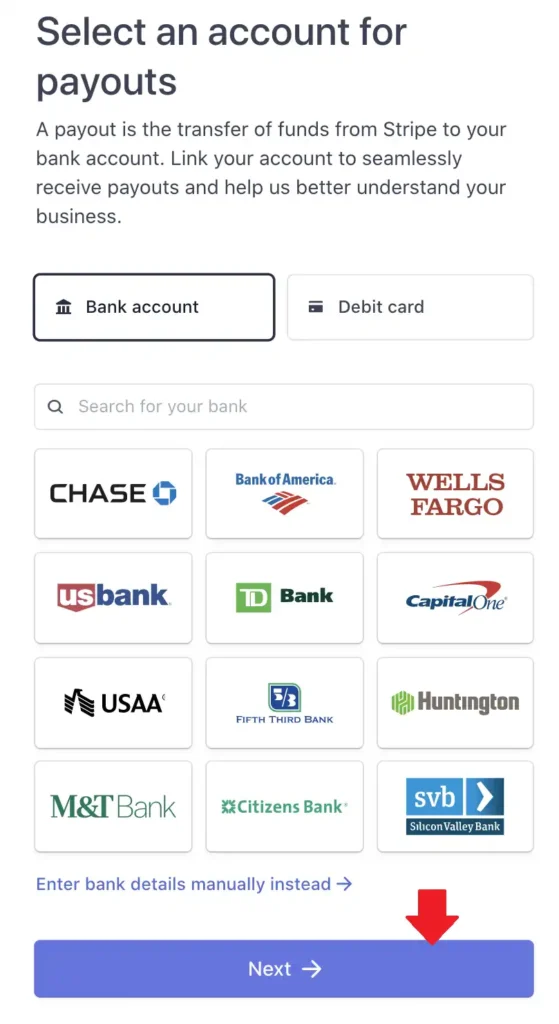
Select An Account for Payouts
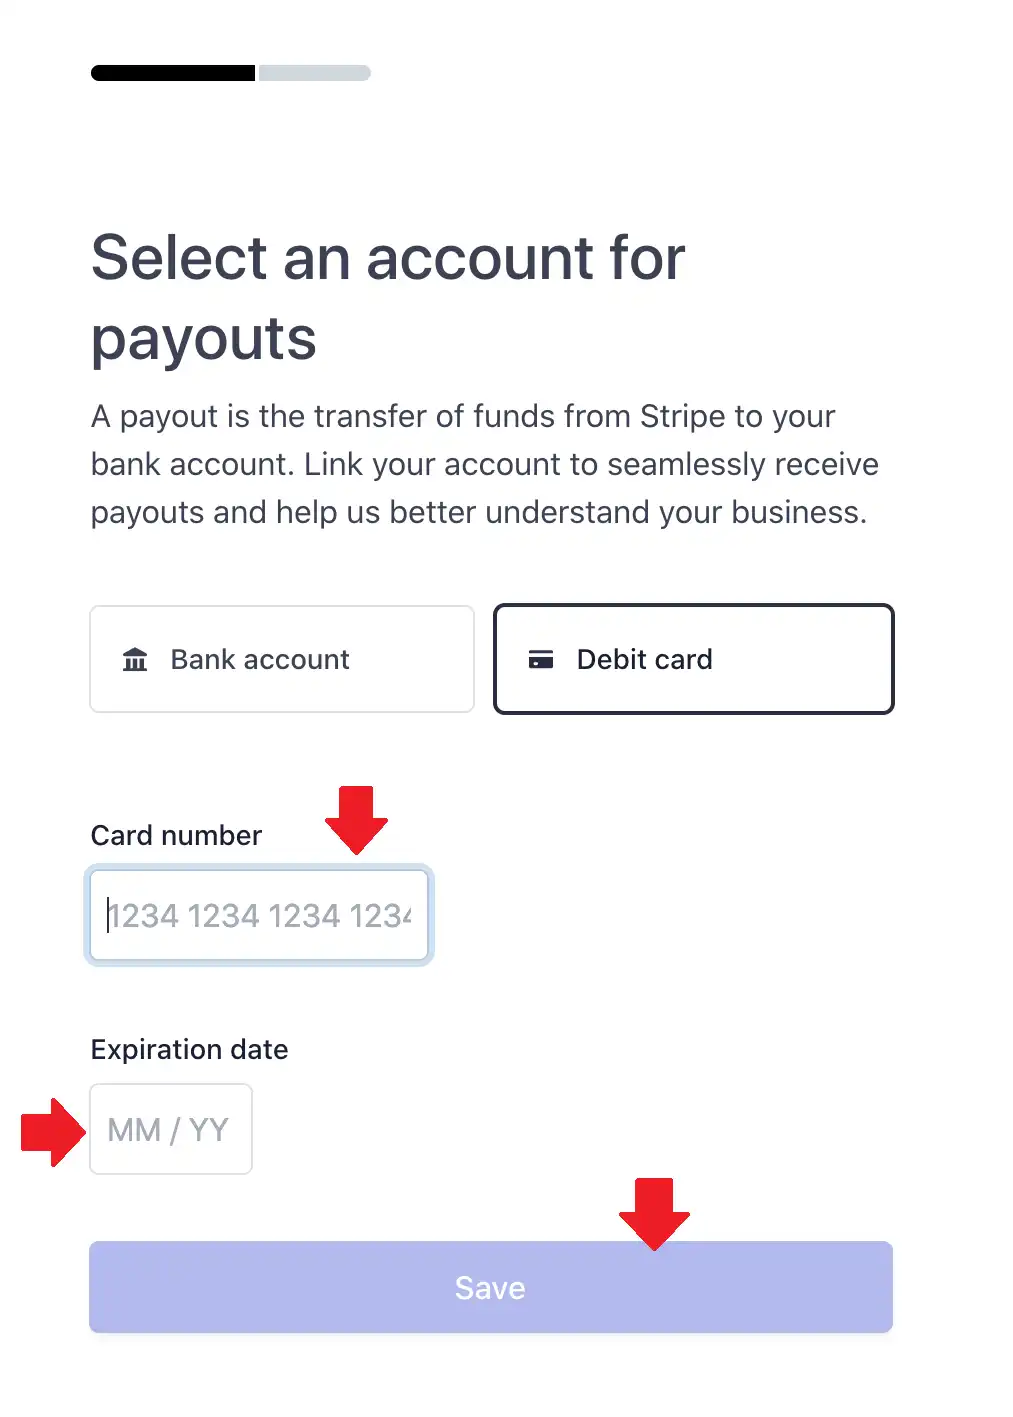
- You have two options here. You can link Stripe directly to your Bank Account or you can link your Stripe to Debit Card. If you choose Debit then follow the next step.
- If you choose Bank Account then search for your bank or click the link “Enter your bank details manually instead”. Provide the required information related to your bank account.
- Click the Next button.
- If you choose Debit then enter your Card Number and its Expiration Date.
- Click the Save.
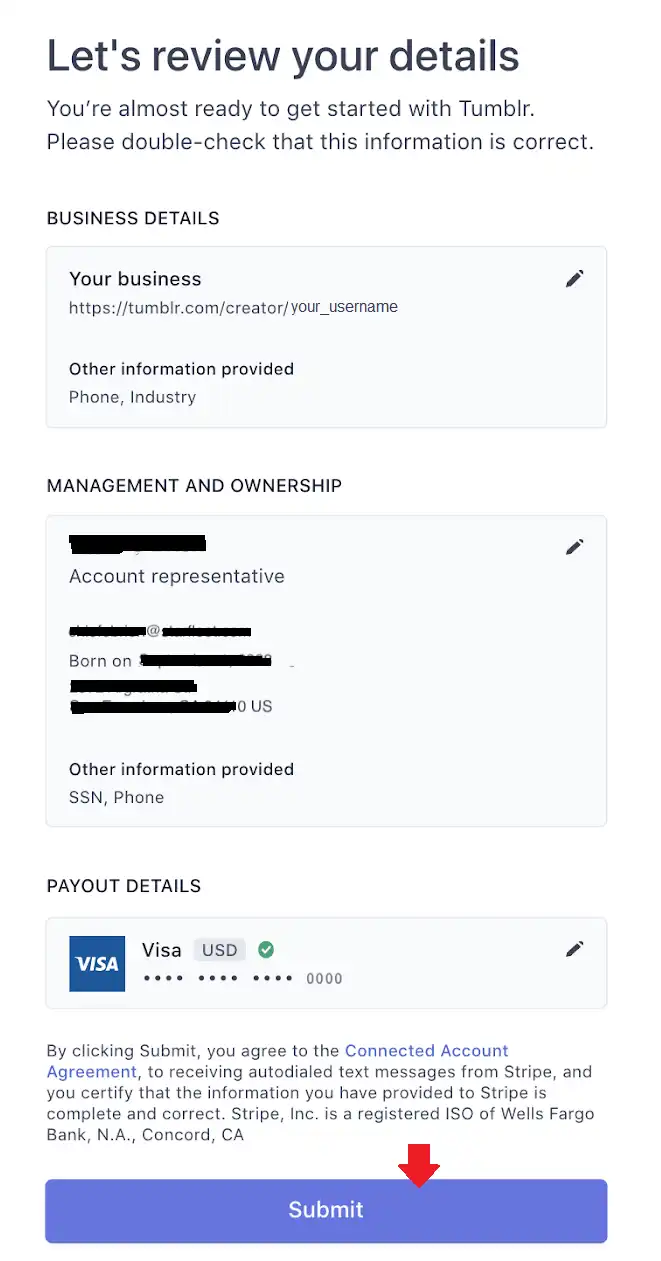
- Review your details and click Submit.
- You will be redirected back to the Post+ Settings Page. Click the Set Up button of Subscription Price there and follow the next section below.
02. Subscription Price
The Subscription price is for your supporters that they will pay to get access to your Post+ content.
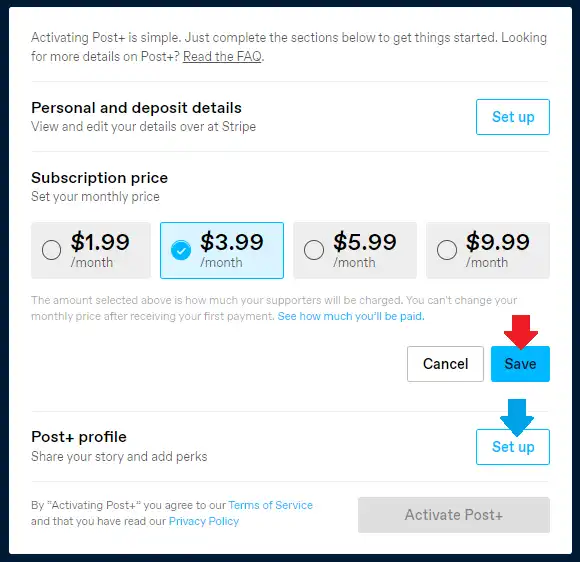
- You can choose from 4 pricing plans i.e. $1.99/month, $3.99/month, $5.99/month, and $9.99/month.
- You can’t change your monthly price once you receive your first payment from a supporter.
- Click the Save.
- Once you’re done with Subscription price click Set up button of Post+ profile.
03. Post+ Profile
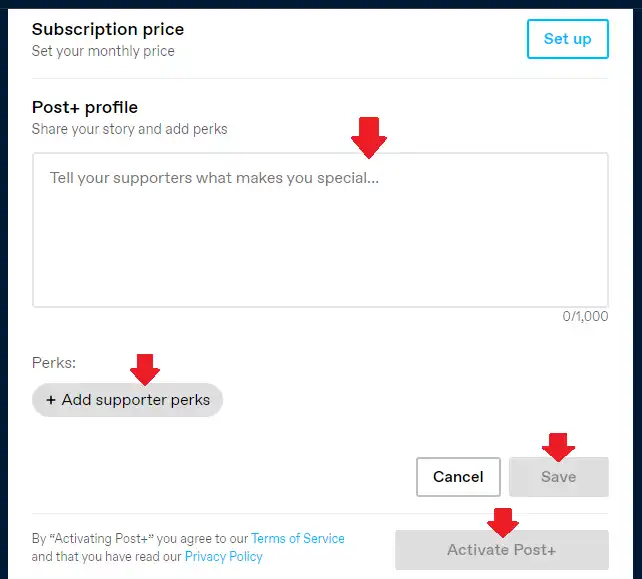
- Enter a solid description about you and your Post+ content so that people can subscribe you. It is up to you that what do you write here.
- You can also add 5 Perks in your profile that supporters can expect from you when they pay your subscription.
- Click the Save.
- Lastly click the Activate Post+ to finish the set up process.
04. How To Create Post+ Content In Tumblr
We have created a separate tutorial that guides you step-by-step on how to create/publish Post+ Content in Tumblr:
05. How To Become a Post+ Supporter In Tumblr
We have created a separate tutorial that guides you step-by-step on how you can become Post+ supporter of a Tumblr creator.
So it was all about setting up Post+ feature in Tumblr. Hope our guide would have helped you. If you like this post then don’t forget to share with other people. Share your feedback in the comments section below.
Also Read


Leave a Reply