Do you want to start a blog and make a passive income online? You’re in the right place. In this article, I will guide you step-by-step on how to start a WordPress blog and make it a full-time business.
Blog is a platform where you write content (posts/articles) of your interest, knowledge, experiences, ideas and more.
Blogging is a great way to connect with people and get your ideas out there. It is one of the best means to make money online from home. When you do blogging professionally you actually make money!
Genuine reasons to start a blog:
- To share your thoughts, ideas, experiences, and stories with the world.
- To get rid of 8 to 5 job and live a boss free life – financial freedom.
- To earn a passive income. Passive income is a money that you earn despite not working on daily basis or in other words an income which requires very little effort to maintain.
- To work from anywhere without any location, time or travel restriction.
- To build your personal brand and share your expertise with the world.
- To build a community around your interest and get feedback on your writing, ideas, skills, or expertise.
- To establish yourself as an expert in your field.
WordPress is the most popular content management system, a robust free-tool to create and manage websites and blogs. According to an estimate 38% to 40% websites on the internet are powered by WordPress.
To launch a professional WordPress blog you need three things (1) Domain (2) Web Hosting (3) Blog Theme.
This article explains each and everything so thoroughly that a person having zero knowledge about blogging & WordPress can create and start his own blog.
Following topics will be covered in this post:
- Choose A Blogging Niche
- Choose A Blogging Platform – Why WordPress?
- What Is Domain & Web Hosting
- How To Buy Domain & Web Hosting
- How To Install WordPress
- How To Create Your First Blog Post
- How To Write An Ideal Blog Post
- How to Setup a Free Newsletter
- How To Grow Blog Traffic
- How To Make Money From Blog / Blog Monetization
- How Long It Takes To Get Traffic & Earn An Income – Timeline
01. Choose A Blogging Niche
Niche is the main topic of your blog around which you will be writing content or in other words it is the area of interest where you are good at writing.
Technology, finance, travel, lifestyle, food, fashion, blogging, photography, marketing, animals, sports, online earning etc, are some of the popular macro-niches. You can find hundreds of thousands of sub-niches within them.
Choosing a right niche is very critical for the success of your blogging journey. So take your time and determine a niche before you create your blog.
I have created a very special post that guides you on picking a profitable niche for blogging with the help of Keyword Research Tool that covers following topics:
- Importance of Niche
- Macro-Niche vs Niche
- How to Identify a Profitable Niche
- How a Keyword Research Tool Helps to Pick a Profitable Niche
Read: How to Pick a Profitable Niche for Blogging
02. Choose A Blogging Platform
A blogging platform is a content publishing service where you can create your blog or website. There are many blogging platforms such as Blogger, Weebly, Wix, etc, but the most popular blogging platform is WordPress.
According to an estimate 38% to 40% websites/blogs on the internet are powered by WordPress. From this percentage you can get an idea how popular is WordPress.
There are three main reasons why WordPress is so popular:
- It is feature-rich, user-friendly, and advanced.
- There are thousands of themes and plugins for any type of website i.e personal, eCommerce, News & Magazine, blog, portfolio, etc.
- WordPress is free and open source means you can customize anything in WordPress like code, functions, themes & plugins, according to your requirements.
After WordPress, Blogger is the most popular blogging platform. All its blogs are hosted by Google & accessed by subdomain “.blogspot.com” like “www.example.blogspot.com”.
There has always been a debate between WordPress and Blogger like which one is better for blogging. I have created a separate article where I have thoroughly compared both blogging platforms.
03. What Is Domain & Web Hosting
Domain is simply the address of your website that you type in URL bar to access your website. It locates your website on internet, like “www.meersworld.net” is a domain.
How to Choose a Domain?
Choosing a right domain name is very important for your blog. Often people get confused when it comes to choosing a domain name. So for your help, here are some recommendations on how to choose a right domain name:
- It should be easy to pronounce and remember.
- It should be easy to type and shouldn’t be too long.
- It should be brandable.
- Choose the popular domain extensions like “.com”, “.net”, “.org”.
- Avoid hyphens and numbers.
- Consider using a keyword that reflects your website.
- If you want to create a personal blog you can use your own name as well.
What is Web Hosting?
Web hosting is a space or location where you upload/install the content and files of your website/blog. Once you upload/install your website on web hosting it becomes live and people can access via the domain of your website.
In the section “How To Install WordPress” I have shown how WordPress is installed in your web hosting (server).
04. How To Buy Domain & Web Hosting
You must have a clear idea about domain and web hosting, now follow these steps to buy domain and web hosting.
Here I am guiding you on how to buy domain and web hosting from Namecheap, an ICANN accredited registrar, offering services since 2000. It is one of the most secure, advanced, high-performance, and affordable web-hosting provider in the world, managing 13 million+ domains worldwide.
- Go to official website of Namecheap.
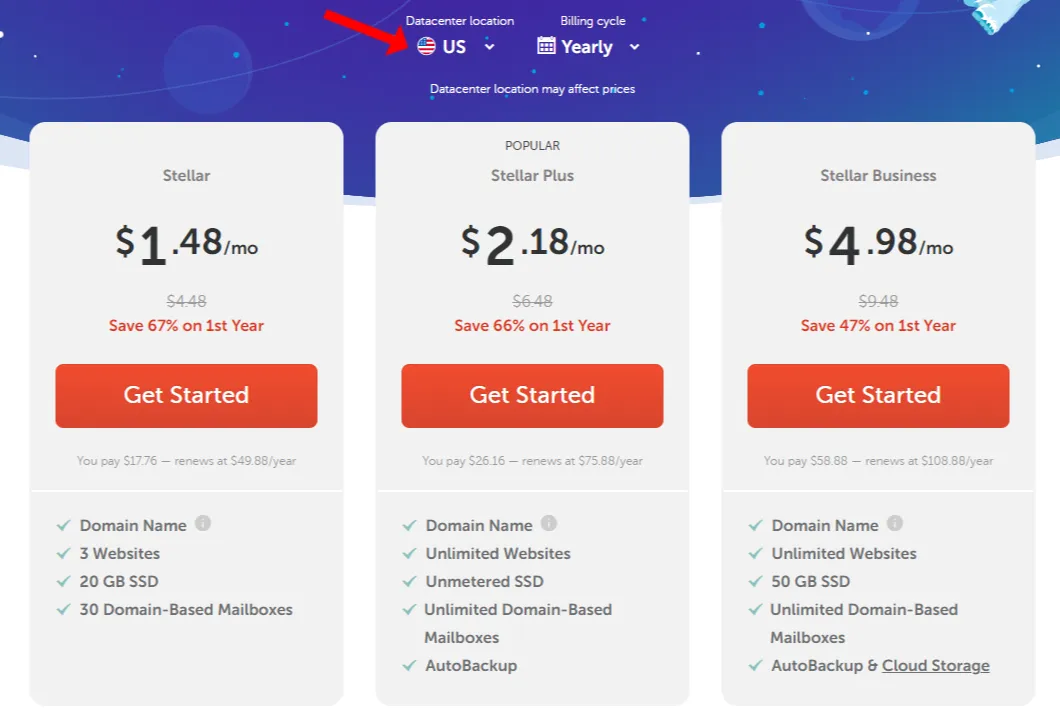
- Choose Datacenter location & Billing cycle (Yearly is recommended). A Datacenter is a location where your web host’s servers are physically located. There are 3 Datacenter locations: US, UK, and EU. The datacenter’s location can affect website speed and latency (delay before a transfer of data begins), so its location should be closer to your audience as possible.
- Choose your desired shared hosting plan by clicking the “Get Started” button. Stellar Plus is the most popular plan.
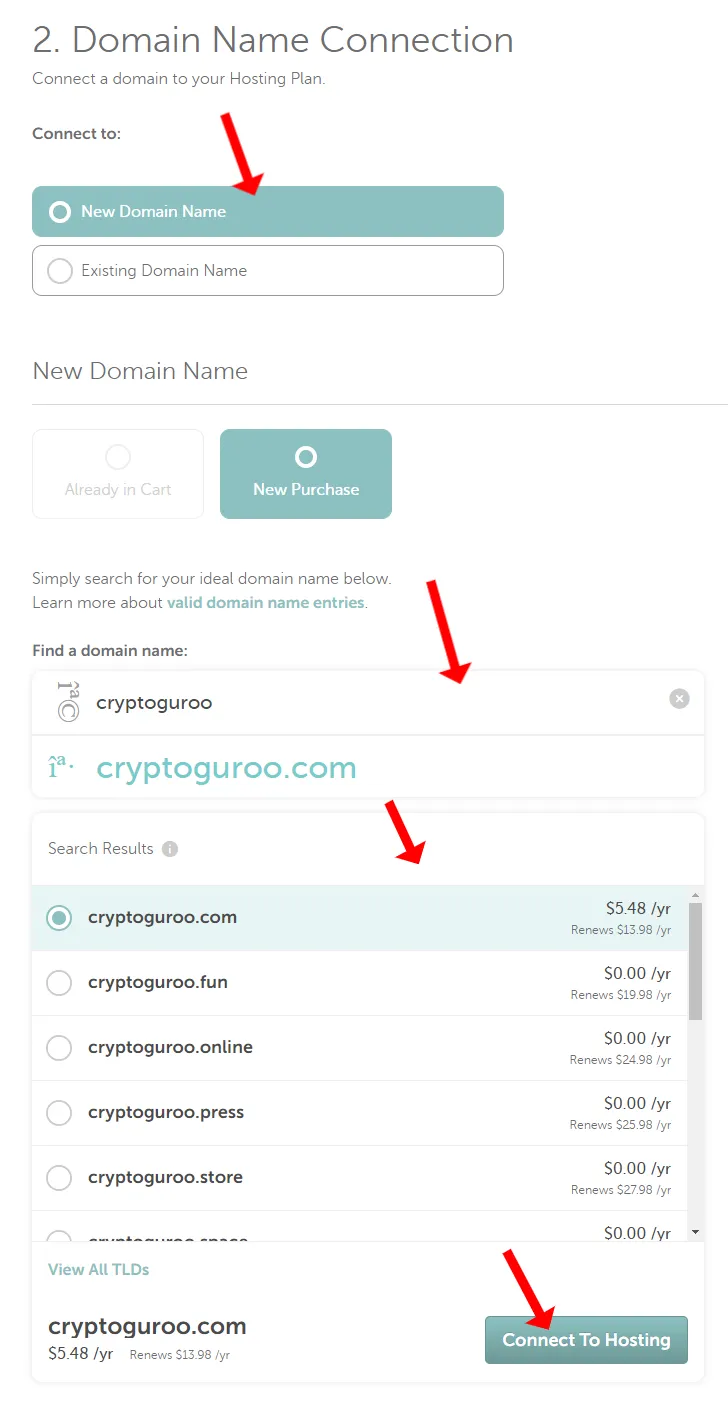
- Select New Domain Name.
- Enter the name of your desired domain in Find a domain name textbox. Here I have entered “cryptoguroo”. It is showing domain name with different extensions (“.com”, “.net”, “.online”, “.site”, “.store”, etc) and corresponding price. Every extension owns a different price, some extension worth less whereas some extensions worth high.
- If your desired domain is already taken by someone else it will suggest you relevant domains with different extensions.
- Once you’re done, click Connect to Hosting.
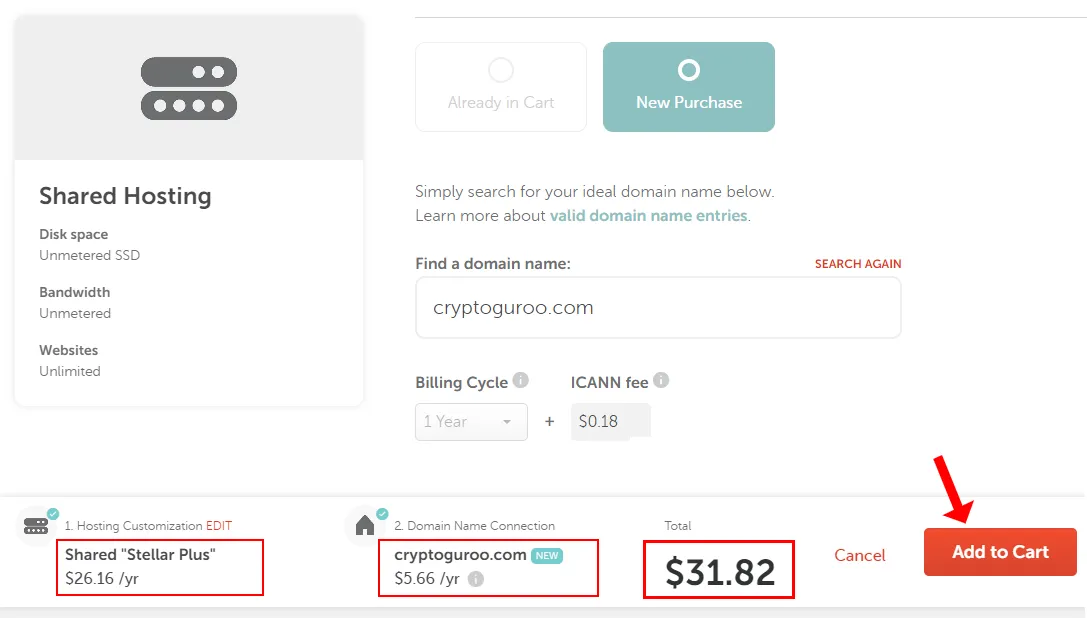
- Here you can see the cost of your domain and shared hosting plan.
- Click Add to Cart button.
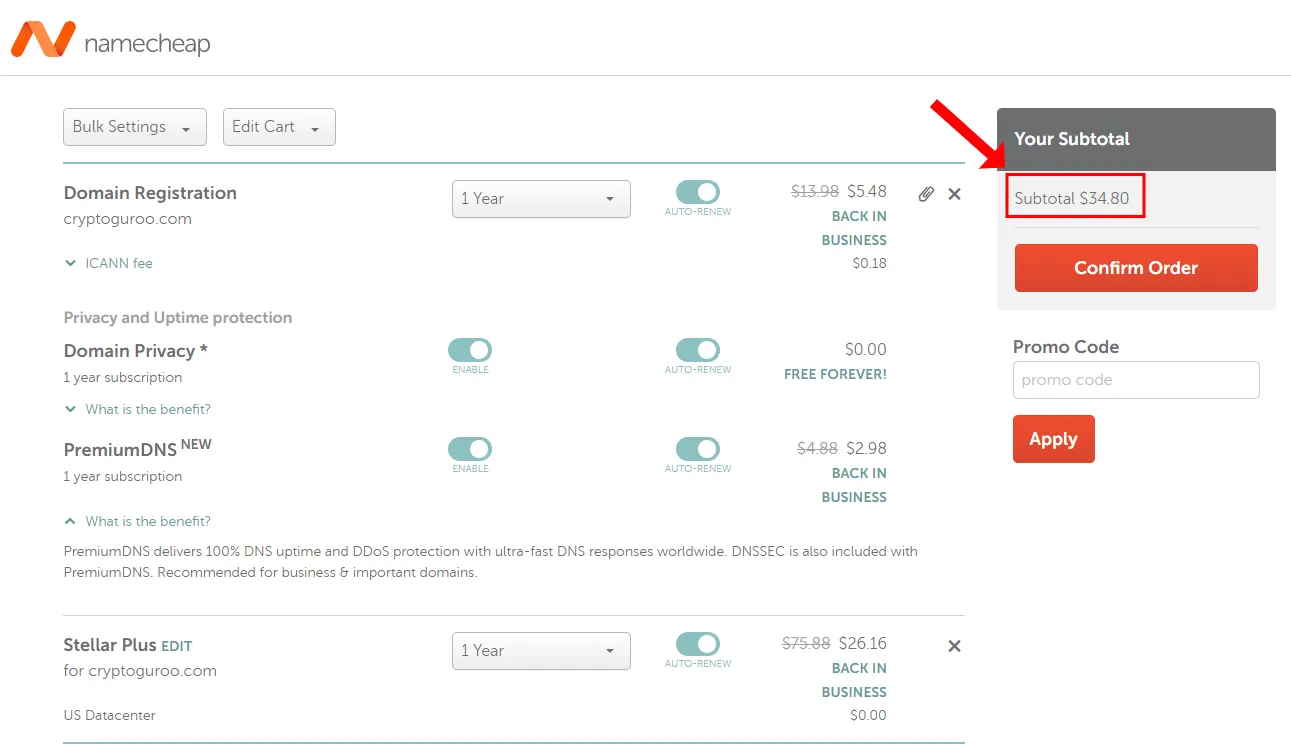
- In Domain Registration enable AUTO-RENEW.
- Enable Domain Privacy* and also enable AUTO-RENEW. Namecheap offers Domain Privacy free for lifetime. The Domain Privacy protects your information such as Phone Number, Email ID, Address, etc, from unauthorized people in the WHOIS records.
- If you wish enable PremiumDNS. It is an advanced feature that delivers 100% DNS uptime and DDoS protection with ultra-fast DNS responses worldwide.
- Find the latest Namecheap Promo Codes and Deals. After adding the Promo Code click the Apply.
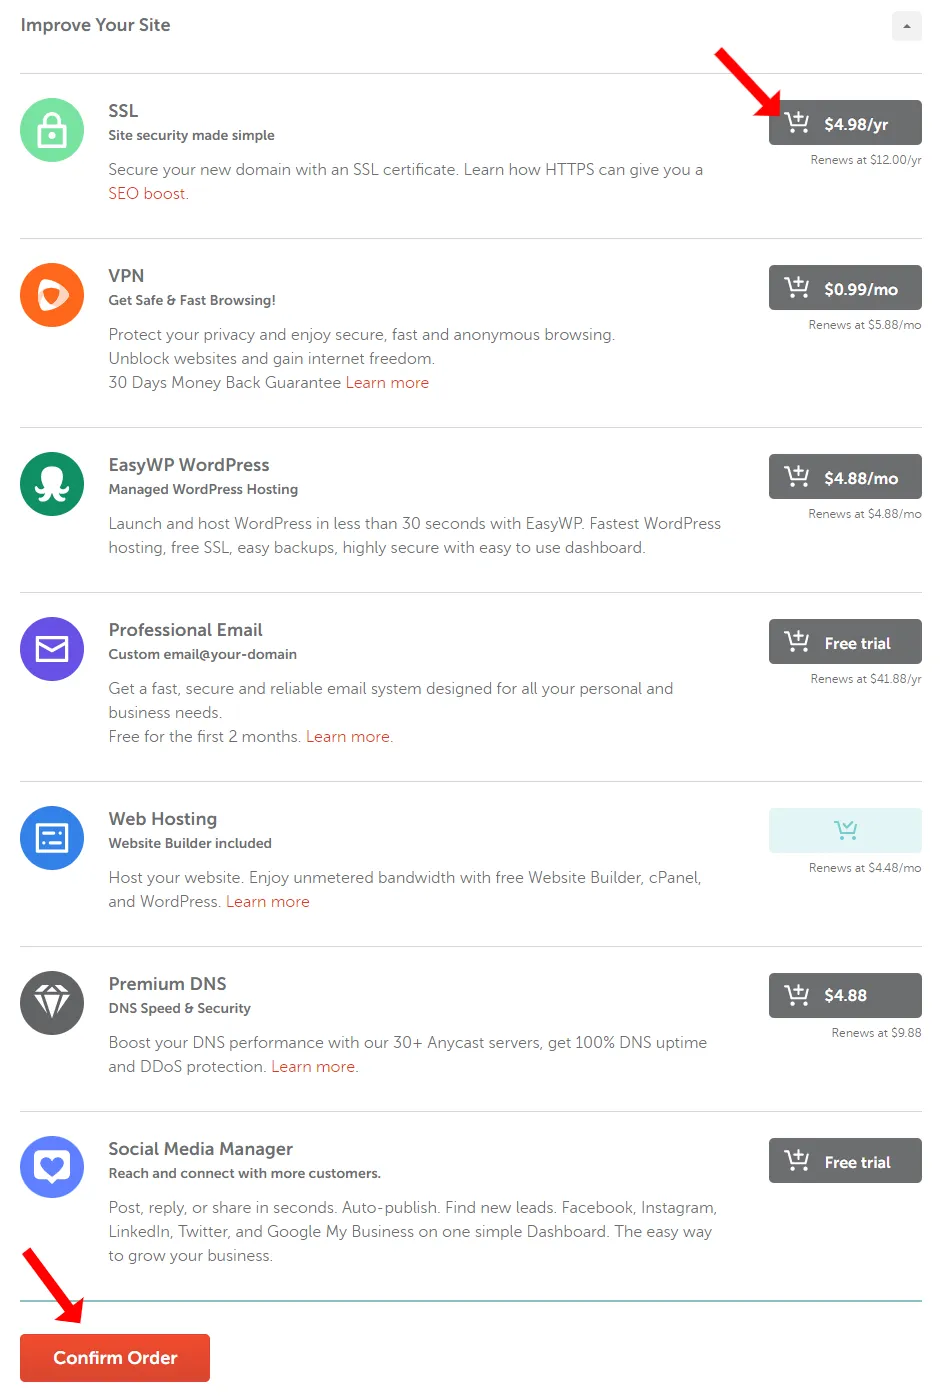
Scroll-down to add SSL add-on to your domain, which is mandatory for any website, as shown in the next step.
- Click on the SSL Cart button to add the SSL certificate to your domain. SSL stands for Secure Socket Layer. It keeps internet connection secure and prevents your sensitive informations such as credit card details, passwords, etc, from hackers and spammers when they are transferred over the network. Once SSL is active, you can see “s” at the end of “http” like “https://www.example.com”.
- Click the Confirm Order at bottom.
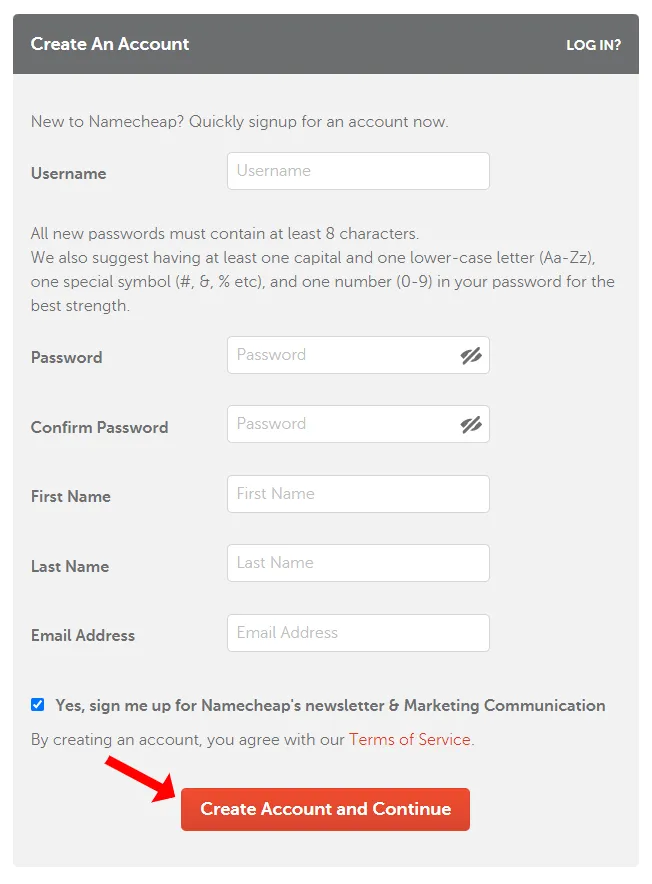
- Now create a Namecheap account to complete the process. It requires Username, Password, First Name, Last Name, and Email Address.
- Once you fill the information click Create Account and Continue.
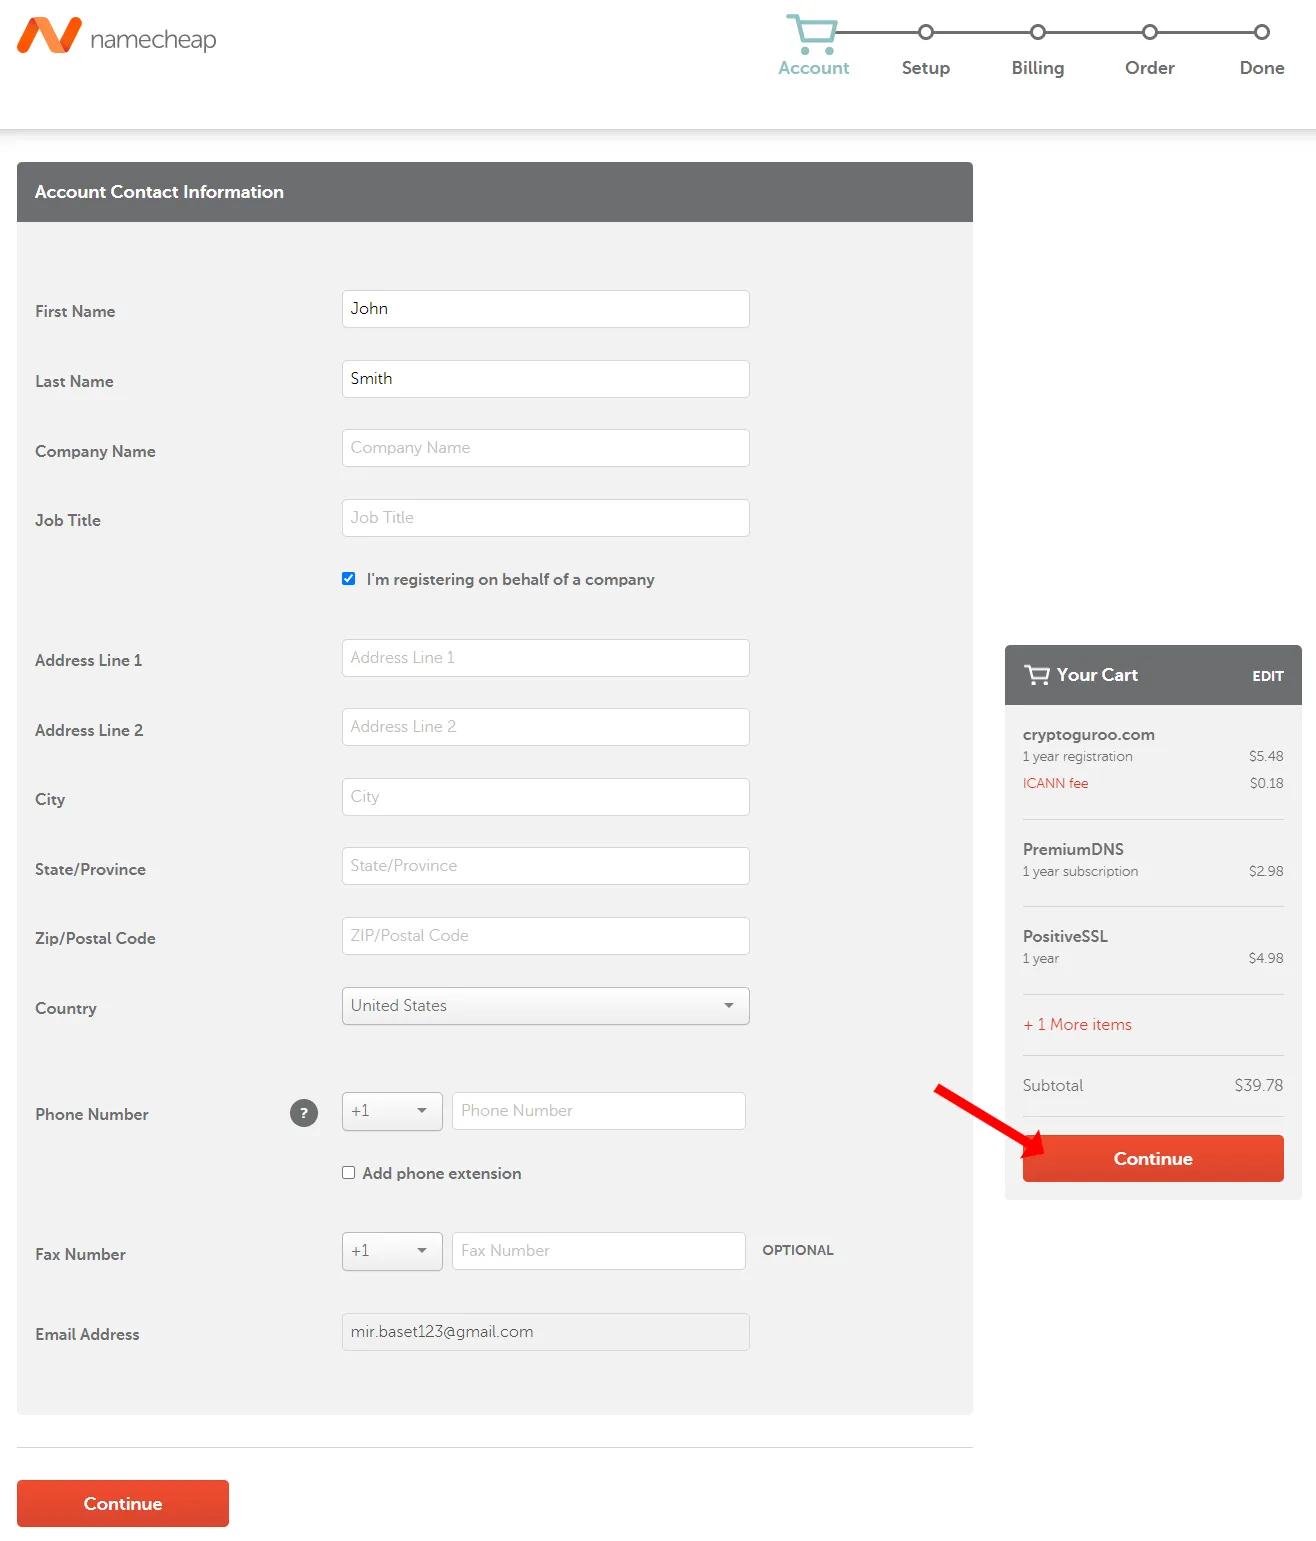
- Fill the Account Contact Information. Please provide the original information.
- After filling the form click the Continue button.
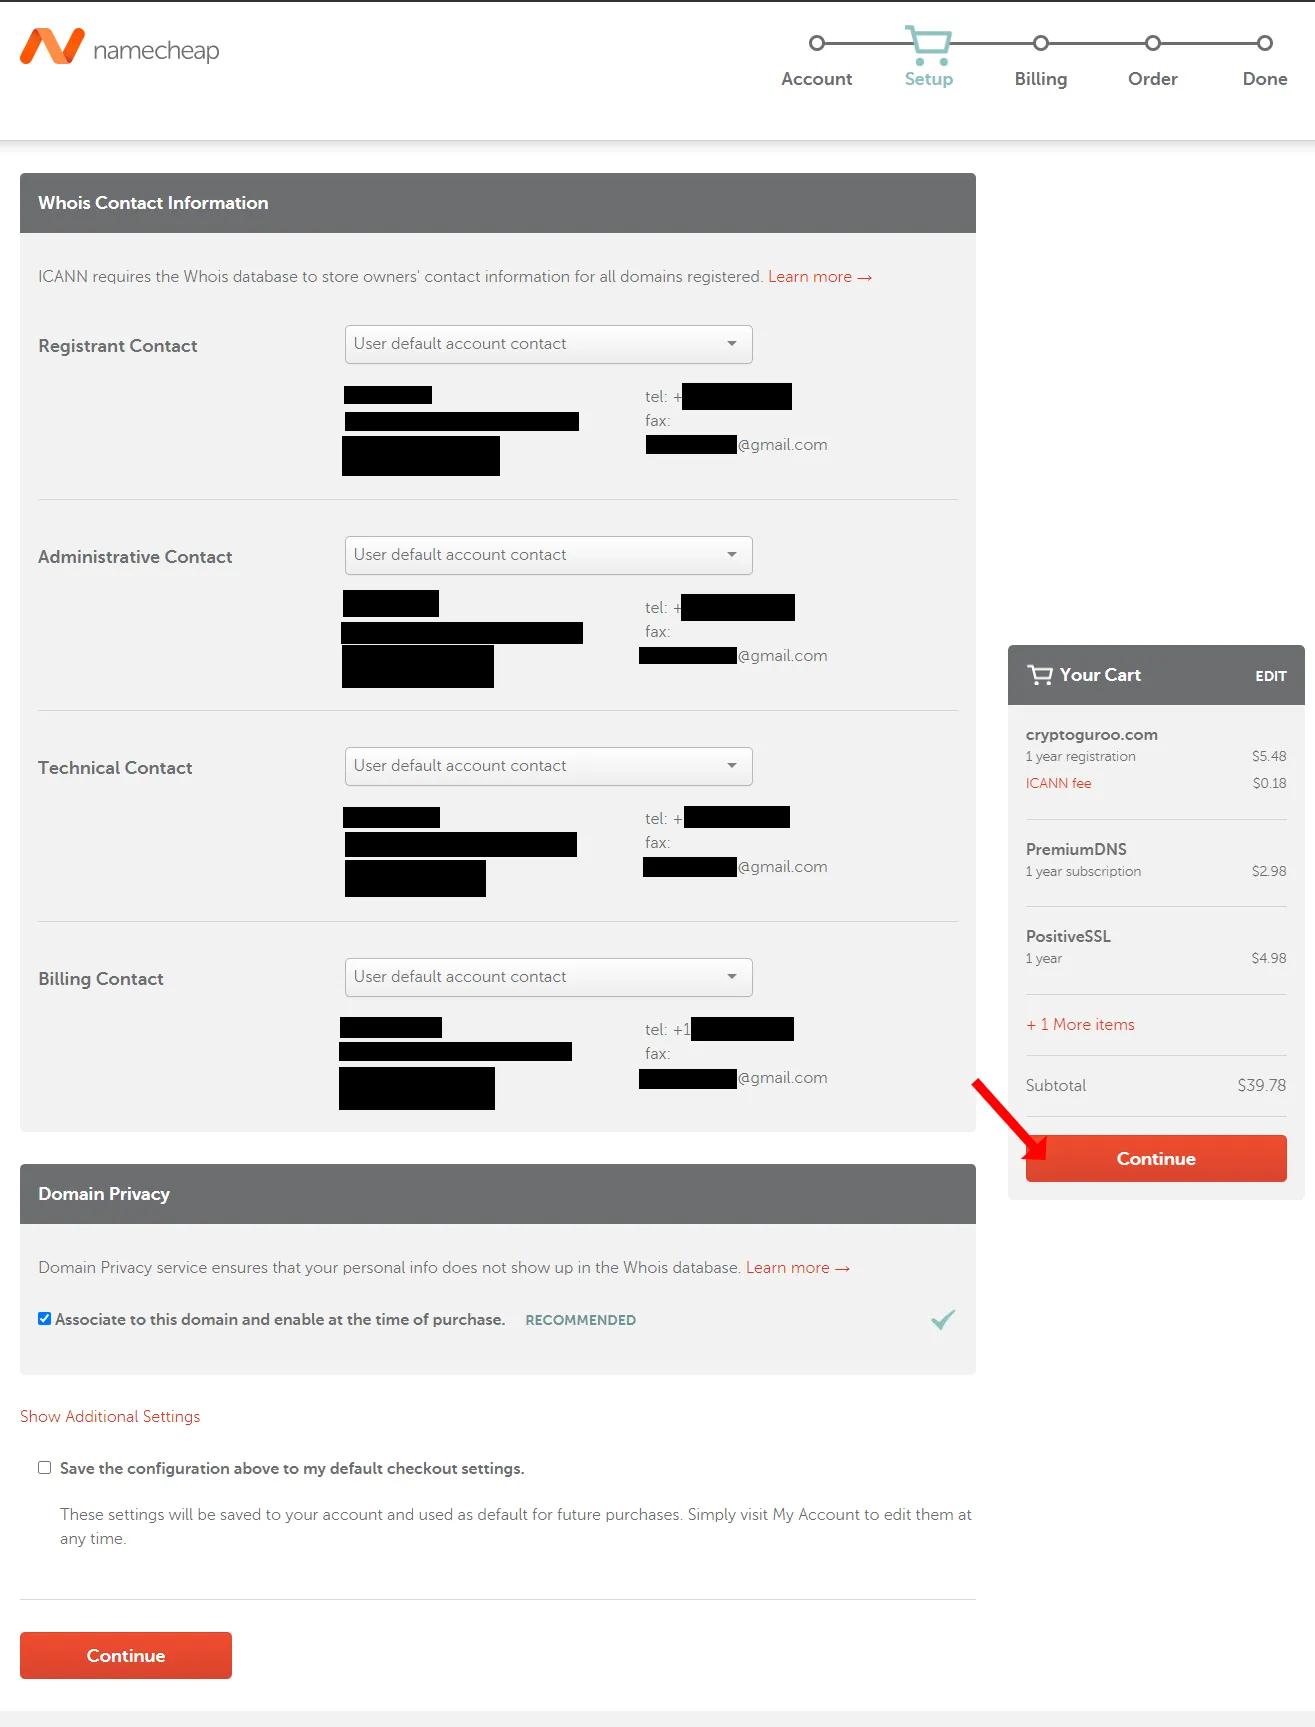
- It will show you the preview of your Account Contact Information.
- Click the Continue button.
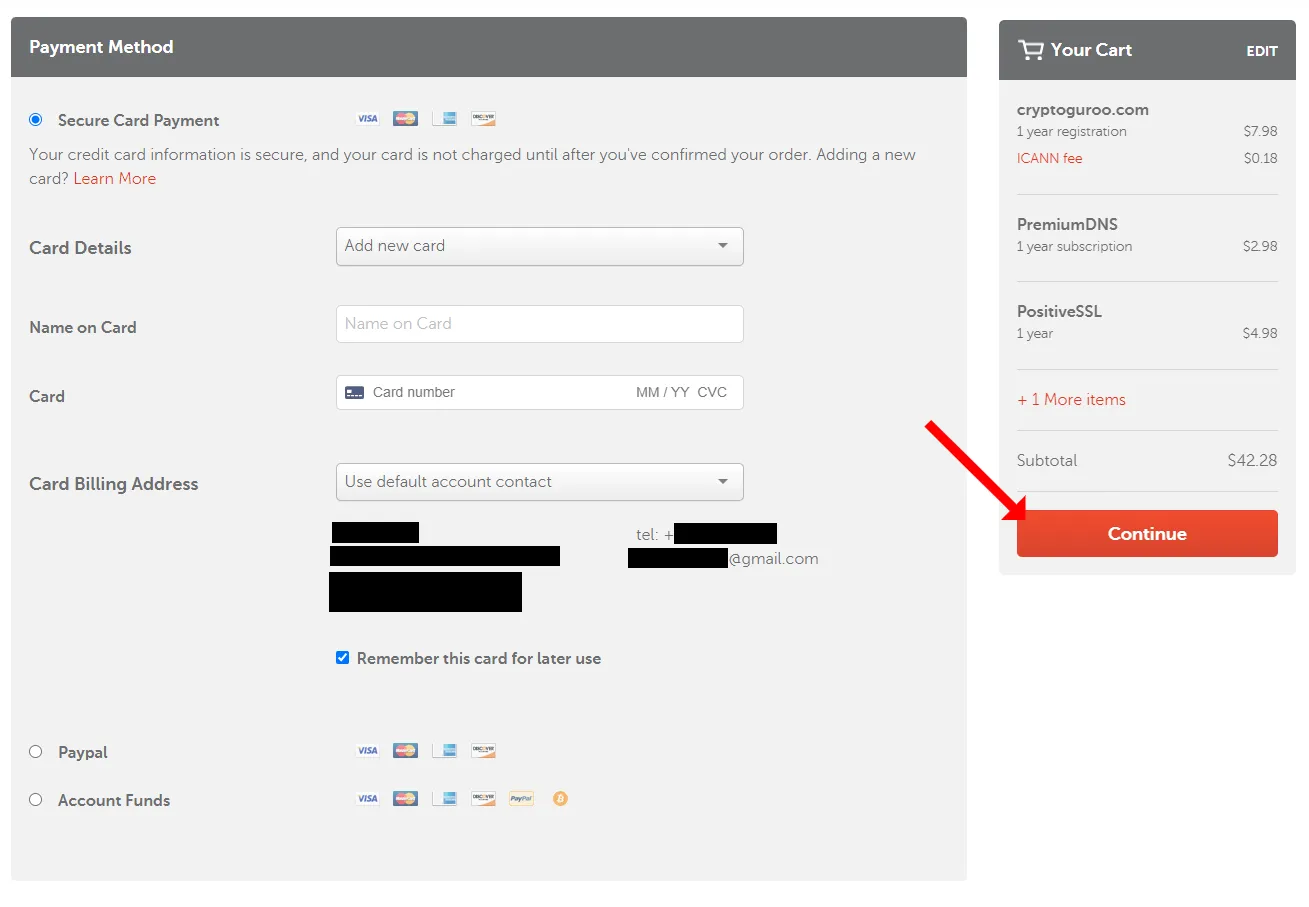
- Choose a Payment Method. Namecheap provides you three options (1) Secure Card Payment (2) PayPal (3) Account Funds.
- Once fill the payment details click the Continue button.
- Tick “I have read and agreed to all Namecheap’s Terms of Service and agreements”.
- Click Pay Now button.

- Congratulations!!! You have successfully purchased your domain and hosting from Namecheap. Normally within an hour a new domain and hosting are activated.
- You will receive an email where you will have complete Hosting Package Details which also includes cPanel details, as shown in the next step.
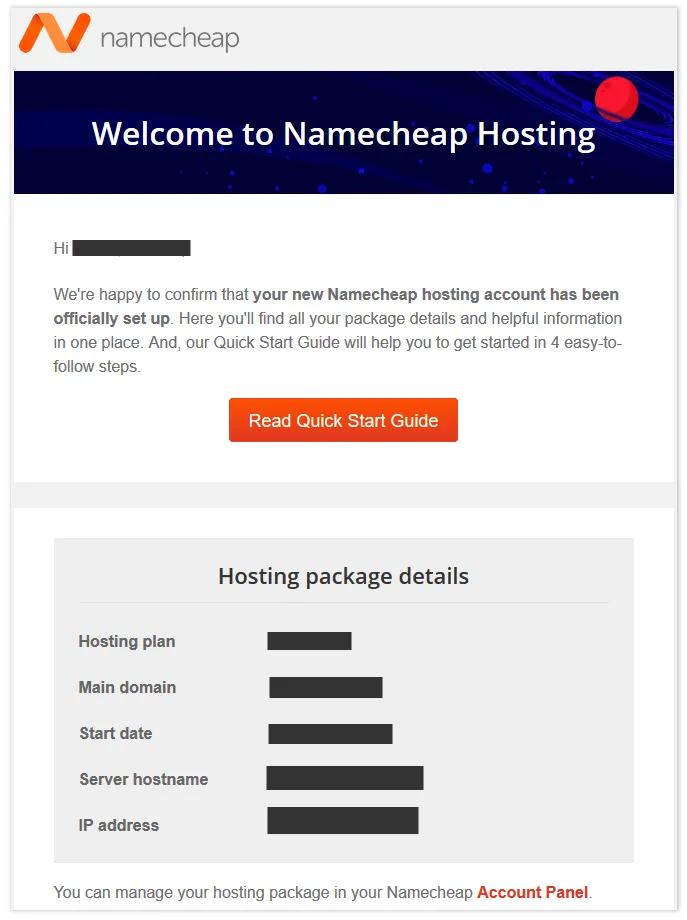
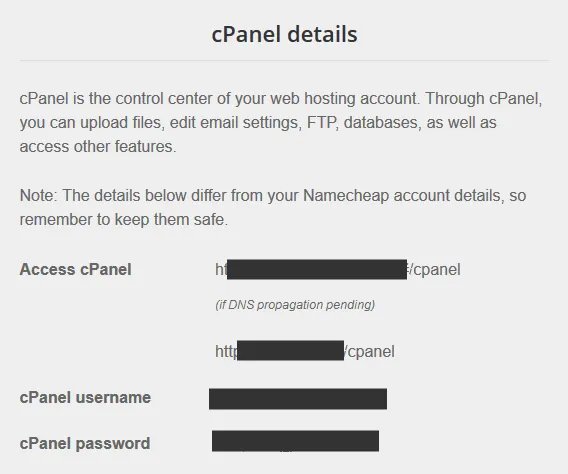
- CPanel is the control center of your web hosting account where you can upload/edit/delete files, add email accounts, edit settings, manage database, take backups, and much more.
- The cPanel details include: cPanel URL, Username, and Password.
You’re done with buying domain and hosting. Now it is time to install WordPress, follow the next section.
05. How To Install WordPress
In this section, I will guide you step-by-step on installing WordPress via your Namecheap cPanel account.
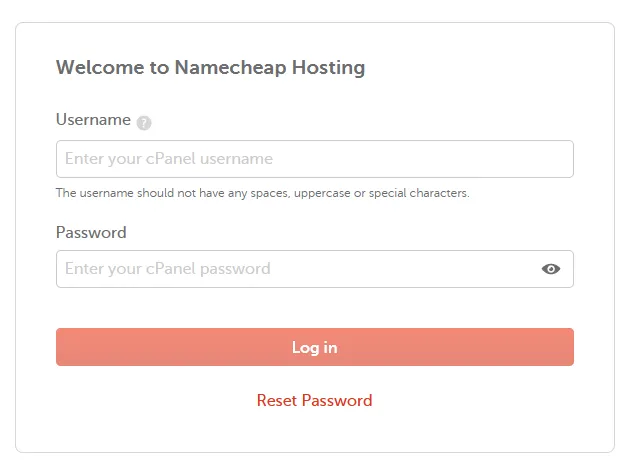
- Open your cPanel using the cPanel URL as provided to you by Namecheap through email. It will be something like, “https://server190.web-hosting.com/cpanel“, “https://premium202.web-hosting.com:2083/“, etc, depending on your hosting plan.
- Enter your cPanel Username.
- Enter your cPanel Password.
- Click the Log in button.
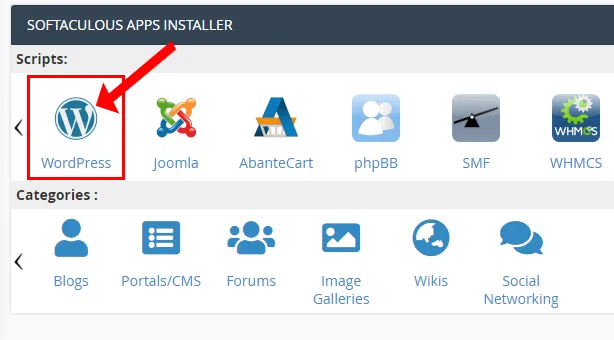
- Scroll-down to SOFTACULOUS APPS INSTALLER section. Softaculous is an auto installer that helps to install commercial and open source web applications like WordPress, Joomla, AbanteCart, SMF, Magento etc, on your web hosting account.
- In the sub-section Scripts: click the WordPress.
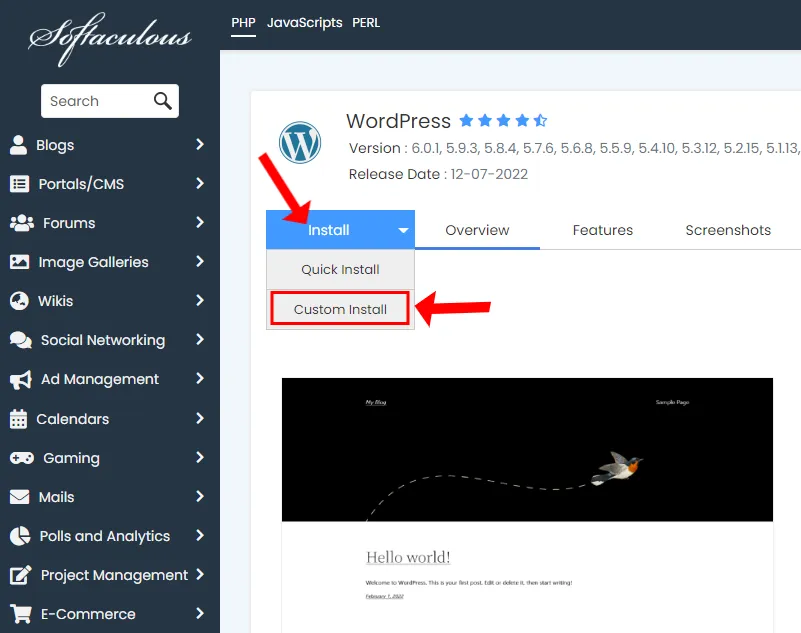
- You will be redirected to Softaculous page. Click the Install tab and select Custom Install option.
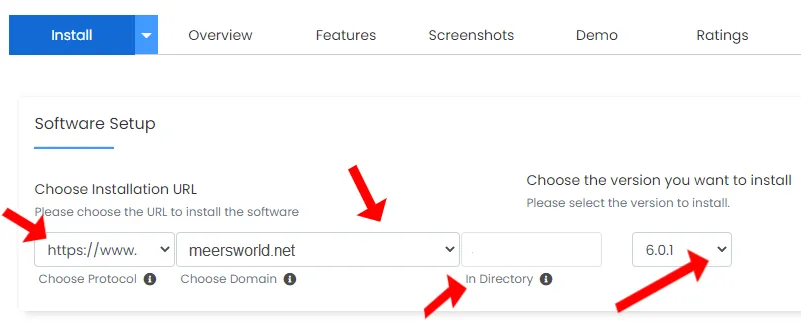
Choose Installation URL settings:
- In Choose Protocol select “https://www.”.
- In Choose Domain select your domain.
- Make In Directory textbox empty by removing “wp“.
In “Choose the version you want to install” select the latest WordPress version. By default the latest version of WordPress is selected.
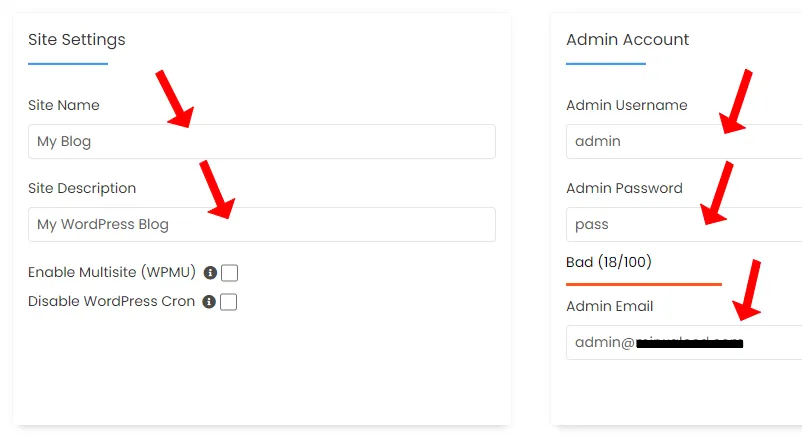
Fill the Site Settings:
- Enter your blog name in Site Name.
- In the Site Description enter a short description that describes your blog niche.
Fill the Admin Account Settings:
- In the Admin Username enter a username. Don’t use “admin”, instead use something that others won’t be able to judge because you will be using this username to login to your WordPress admin section.
- In the Admin Password enter a secure password.
- In the Admin Email enter your admin email that will be associated with the Username. By default WordPress uses “admin@yourdomain” email that can be changed later from Users section.
- Choose a Language for your blog.
- Leave the sections Select Plugin(s), and Advanced Options as it is.
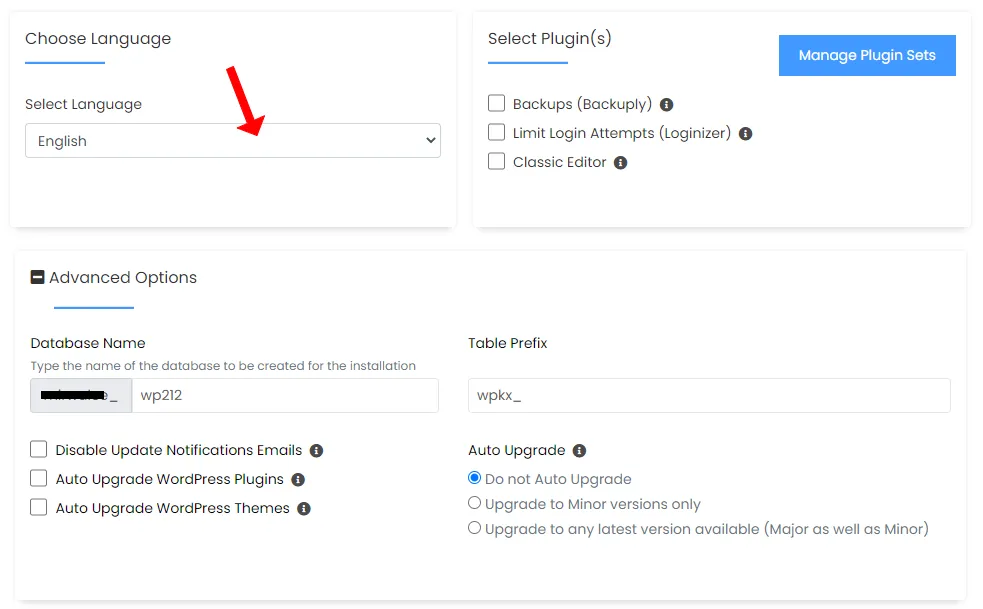
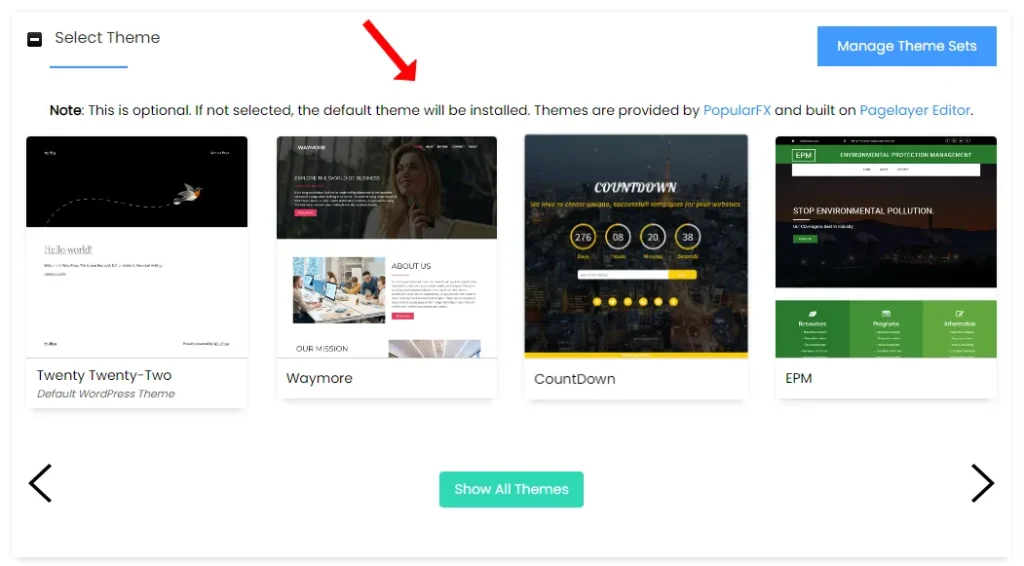
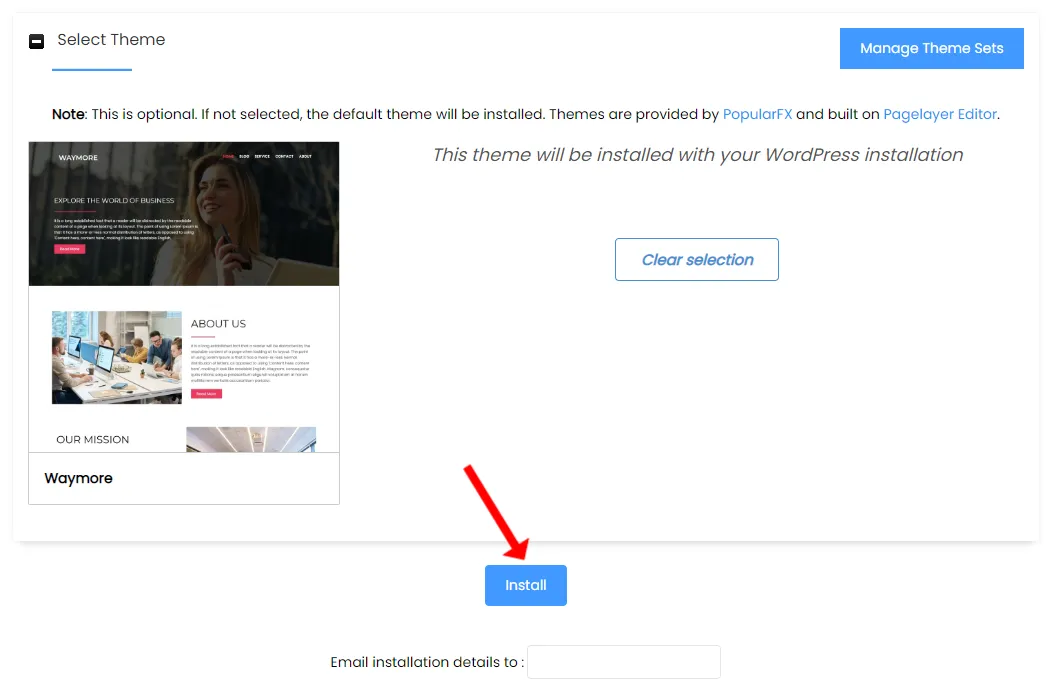
Now it is time to choose a theme for your blog. If you don’t want to use these themes, ignore themes section, and click the Install button located at bottom of the page, as shown below after 3 steps.
- It will show you plenty of themes for different blog niches. Pick the one which is relevant to your blog or the one that you feel is good for your blog. If you’re confused then choose a random theme, you can change later.
- The Navigation Arrows (< >) allow you to explore more themes. The Show All Themes lists you all the available themes.
- Here I will select Waymore theme.
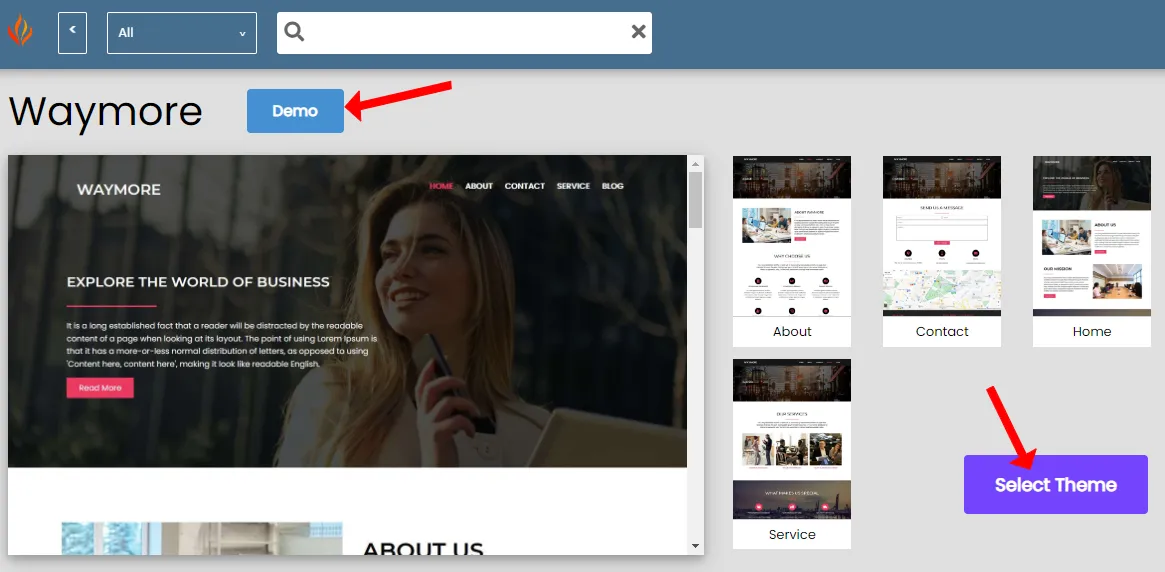
- Click the Demo button to view the Live Preview of the theme.
- Click the Select Theme button to choose the theme.
- It may show you a image copyright information.
- Click Yes.
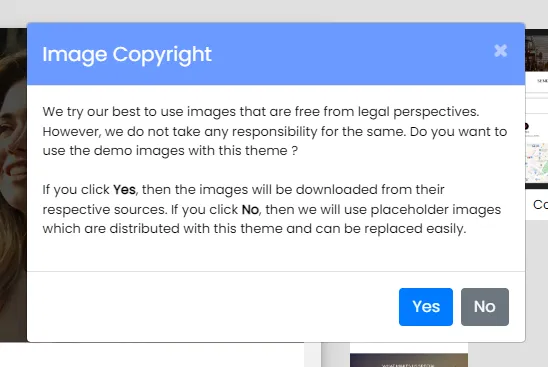
- Your theme will be selected.
- Now click the Install button to begin the installation of WordPress.
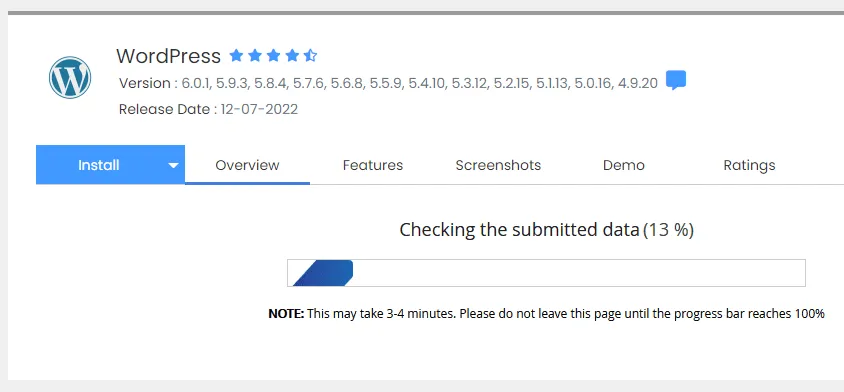
- The WordPress installation takes 3 to 4 minutes, so be patient and wait for it to finish.
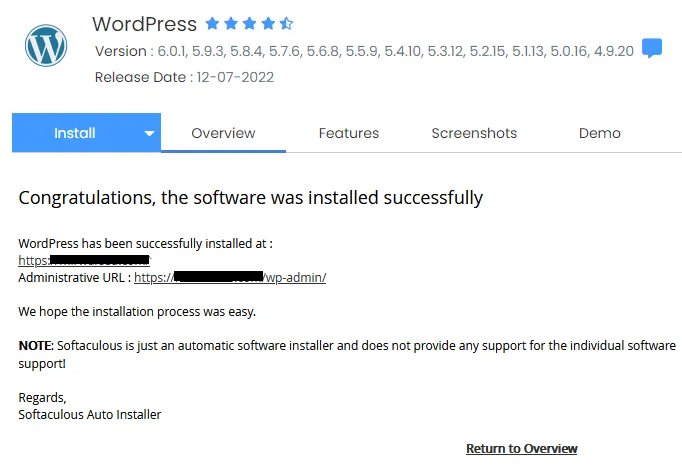
- Once the installation is finished successfully it will show you a message, “Congratulations, the software was installed successfully“.
- It will also show you the admin section link (Administrative URL) of your website. It will be similar to “https://www.example.com/wp-admin/“.
Now login to your WordPress Admin section, as shown in the next step.
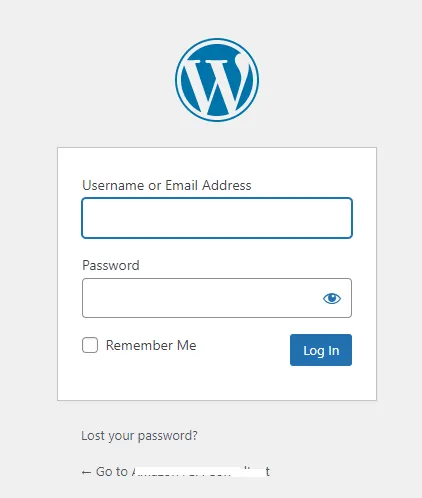
Login to your WordPress Admin:
- Browse your WordPress Admin URL, like “https://www.your_domain/wp-admin/“.
- Enter your Username or admin Email Address and Password.
- Click Log In.
- This is how your WordPress admin section looks like.
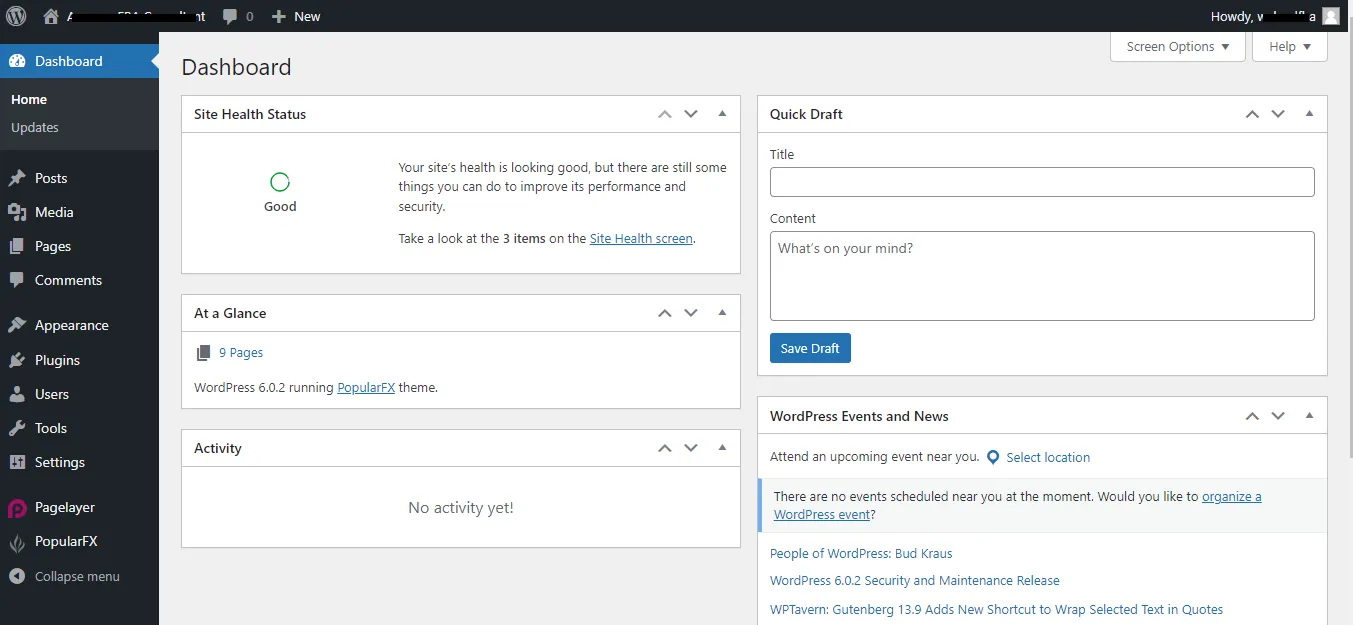
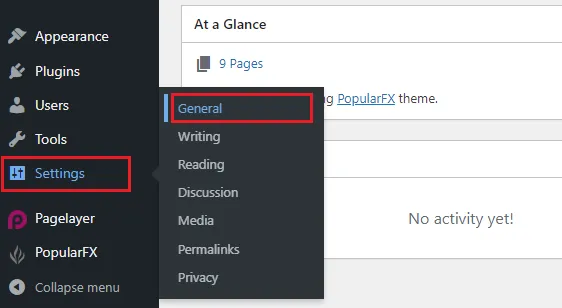
- To update the General settings of your WordPress blog go to Settings from sidebar.
- Click General.
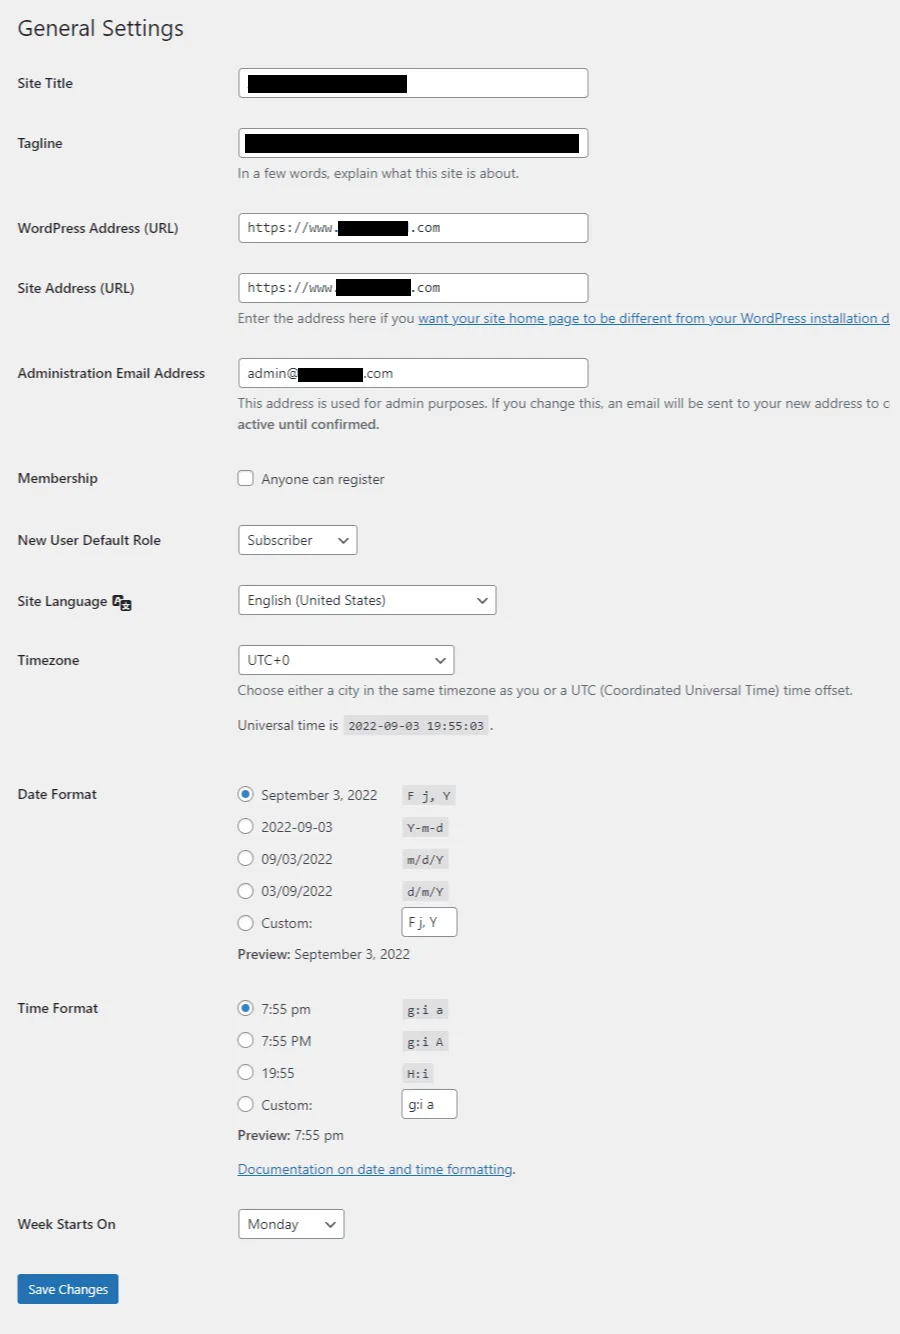
Update the General Settings:
- In the Site Title enter the name of your blog. It is displayed on three places (1) Top of your browser beside favicon (2) Google search results (3) Header, as a text logo if image logo is not placed.
- In the Tagline provide a brief description about your blog.
- In the WordPress Address (URL) enter your domain address like “https://www.example.com”.
- In the Site Address (URL) enter your domain address again.
- In the Administration Email Address enter your email address. You can use either your private email address or your public email address such as Gmail’s, Yahoo’s, etc. Private email address is the one with your domain address such as “info@jacksmith.com”, “admin@jacksmith.com”, etc. Learn: How To Create Email Account In Namecheap cPanel | Access Webmail
- Also update Site Language, Timezone, Date Format, City, etc. Once you are done, click Save Changes at bottom.
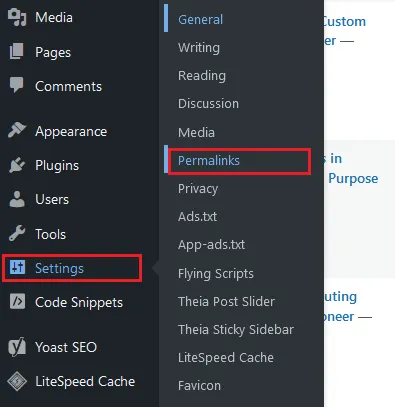
Set up the post Permalink settings:
- Go to Settings from your sidebar.
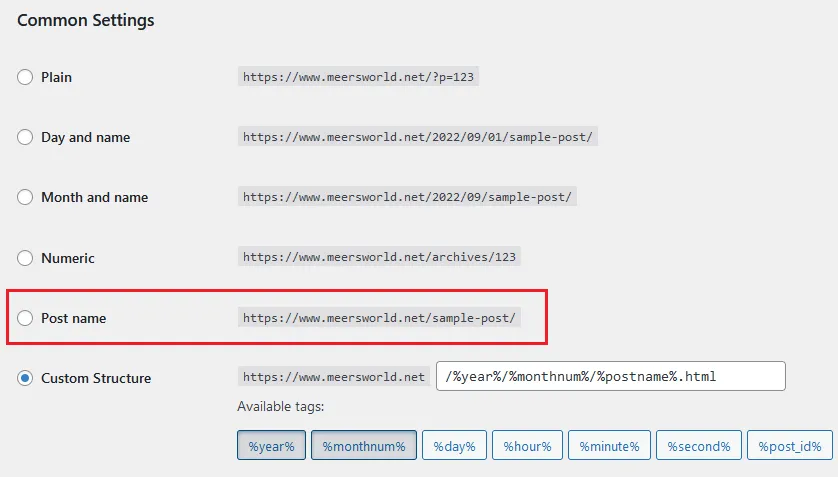
- Click Permalinks. Permalinks (Permanent Links) are the URLs of your blog posts. Once a post is published its URL cannot be changed, that’s why it called permalink.
- WordPress offers different types of Permalink settings. Each type is shown with example. If you have an e-Paper blog ideal permalink setting would be Day and name or Month and name because date helps to identify its publish date. Otherwise choose Post name settings, it doesn’t include year, month and day. It will be similar to this: “https://www.example.come/how-to-start-a-blog/“.
- Do not change Permalinks settings after you publish blog posts and when they are indexed in Google. If you do then it will change the URLs of your blog posts, as a result you may get 404 Page Not Found error.
- The Custom Structure settings allow you to create a permalink structure of your choice. It is particularly very useful when you migrate a blog from other platforms like Blogger to WordPress.
- Once you’re done, click Save Changes at bottom.
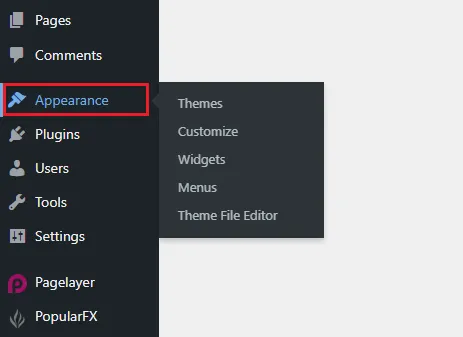
Appearance settings:
- The Appearance settings allow you to upload/activate/customize/change/delete Themes, customize Sidebar widgets, add/delete/edit/update Menu Items, and edit Theme Files.
You can find thousands of professional modern-day WordPress themes on ThemeForest for any type of niche like Blogs, Portfolio, Personal, Travel, Finance, Cooking, Review, News & Magazine blogs, Corporate, Technology, Entertainment, eCommerce, Sports, Gadgets, Gear, Fashion, Education, Clothing, Retail, Real Estate, Wedding, Photography, etc. Read: How to Buy a Theme on Themeforest & Download.
Pages section:
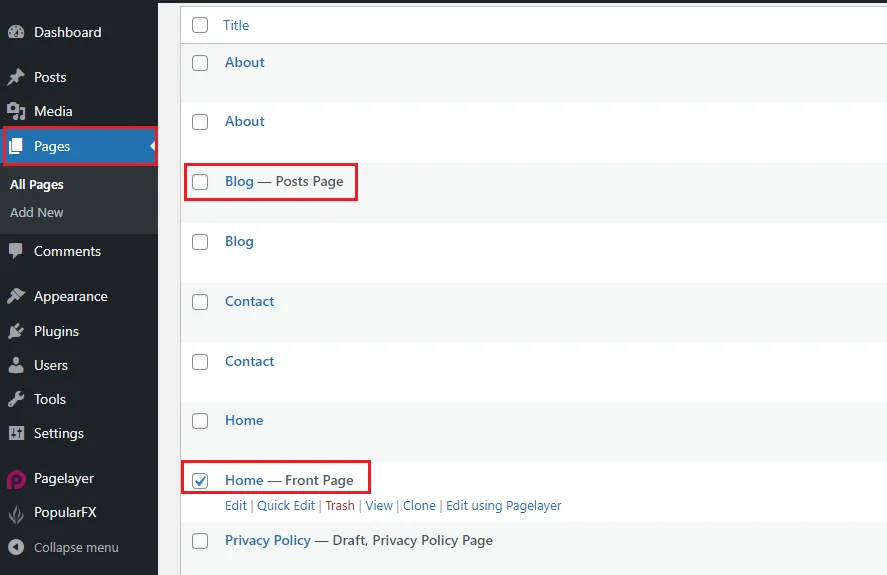
- On Pages section you can create pages for your WordPress blog. Don’t forget to create the mandatory pages for your blog i.e. Disclaimer, Privacy Policy, and About Us/Me.
- Some theme makers design themes in pages. So if you want to edit your theme’s images, layout, style, or text of Homepage and Item Page (Detail Page) you can find them on Pages section.
- The Homepage is marked by Front Page and Item Page is marked by Posts Page, as shown below. You can edit them on WordPress editor as well as third-party WordPress Page Builders on which they are designed like Elementor, WP Page Bakery, Visual Composer, PageLayer, etc.
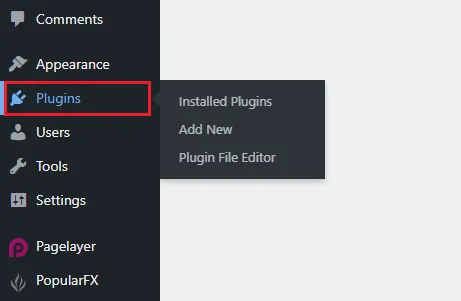
Plugins section:
- Plugins in WordPress are programs that add new features, functionality or extend existing features. For example, contact form, sliders, mega menus, gallery, currency switcher, timetable, management systems, online store, online booking system, SEO tools, page builders, performance tools, etc.
- In plugins section you can install/add/delete/activate/deactivate/edit plugins.
You can also find WordPress plugins on CodeCanyon.
Things To Do after creating a WordPress blog:
Till this point you’re done with the creating a WordPress blog. Now it is time to set up important things like Blog SEO, Creating Google Search Console & Analytics accounts, Contact Us Page, Spam Protection, etc.
Go through our below post to learn about 5 essential WordPress plugins that covers:
- Site Kit by Google (Create Google Search Console & Google Analytics accounts for your blog and show traffic stats on your WordPress Dashboard using Site Kit by Google plugin).
- Yoast SEO (One of the leading and most widely used SEO WordPress Plugin. It optimizes your website to perform better in the SERPs).
- LiteSpeed Cache (Improves your blog performance and helps you to pass the Google Core Web Vitals Metrics).
- WP User Avatar (This plugin allows you to easily upload avatars for your blog users. You don’t need to register for Gravatar).
- Contact Form 7 (Contact Form 7 is one of the most installed and popular free WordPress plugin for creating and managing contacts form in your website).
Read This: 5 Essential WordPress Plugins That A New Website Needs
One of the biggest issues in WordPress has been spam comments. Through there are many WordPress plugins like Akismet, for controlling the spam comments, but there is a very light-weight WordPress plugin called Forget Spam Comments that performs better than any other plugin in protecting your blog from spam comments.
Read this Tutorial: How to Stop Spam Bot Comments in WordPress Using Forget Spam Comment.
07. How To Create Your First WordPress Blog Post
In this section, you will learn about creating your first blog post in WordPress and quick introduction to WordPress Editor.
- Login to your WordPress Admin.
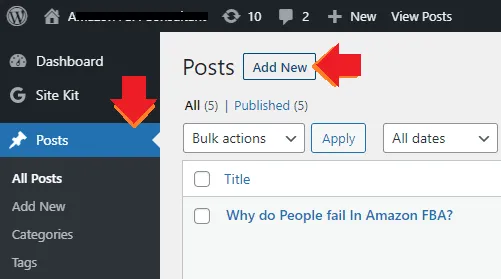
- Click the Posts from the Sidebar.
- Click the Add New button to create a new post.
- In the Add title enter your post title. The title shouldn’t be too long.
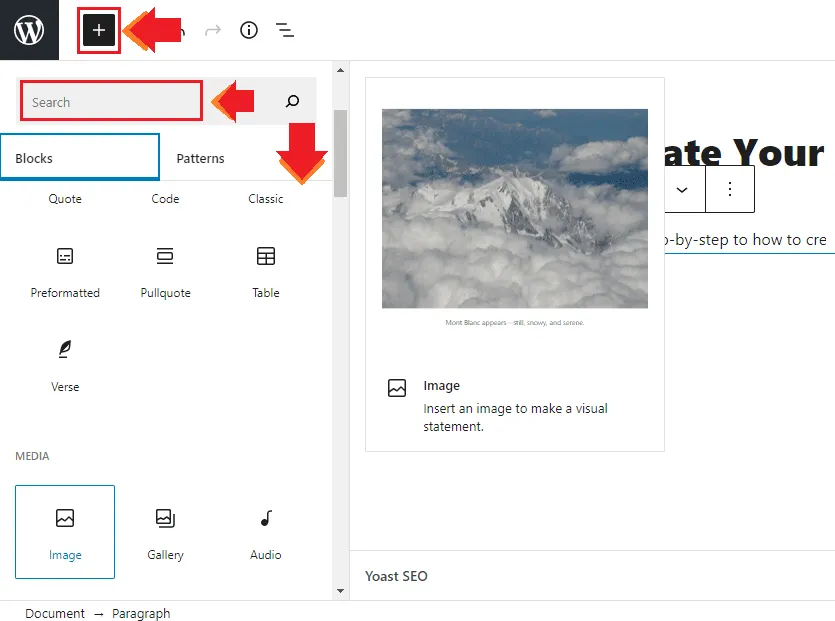
- In Start writing or type / to choose a block you can add your content that includes Text, Images, Links, Videos, Blocks, etc. The “Blocks” are pre-made components for adding the content in WordPress like Custom HTML, Code, Paragraph, Heading, Quote, Table, List, Image, Video, Gallery, Audio, Calculator, etc. They appear when you click the “+” icon, as shown in below steps.
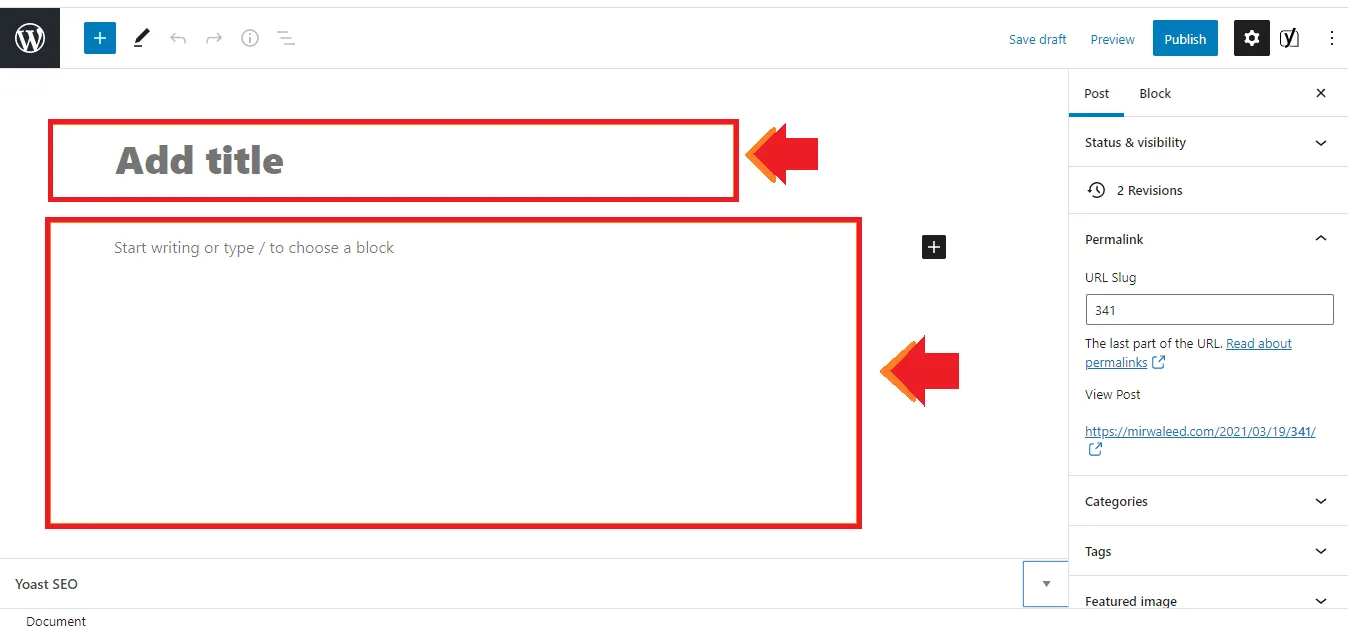
- At your right side there is a Settings section. The Post tab contains settings related to a post and Block tab contains settings related to a selected block present inside the post. For example, if you select an image its settings like Image Size, ALT Text, Title Attribute, Description, etc, will be shown in the Block tab.
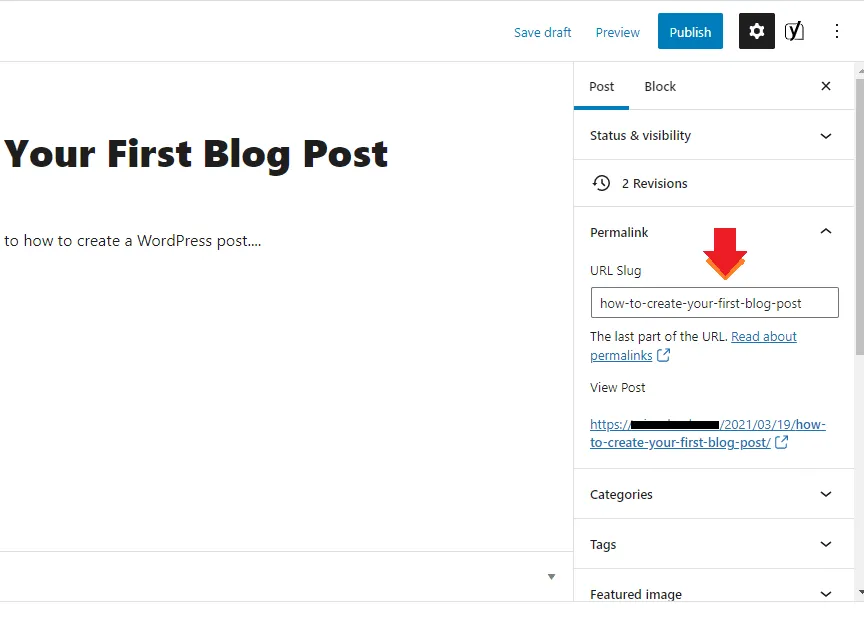
- Permalink is the permanent URL of your post. WordPress automatically creates this URL from your post Title. You can modify this URL in “URL Slug” box. The preview of the URL is shown under the “View Post” label. Each word or character in the URL Slug are separated by hyphen (–) like “how-to-create-your-first-blog-post“. The words in your URL Slug shouldn’t be more than 5 or 6 words/characters.
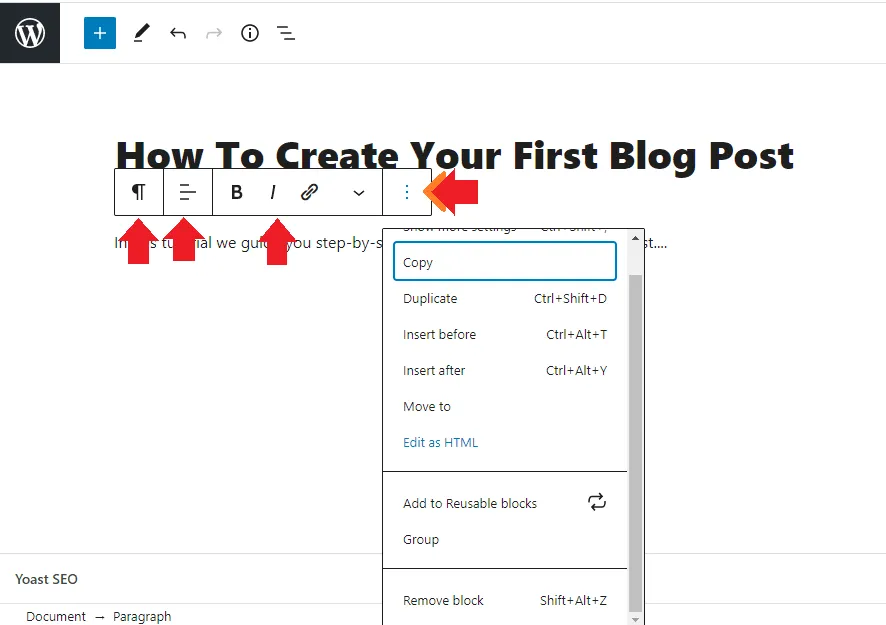
- When you edit or write a post in your WordPress Editor you will see a Quick Toolbar, that contains different editing options such as element styles, text alignment, bold, italic, link, etc.
- Click the Ellipsis Icon (Three Vertical Dots) in the Quick Toolbar to open the options such as Copy, Move To, Duplicate, Remove, etc.
- Click the blue “+” icon at your top left corner. When you click it will turn black and there will appear a Sidebar that shows plenty of Blocks (HTML Elements). Blocks are already discussed above. When you hover over the block it shows demo at your right side.
- You can also find a block directly from the Search bar. The “+” icon also appears within the post as well.
- To close the Sidebar click the “+” icon again.
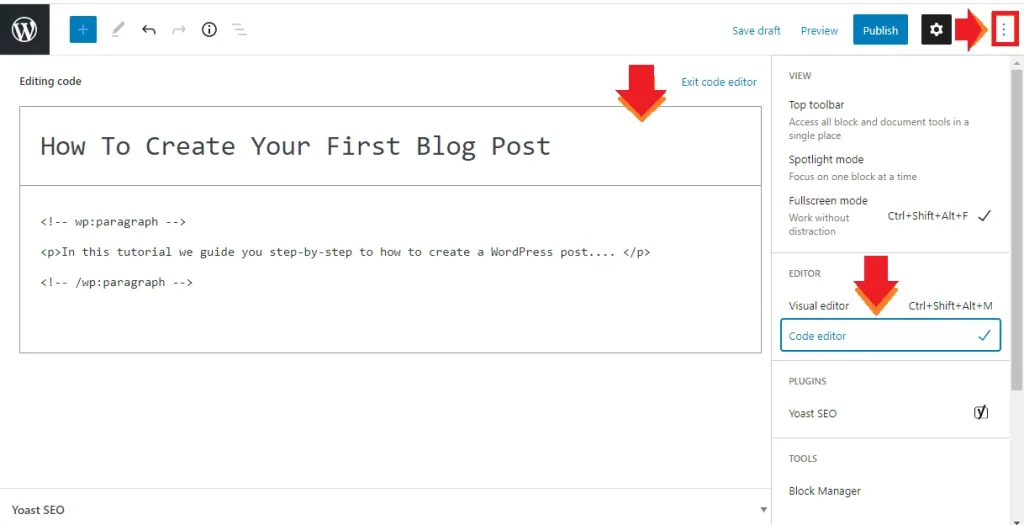
- In order to switch from Visual Editor to Code Editor click the Ellipsis Icon (Three vertical dots) at top right corner.
- Click the Code Editor. The Code Editor shows you the HTML code of your post.
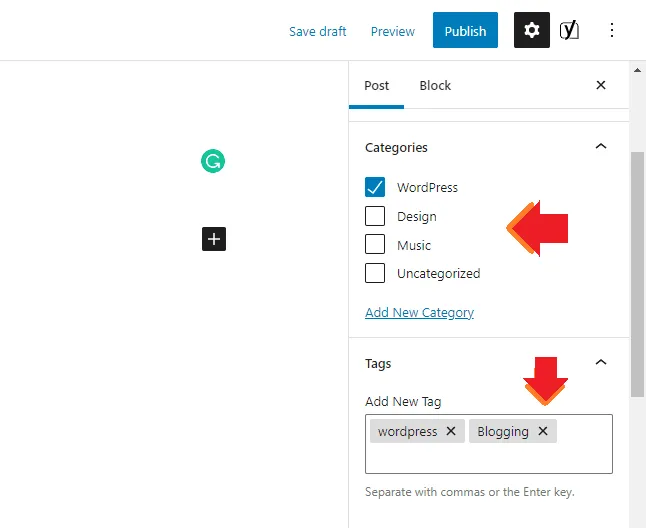
- The Categories and Tags are two primary ways to group content on your blog. Categories are general labels whereas Tags are specific label. Tags describe your posts in more detail. They help to organize your articles and also have a significant role in post’s SEO.
- Expand “Categories” & “Tags” from the Sidebar to link your article to different categories and tags. Read more about Categories and Tags: What is the difference between tags and categories?
- The Featured Image section allow you to upload the Featured Image (Cover Image) of your post.
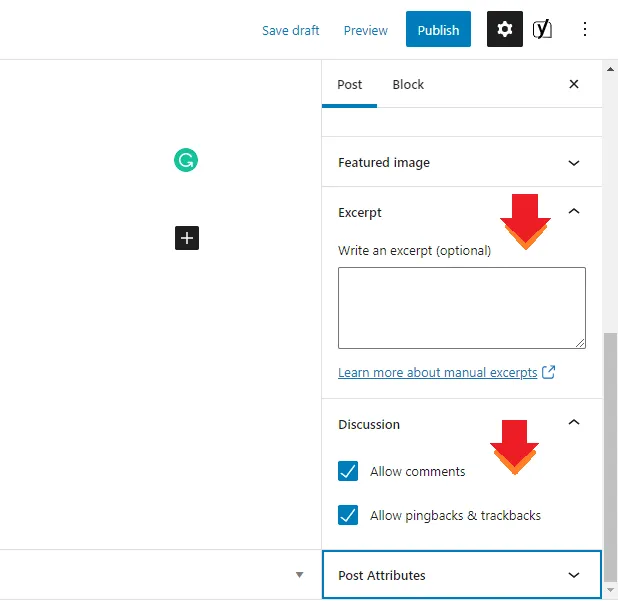
- Click Excerpt from the Sidebar to add a short summary or snippet of your blog post.
- Click Discussions to choose whether you want to allow “Comments” and “Pingbacks & Trackbacks” on your post. The “Pingbacks & Trackbacks” are a special type of comment created when you link to another blog post. The pingback tells you and other blog visitors: “Hey! Someone put a link to your post on their website”. Learn More About: Trackbacks and Pingbacks.
08. How to Setup a Free Newsletter
A newsletter is a document/email that you send to your newsletter subscribers to share the latest news, updates, promote products, sales, offers, coupons, brand, giveaways, case studies, and much more. Normally they are sent once in a week, quarter, or a month.
The Newsletter Plugin is a free plugin that allows you to collect subscribers via subscription form, create newsletters, and send newsletters to your subscribers or email lists.
I have created a separate tutorial that guides you step-by-step on how to setup free Newsletter plugin on WordPress and use it.
:: Download Cheap Professional Newsletter Templates Made For All Niches.
09. How To Write An Ideal Blog Post
Since you have learned how to create your WordPress blog post now it is time to learn how to write an ideal blog post. If you follow these guidelines from the day one of your blogging career you will be able to bring good organic traffic i.e. the traffic from the search engines (Google, Bing, etc).
The art of writing an ideal blog post is simple, write to impress the readers by keeping the SEO guidelines in your mind, as I have discussed in this section. Your blog posts should be so good & solution-oriented that people would love to stay on your blog and visit again.
Focus on your users, create unique and quality content.
The majority of SEO experts are of the opinion that blog post length should be around 1000 words to 25000 words. In general lengthy articles are ranked better in Google. Don’t write irrelevant and repetitive content just to make your article lengthy.
The title of your blog is always very important, should not be too long or too short. Always write the main keywords in the title. When you write your post content don’t go too far from the title, remain within the scope of your post title and provide the content for which a visitor visits your page.
When you write a blog post always keep smartphones in your mind because majority of people use smartphones as compared to computers, and that’s why while indexing & ranking Google gives more priority to those posts and blogs which are mobile-friendly.
Your paragraphs should not be more than 2 to 4 lines. If you write lengthy paragraphs that will be too large for smartphone readers.
First two paragraphs of your post are always very important because you can capture the attention and trust of readers. Your first paragraph must contain the key phrase of your title.
Here are some ideas for you:
- Be short and direct. Ask a question or two like “Do you want to know how to create your first blog post? Here are 10 tips”.
- Share a shocking or interesting relevant fact or statistics like “Do you know that 40% websites on internet are powered by WordPress?”.
- Share something personal.
- Start with a reader’s a question like “Do you have tips for creating your first blog post? I have… “.
- You can share a relevant quote.
- Briefly summarize the solution or what readers are going to expect in the detail post.
Always format your post content. Use heading tags H1, H2, H3, bullets, numbering, spacing etc, to properly format your blog post. There should be only one H1 in your blog post.
The Text color should not be vague, standard color is black. Font-size should be at least 16px. The Font-family should be simple and easily readable.
Make your posts more attractive by using relevant images, info-graphics, videos, etc. Don’t use unnecessary images as they increase the loading time of a page. Your post content should be more than images.
Write a good conclusion at bottom of the post, if necessary.
Always use optimized images means before you upload images reduce their size. Don’t upload poor quality and large size images. Give every image a meaningful name. Don’t name your images like image 1, image 2 etc. Image name should be relevant to your post title.
After uploading an image must write the meaningful Title Text & Alt Text. A good number of visitors come to your blog by clicking images on Google.
Use Link Attributes in your links. To know more about link attributes i.e. “nofollow” and “sponsored”, go through this article:
10. How To Grow Blog Traffic
Most of the bloggers give up on blogging after doing for a month or two when they see very little traffic coming into their blog. Do remember that it takes time for a new blog to get traffic.
RELATED
- Understand On-Page SEO and Off-Page SEO | Grow Your Blog Traffic
- Why Does it Take So Long to Get Traffic on New Blogs, Even With Good Content, and SEO?
- Best Content Marketing Tools for Beginners
- How to Optimize Your Blog for Voice Search
- How to Add Schema Markup to a Website
- Technical SEO for Bloggers Without Coding Skills
- Blogging Automation Tips for Beginners
If you consistently create blog posts around your niche by keeping the guidelines in you mind, as I have suggested in the above section “How to write an ideal blog post”, nothing can stop your blog to bring traffic from different sources such as Google, Social Media, Backlinks, Forums, etc.
Consistency is the key to success in blogging. It helps you to identify your mistakes and blunders. As the time will pass solutions will come naturally to you, and you will learn what ranks and what doesn’t.
Try to publish 2 to 3 articles per week. Review your old posts frequently because there is always a chance of improvement.
Soon after creating your WordPress blog submit your blog to Google Search Console, create Sitemap.xml, connect your blog to Google Analytics and Bing Webmaster Tools, as discussed in the Section 6.
On your website traffic stats, check regularly on which searched keywords your blog and articles are ranked.
You must have heard of backlinks, a good source for bringing traffic to your blog. Backlinks are links of websites from where your blog is getting traffic.
There are different ways to create backlinks, like:
- You can share your blog post links on relevant YouTube video comments.
- You can share your blog post links on comments section of different blog articles.
- You can join different forums, Facebook groups etc, where you can answer queries by suggesting your relevant blog posts.
- The best way to create backlinks is by creating quality content, as I have discussed earlier. If you create quality and solution-oriented content other websites will recommend your website and articles on their website and articles. It will send a positive signal to Google that you have high authority over your content.
Social Media is a popular platform for bringing traffic to your blog. Create official pages or accounts on all popular social media platforms like Facebook, Twitter, Pinterest, Instagram etc. Build audience and share your content with them.
11. How To Make Money From Blog
Now here comes the topic for which people create blogs i.e How to make money from your blog. Here I will introduce you to four different ways of making money from your blog:
- Google AdSense
- Affiliate Marketing
- Paid Content
- Selling Your Own Product.
When to apply for Google AdSense or affiliate programs?
Most of the new bloggers always make this mistake like after writing 2 or 3 posts they start applying for Google AdSense or other affiliate programs.
When you create a new blog don’t focus on making money, try to focus on writing posts and bringing organic traffic. Once you do that you can apply for AdSense and relevant affiliate programs.
Create these 4 important pages soon after your blog is ready:
- Privacy Policy page
- Disclaimer page
- About Us page
- Contact Us page
01. Google AdSense
Google AdSense is one of the most popular PPC (Pay Per Click) based program to monetize your blog. It pays you certain amount of money for every genuine click depending on the location and CPC (Cost-Per-Click) of keywords.
How much you can earn from Google AdSense depends on different factors such as location, traffic, niche, RPM, CPC, etc.
In order to learn how to sign-up/apply for Google AdSense and connect your blog, Read this Tutorial:
Below are some alternatives to Google AdSense for monetizing your blog, such as:
- Media.net, PropellerAds, Amazon Native Shopping Ads
- Adversal, Sovrn, Skimlinks, Monumetric, InfoLinks
02. Affiliate Marketing
Affiliate Marketing is the process of earning certain amount of commission by selling a product or service of a brand or a company via your affiliate links.
Let’s say you join an affiliate program of a mobile brand. You put the banner on your blog. A visitor comes to your blog and clicks the banner. He will be redirected to the product page of the mobile from where he can purchase. If he purchases a mobile your earn a certain amount of commission.
The commission rates vary from brand to brand and service to service. Some affiliate programs pay fixed commissions whereas some pay percentage-based commission.
There are thousands of affiliate programs available on internet for every niche. In order to become their affiliate partner you have to submit an application where you provide information about yourself & your blog.
After reviewing your application they will send you an email whether it is accepted or rejected. Some affiliate programs accept applications without review.
Some companies develop their own affiliate tracking software, but majority use third-party affiliate networks like Impact Radius, CJ Affiliate, Shareasale, Clickbank, Partnerize, Rakuten LinkShare, and more.
You can find plenty of affiliate programs on Meer’s World.
If you want to know which one is better between Google AdSense & Affiliate Marketing, means from whom you can earn more money or which one is more suitable for your blog, read this article:
03. Paid or Sponsored Content
When your blog gets good reputation and brings good monthly traffic, websites and brands will contact you for promoting their products, services or websites via your blog posts or banners.
If they ask you for publishing articles on your blog you will get paid per article. Either they will provide you the content or they will ask you to write content for them and publish on your blog.
For displaying a sponsored banner on your blog, you will get paid monthly, yearly or for certain period of time.
04. Sell Your Own Product
Selling your own product is also a great way to make money from your blog. Let’s say, you have a food blog, you can recommend your own eBook of recipes to your blog visitors. Similarly you can sell tools, software, themes, gadgets, gear, machines, etc, depending on the niche of your blog.
12. How Long It Takes To Get Traffic & Earn An Income
This section is very important, not many bloggers tell you about this information i.e “How long it takes to start getting results from your blog”. It is sort of a timeline, will help you to evaluate your blog after certain period of time, whether you are doing things right or wrong.
In the first 6 months of your blogging try to add as many content as possible because on average it takes 8 months for a blog to level off. Keep in mind that this timeline and stats are not ultimate, these are the average results gathered from different surveys, polls, interviews, etc, by Income School.
Let’s go through this timeline, what it suggests and what it predicts:
- In the First Two Months, try to add at least 30 to 40 articles. By the end of 6 months if your blog contains 60 to 70 articles, it would be relatively good. You can expect a traffic of 150 views per month and income around 0$ to $5 per month.
- In the Next 6 Months, try to add more content consistently. In your first year (12 months) there should be at least 100 to 120 articles on your blog. You can expect a traffic of 5,000 to 10,000 views per month and an income of $100 to $220 per month, which is quite reasonable.
- In the Next 6 Months, you will have a good idea about your old articles like which articles were ranked and which were not. You can make improvements in your old articles and also you will have a good idea like on which topics you are going to write new articles.
- In 18 Months Period, having 130 to 150 articles on your blog, you can expect a traffic of 30,000 to 50,000 per month, and an income of $18,00 to $2,000 per month. As your blog gets older advertisers optimize ads for your blog and willing to pay you more to get their ads on your website..
- In 24 Months (2 years), having 160 to 200 articles in your blog, you can expect a traffic of 100,000 views per month and an income around $4000 per month. If you have blog articles around 400 in 2 years you can raise your earnings may be up to $8000 per month.
So it was a timeline to reach $4000 per month in two years. Always remember that your niche has a big role in your income. There are many practical examples exist where bloggers spend few hours per week and earning thousand of dollars per month.
Let’s take a practical example. A person created a blog on the niche “dirt bikes”. He wrote only 9 articles, but he was earning $4000 per month on average. Why he got early success? Because it was a low-competition niche with good monthly search volume, and he has authority & expertise over his content (niche).
Suppose your niche keyword is “Travel”, and you have published hundreds of articles on it, but you are not getting any traffic. It might take years for you to rank your content because it is a very high-competition niche, instead you can choose a sub-niche of “Travel”. If you do things smartly you will get better results. Niche has been discussed thoroughly in the Section 1.
Final Thoughts
So it was all about creating a WordPress blog and make money. I hope that you have enjoyed this article. Don’t care about what people say, keep publishing posts consistently & identify your mistakes. Nothing can stop you from achieving the success and making big money.
Keep in your mind that blogging is a great career, but it needs patience and consistency!
Success is the sum of small efforts – repeated day in and day out.
Robert Collier
If you like this post then don’t forget to share with other people. Share your feedback in the comments section below.



Leave a Reply