Do you want to migrate your hosting and transfer your domain to Namecheap? You’re in the right place. In this tutorial, I will guide you step-by-step on how to do.
You have taken a wise decision to migrate your domain or hosting to Namecheap because it is an ICANN accredited, secure, fast, affordable, and one of the leading domain and hosting providers in the world. Apart from its amazing features and affordable cost, the thing that distinguishes Namecheap from other hosting providers is its user-friendly Live Chat Support 24/7.
How Hosting Migration & Domain Transfer Works?
Before you begin, let’s have a quick go through on how hosting account migration and domain transfer to Namecheap works.
- Step 1 (Hosting Migration): Purchase a hosting plan on Namecheap and then send an email to Namecheap containing the migration details. Namecheap will take a full backup of your current hosting account and migrate it to your purchased Namecheap hosting. All your website data will be restored there. During the migration process your website will remain up (live), it may go offline for 15 minutes.
- Step 2 (Finalize the Hosting Migration): In order to finalize the hosting account migration, you have to connect your domain to Namecheap hosting. To do this you have to update the nameservers for your domain of current registrar with the Namecheap’s nameservers, that it will send you via an email. The nameservers are primarily used to point your domain name towards your hosting.
- Step 3 (Domain Transfer): You have to repurchase your domain name on Namecheap by getting the domain’s authentication code from your current registrar. Once done, you will send an email request to Namecheap. They will send a request to your current domain registrar to release the domain. The domain transfer process takes 5 to 7 days.
NOTE: For your domain to be eligible for transfer it should be at least 60 days old with your current registrar (domain provider/domain host). The hosting migration and domain transfer with Namecheap do not put your website offline. It remains active (online) and the whole process occurs smoothly.
If you want to transfer ONLY your domain to Namecheap then jump to TOPIC 2, otherwise follow all the topics in the sequence.
- How to Migrate Your Hosting to Namecheap
- How to Get Support Pin on Namecheap
- Submit a Hosting Migration Ticket to Namecheap
- Connect Namecheap Hosting to Your Domain
- How to Transfer Your Domain to Namecheap
- Get Domain Authorization Code
- Repurchase Your Domain on Namecheap
- Things To Do After Domain is Transferred to Namecheap
- How to Update Your Namecheap cPanel Username and Password
01. How to Migrate Hosting to Namecheap
In this section, I will guide you on How to buy a hosting plan on Namecheap, How to submit your hosting account migration ticket to Namecheap, and How to connect your Namecheap hosting to your domain by updating its nameservers with the Namecheap nameservers.
First of all create a Namecheap account. If you already have a Namecheap account, simply Sign In.
- Go to Namecheap Homepage.
- If you want to login to your Namecheap account, click the SIGN IN tab located at top of the page and enter your Username and Password.
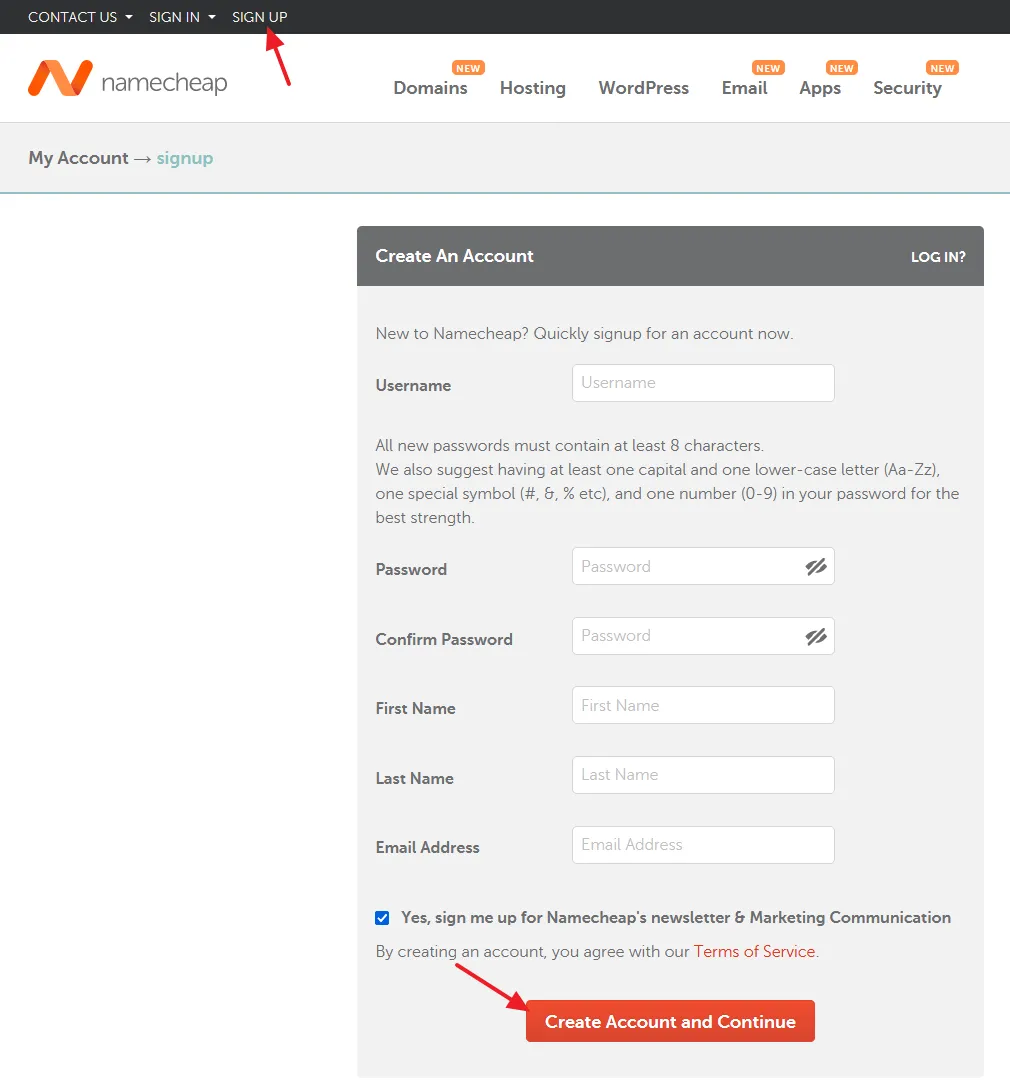
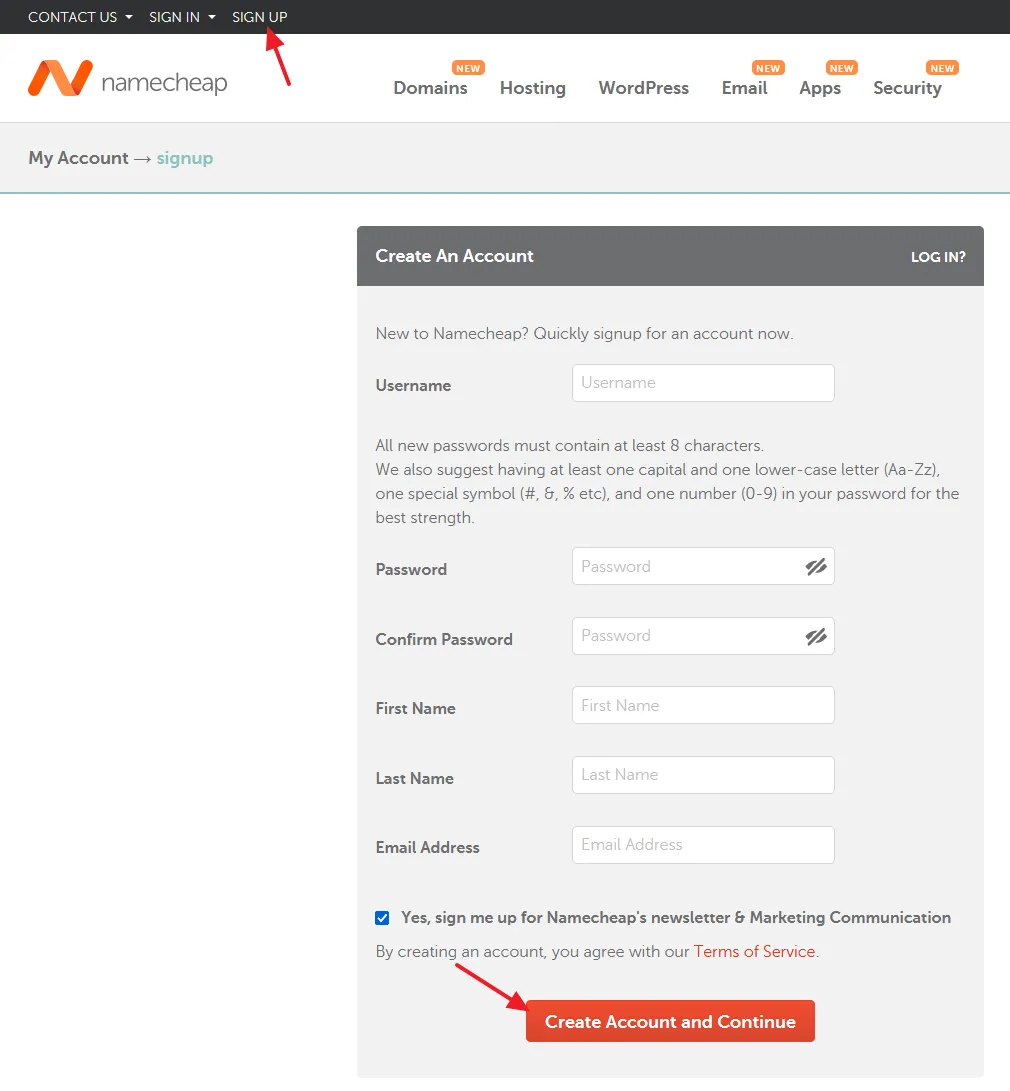
- If you want to create a new Namecheap account click the SIGN UP tab, located at top of the page.
- Enter a unique Username. Set a strong Password. Enter your First Name, Last Name, and Email Address.
- Click the Create Account and Continue button. It will send you a verification email to confirm the ownership of your email address.
After you create a Namecheap account you will be able to access your Namecheap account.
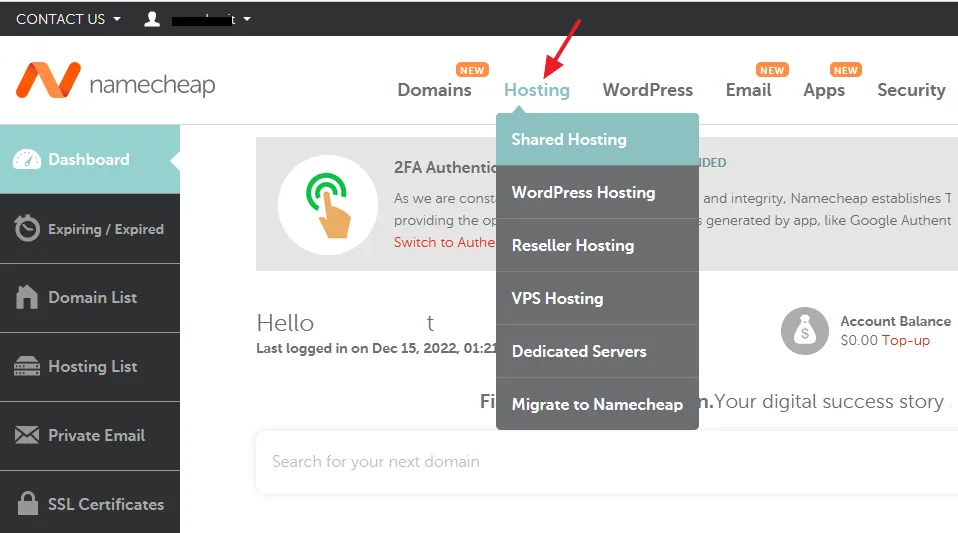
- Click the Hosting tab.
- Choose your desired hosting type. For blogs and custom websites Shared Hosting is widely used because it is affordable and fulfills their requirements. The VPS Hosting and Dedicated Servers are special dedicating hostings used for corporate websites, podcasting, game servers, high-traffic websites, video websites, large eCommerce websites, live streaming websites, etc.
- Here I am choosing Shared Hosting because I am migrating a WordPress blog. For WordPress blogs and websites you can also choose WordPress (Managed) Hosting, which is more expensive than the Shared Hosting, but offers more automation and features.
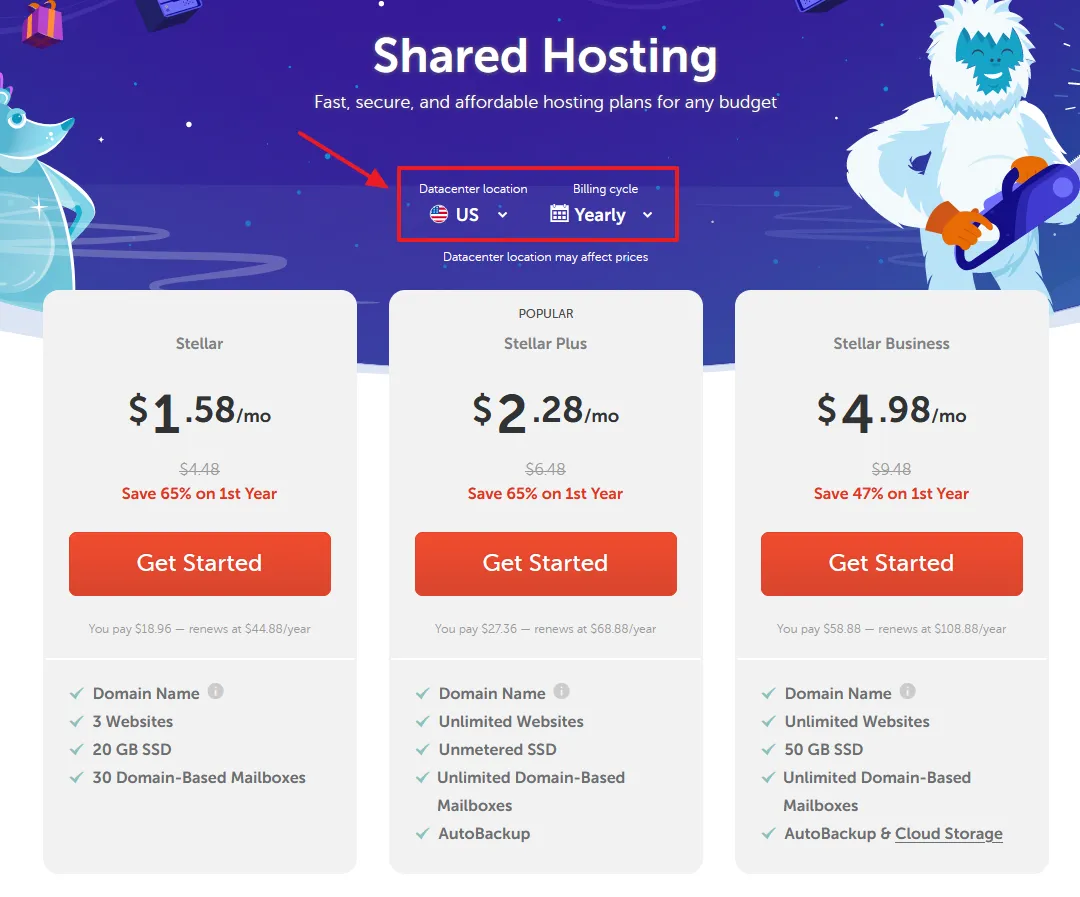
- Choose the Datacenter location and Billing Cycle. A Datacenter is a location where Namecheap’s servers are physically located. Choose a datacenter location nearest to your main audience’s location. For example, your country is India, Pakistan, Bangladesh, China, or Australia, but your main traffic comes from America, the ideal datacenter location for your website would be US.
- Depending on your website storage and traffic requirements choose a Shared Hosting plan. You can scroll-down the Shared Hosting page to view the detail features of each hosting plan.
- Click the Get Started button to choose a plan.
Now you have to connect your domain to your hosting plan.
- Select the the Existing Domain Name.
- In the “Existing Domain Name” select the Your Third-Party Domain Name option. If you have already purchased a Namecheap domain and want to connect your hosting plan to it then select Your Namecheap Domain Name. Below you can see that this option is disabled because I don’t have a domain on Namecheap.
- In the Find a domain name text field enter your domain name to which you want to connect the hosting plan. For example, if I want to migrate my blog Meer’s World to Namecheap then I will enter my domain name “meersworld.net”.
- Click the Connect to Hosting button.
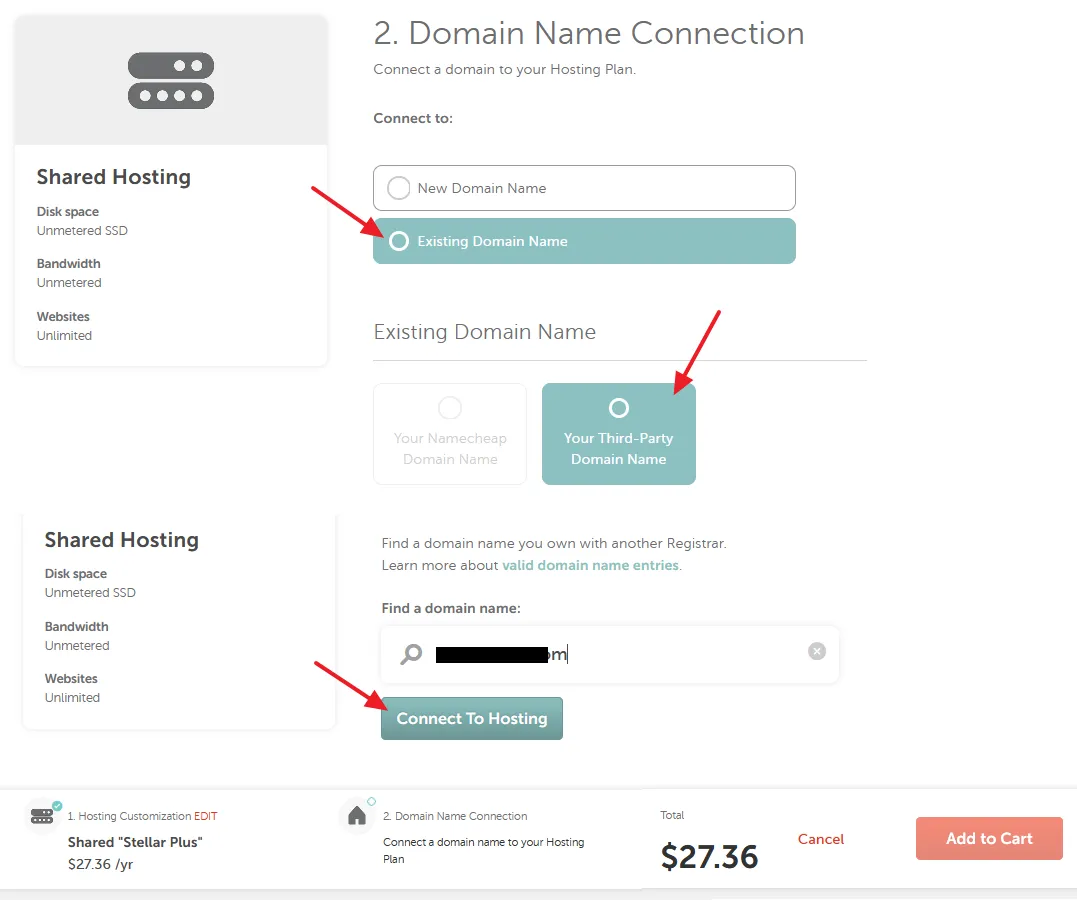
- You can see that the domain is Connected to hosting plan. Click the Add to Cart button.
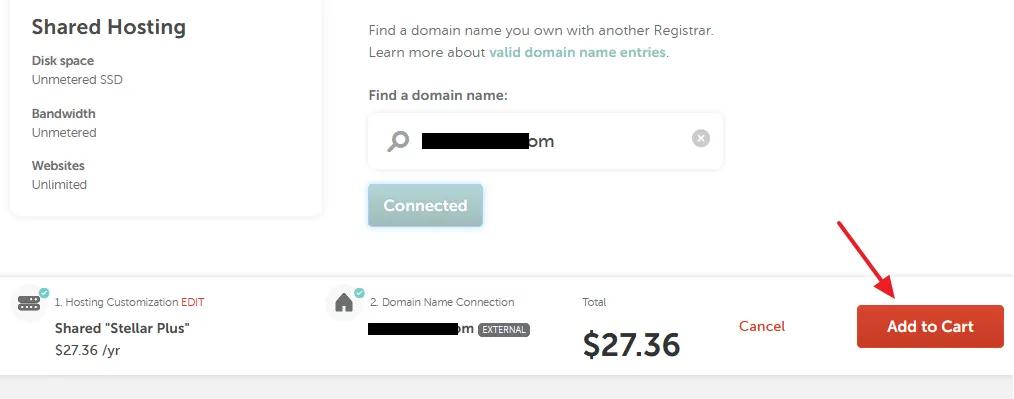
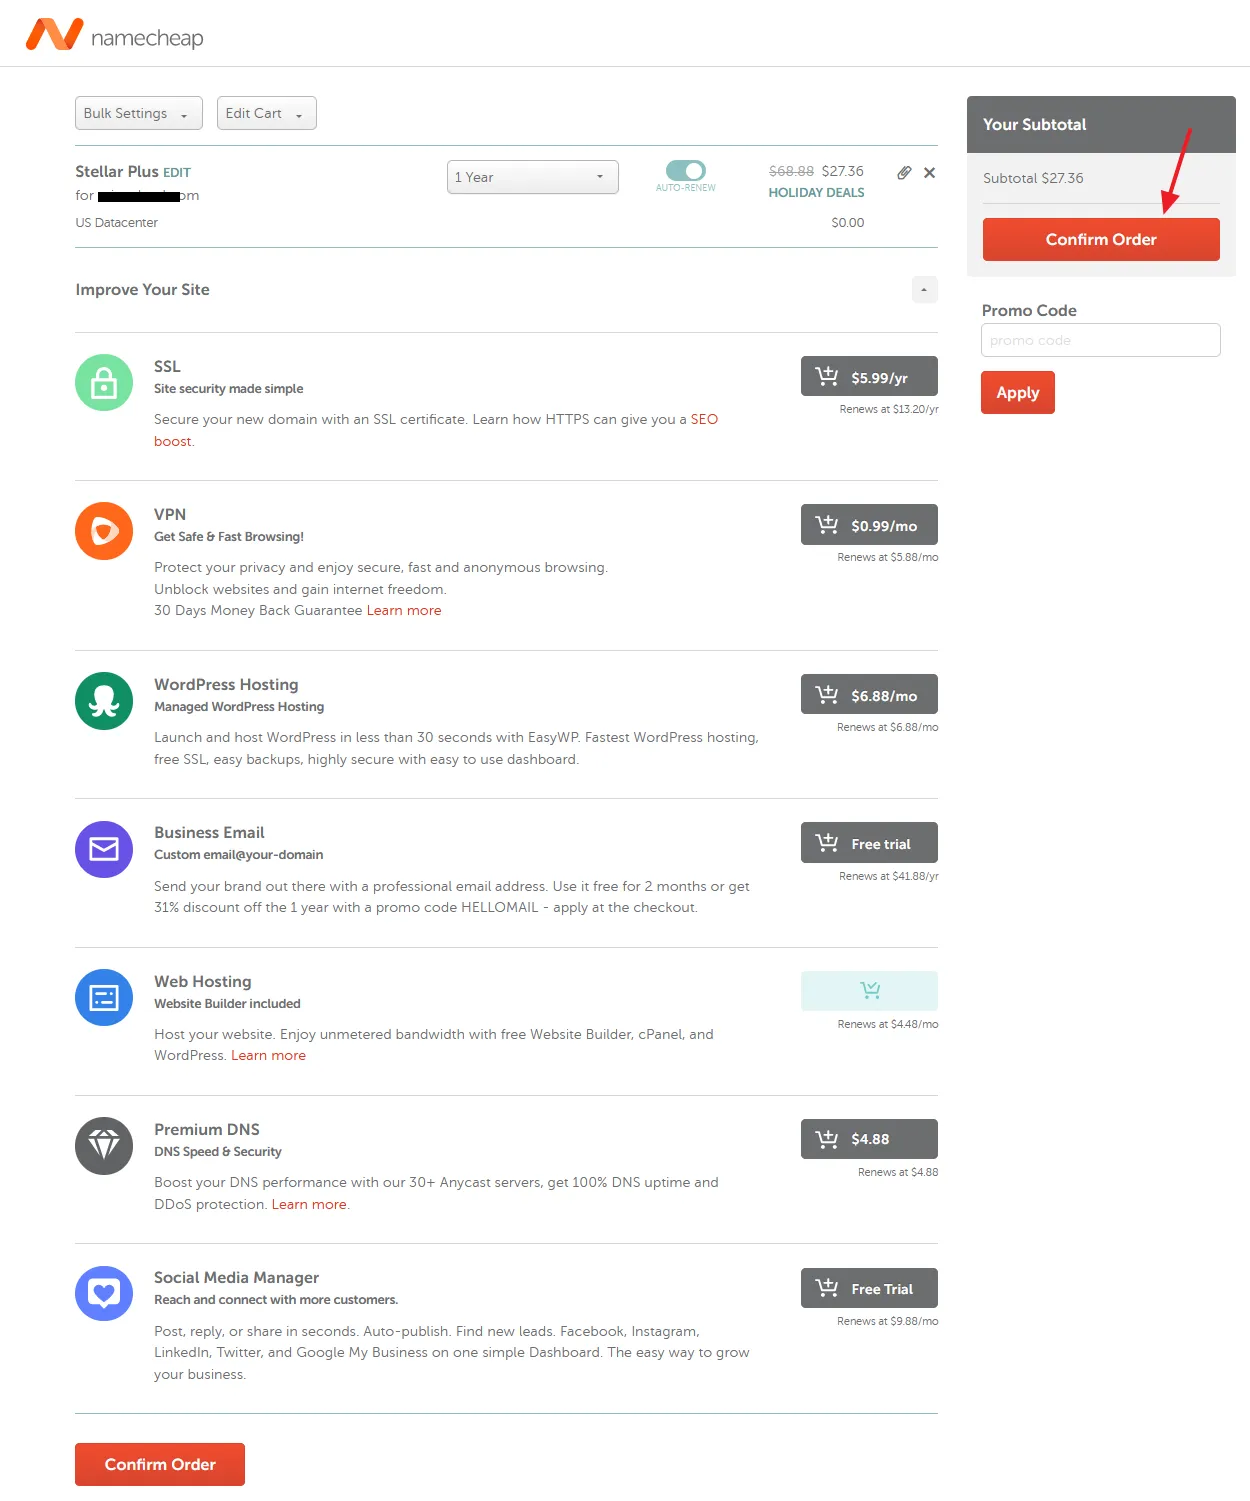
- If you have a Namecheap promo code enter it in the Promo Code field and click the Apply button. It will add a discount to your total. Find the latest Namecheap Promo Codes and Deals.
- Click the Confirm Order button.
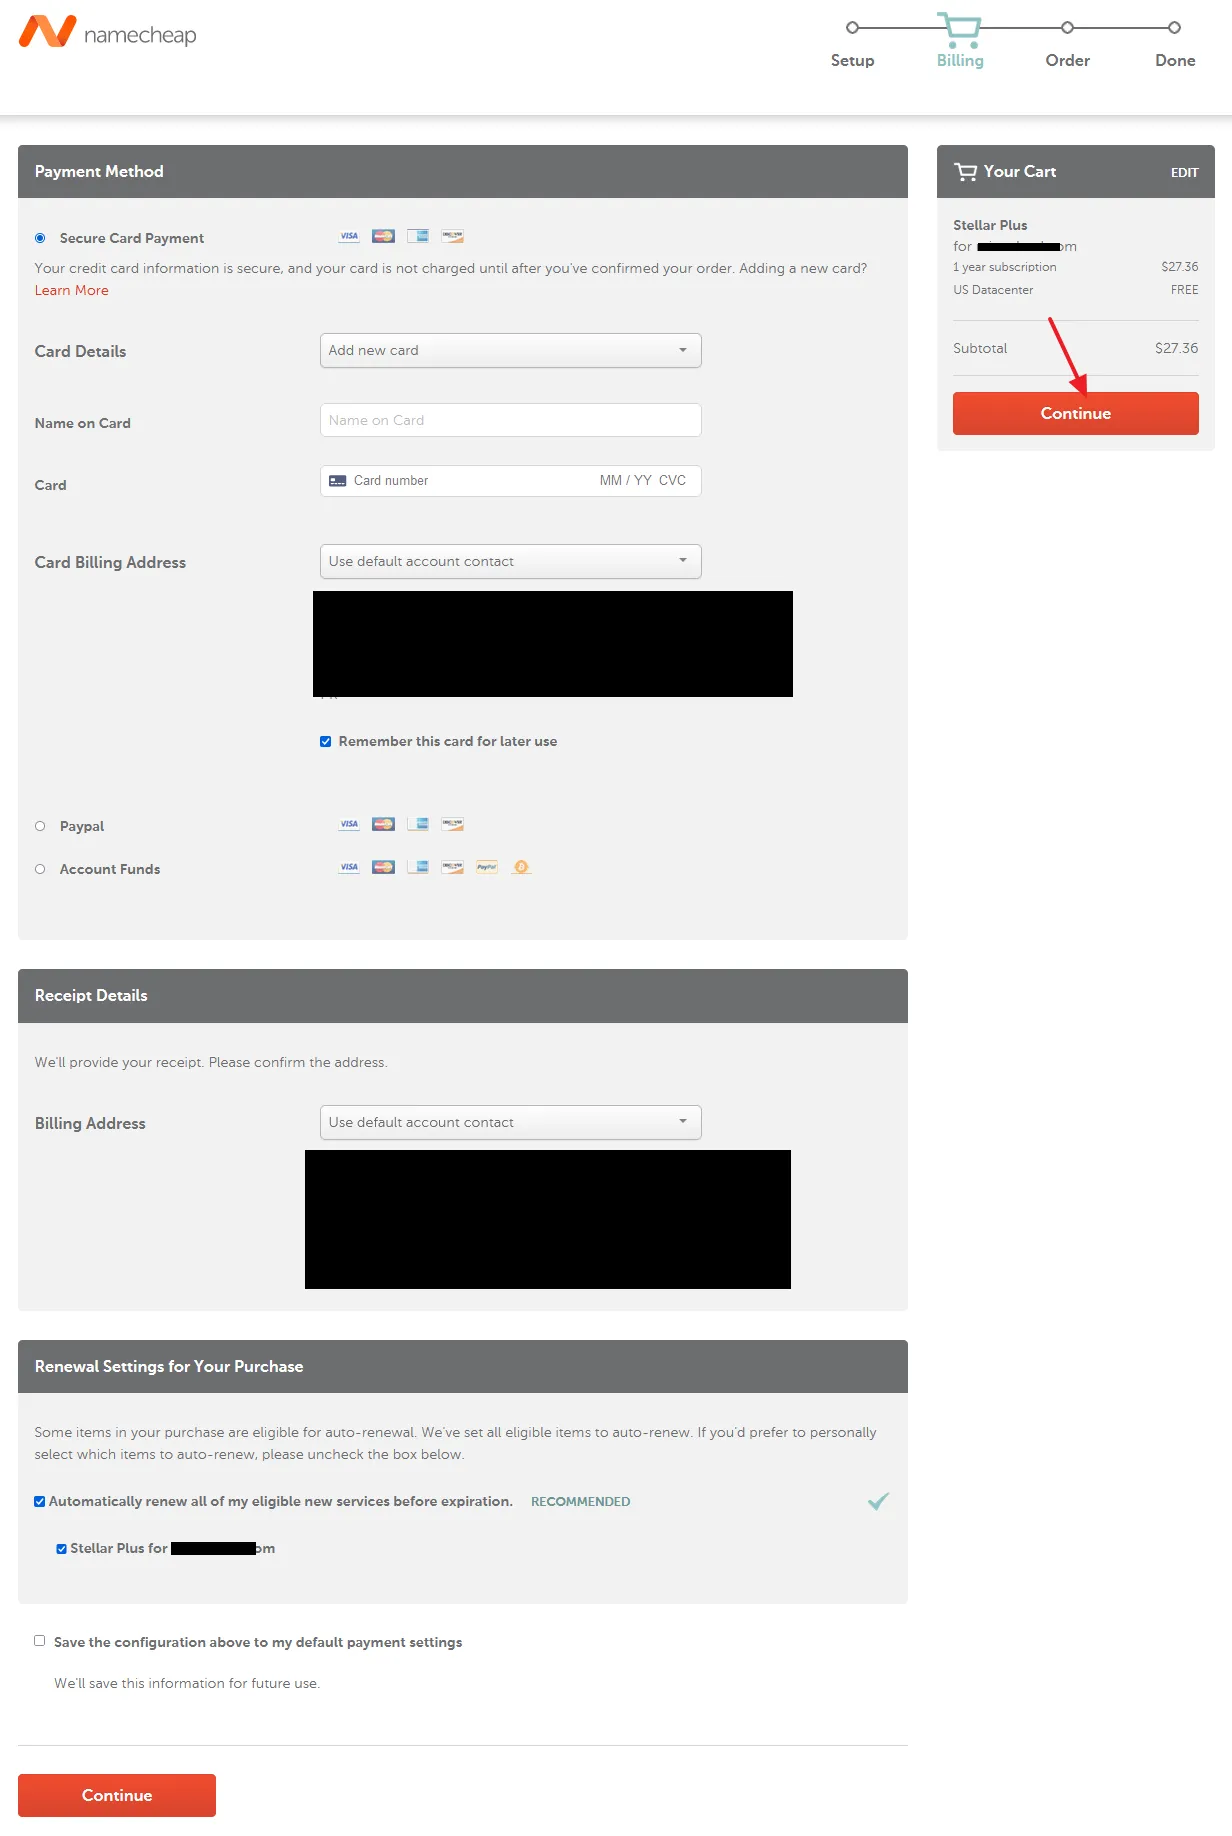
- Select your Payment Method, provide the details and click the Continue button. Namecheap offers Credit Card, PayPal, and Account Funds payment methods.
- Tick the Terms and Agreements and click the Pay Now button.

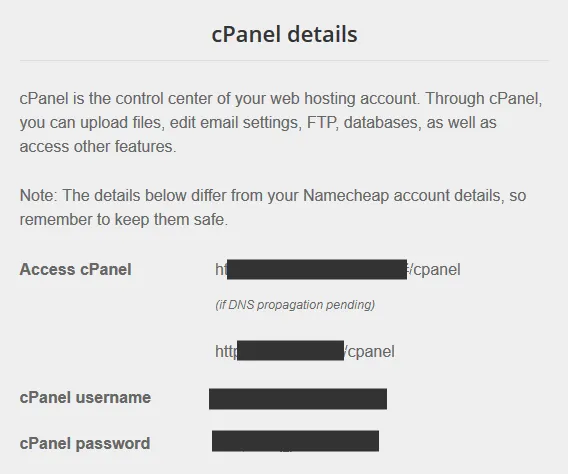
- Namecheap will send you a Welcome Email with the details of your Hosting Package and cPanel. The Hosting Package details include Hosting Plan name, Main Domain name, Start Date, Server hostname, and IP address.
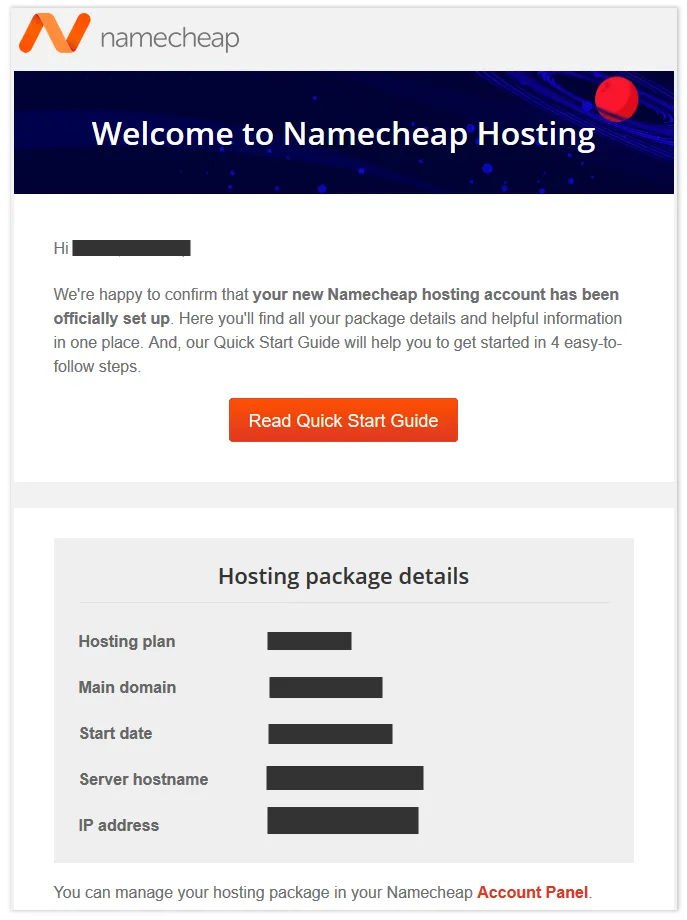
CPanel (Control Panel) is the control center of your hosting account where you can upload/edit/delete files, add email accounts, edit settings, manage database, take website backups, and much more.
- The cPanel details include: cPanel URL, cPanel username, and cPanel password.
- The information i.e. Hosting Plan name, Domain Name, cPanel username, and cPanel password will also be used in the below steps while submitting the Hosting Migration Ticket to Namecheap.
1.1 How to Get Support Pin on Namecheap Account
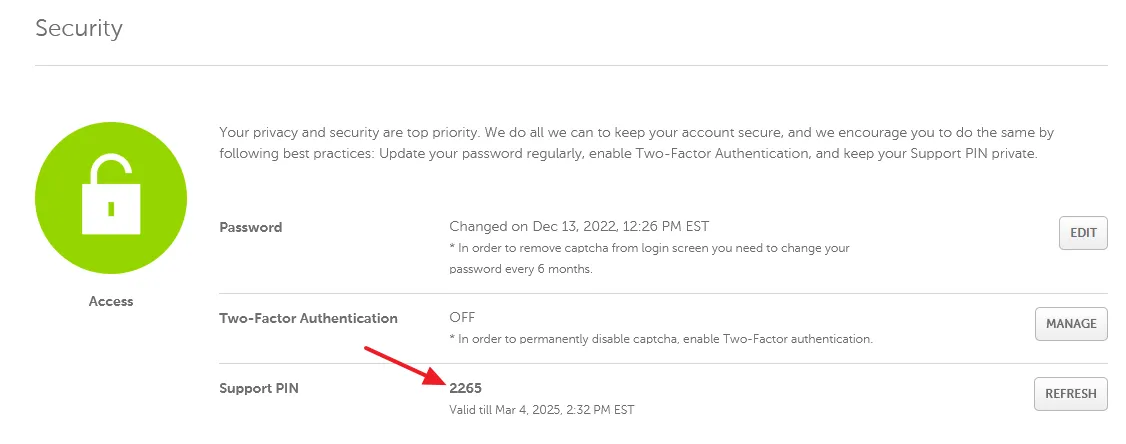
The Support PIN is used to validate your account ownership during the migration process to Namecheap. It ensures secure communication and speeds up request validation when transferring hosting accounts.
You will provide this Support PIN in the hosting migration details, as shown in the next section.
- Go to Namecheap.com and login to your account.
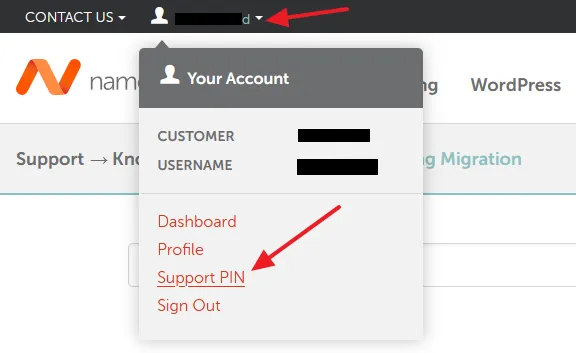
- Click on your Namecheap Username located at the top of the page.
- Click on the Support PIN link.
- Copy the Support PIN. It is a 4 digit number.
1.2 Submit a Hosting Migration Ticket to Namecheap
You have successfully purchased a hosting plan on Namecheap, now it is time to submit Hosting Migration ticket to Namecheap so that they will migrate your hosting account to Namecheap hosting.
- Go to Namecheap Homepage.
- Hover the mouse over Transfer to US tab and click Migrate Hosting.
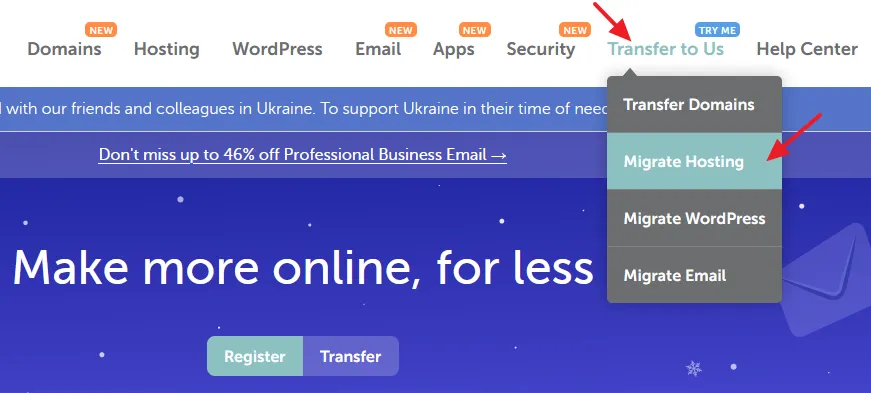
- Click on the Move My Hosting button to open the page that provides you the required information that you have to send to Namecheap’s migration department via this email: hostingtransfers@namecheap.com.
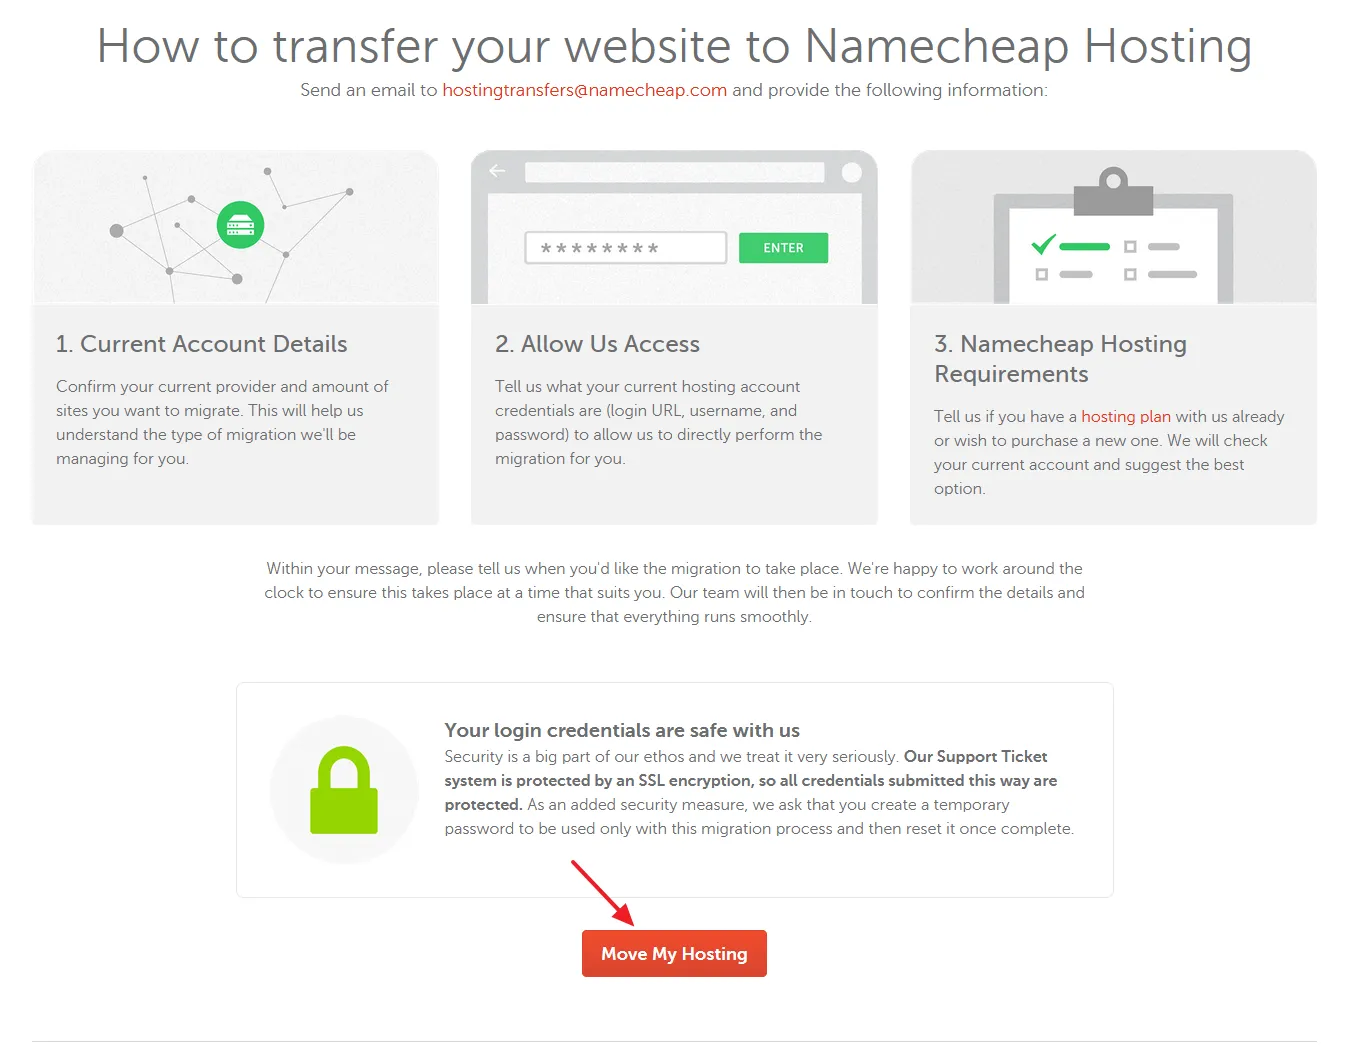
- Create a new email and provide the information that I have shown with the red boxes. To know more, follow the next steps below.
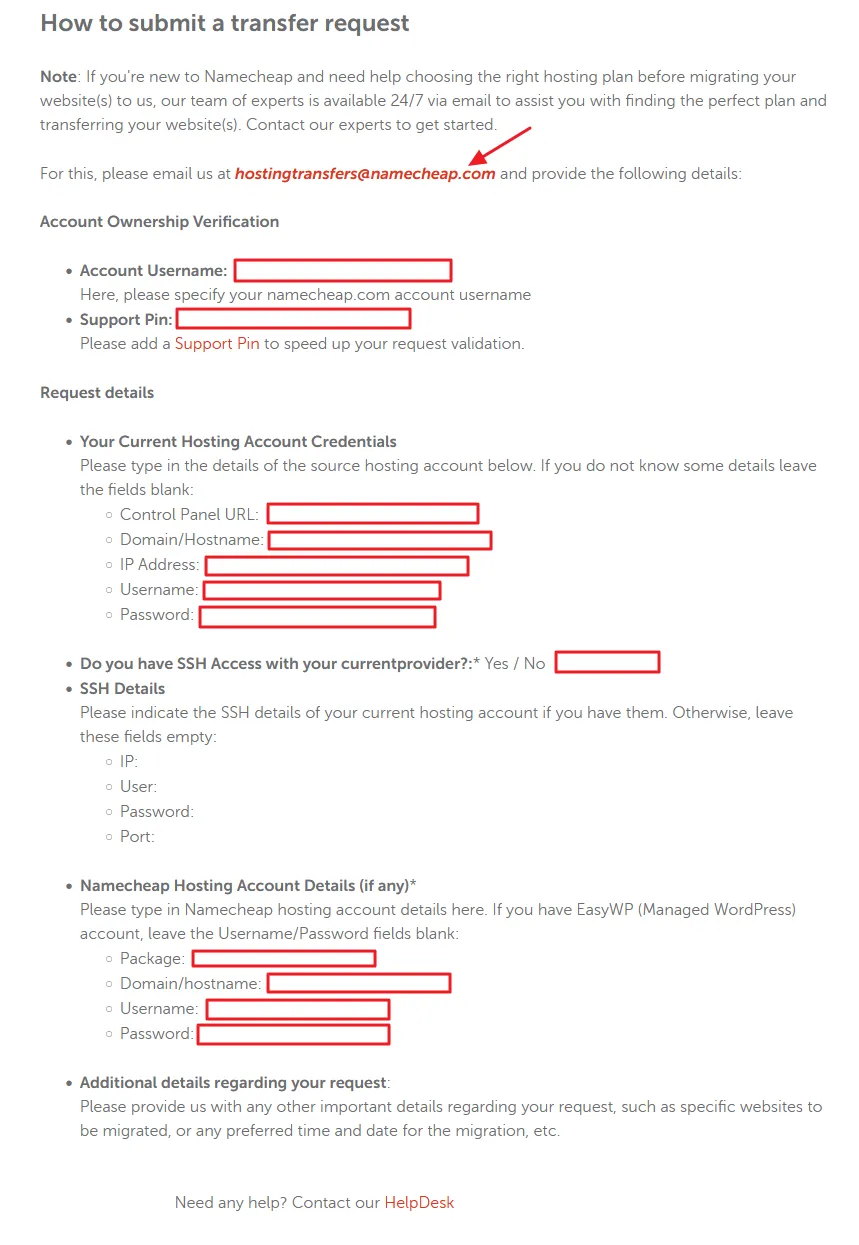
Account Ownership Verification
- In the Account Username enter your Namecheap account’s username that you have created in the first step.
- In the Support Pin paste a support pin to speed up your request validation.
Request details
Your Current Hosting Account Credentials
Provide the cPanel credentials of your current(old) hosting (where your website is hosted) NOT Namecheap’s. Using these credentials Namecheap team will access your cPanel account and migrate your hosting account to Namecheap hosting.
- In the Control Panel URL: paste your cPanel URL.
- In the Domain/Hostname: paste the URL of your domain (website).
- In the IP Address: enter the IP Address of your domain (website). You can find the IP address of your domain via WhatIsMyIP.com. Go to WhatIsMyIP.com and paste the full URL of your domain in the Domain URL field like “https://www.example.com”. It will return your Domain Server IP.
- In the Username: enter your cPanel Username.
- In the Password: enter your cPanel Password.
In Do you have SSH Access with your current provider? Write No.
Leave the SSH Details empty.
Please indicate the SSH details of your current hosting account if you have them. Otherwise, leave these fields empty:
- IP:
- User:
- Password:
- Port:
Namecheap (Destination) Hosting Account Details (if any):*
You have to provide the details of the Namecheap Hosting that you have purchased.
- In the Package: enter the name of your hosting plan that you have purchased like “Shared Stellar Plus”, “Shared Stellar”, “Stellar Business”, etc . Namecheap also sends you the name of Package in the Welcome Email.
- In the Domain/hostname enter your domain (website URL) like “example.com”.
- In the Username enter your Namecheap cPanel Username.
- In the Password enter your Namecheap cPanel Password.
Additional details regarding your request
You can write additional details regarding your migration request. You can also mention at what time you want migration to be done.
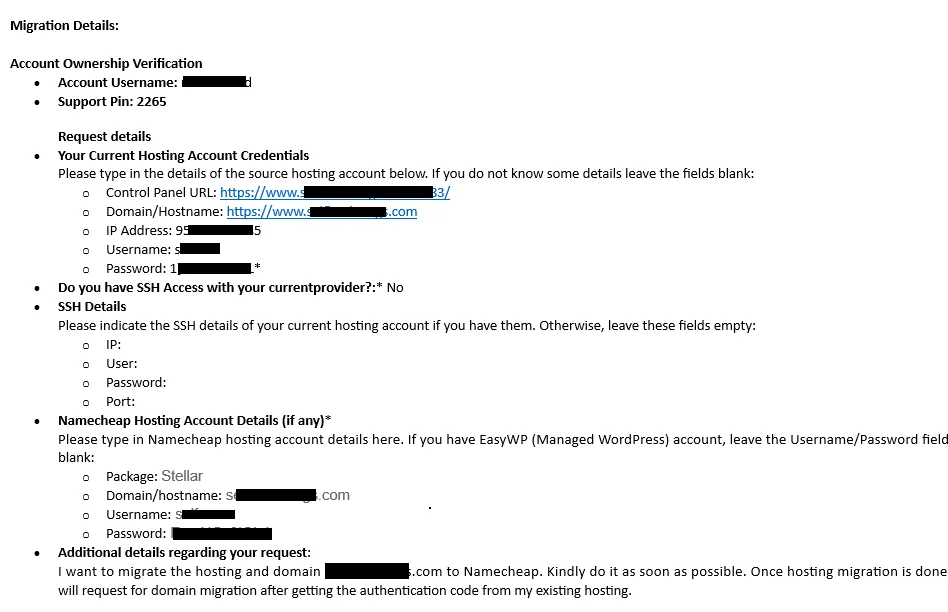
This is how the email looks like:
1.3 Connect Namecheap Hosting to Your Domain
Once the migration is done you will receive two emails from Namecheap (1) Email containing your Namecheap cPanel’s updated Username and Password (2) Confirmation email that your hosting account has been restored/migrated to Namecheap.
In the second email you will also be asked to finalize the transfer/migration of your Hosting Account by connecting your domain to Namecheap hosting by updating its nameservers, that they will provide you in the email.
What does connecting your domain to Namecheap hosting means? Your hosting account is migrated to Namecheap, but not your domain. Your domain is still pointing to your old hosting account. You can make your domain to point to Namecheap hosting instead of old hosting by updating its nameservers.
The nameservers are primarily used to point your domain name towards your hosting. They also help your website URLs to connect with a server IP address in a human-friendly way.
The Namecheap nameservers will be similar to these:
- dns1.namecheaphosting.com
- dns2.namecheaphosting.com
Login to your current(old) hosting (registrar) where your domain is hosted and update its nameservers with Namecheap nameservers. Every hosting has different settings/method to update domain nameservers. If you don’t know how to update/change nameservers go to your hosting support section and read the relevant documentation.
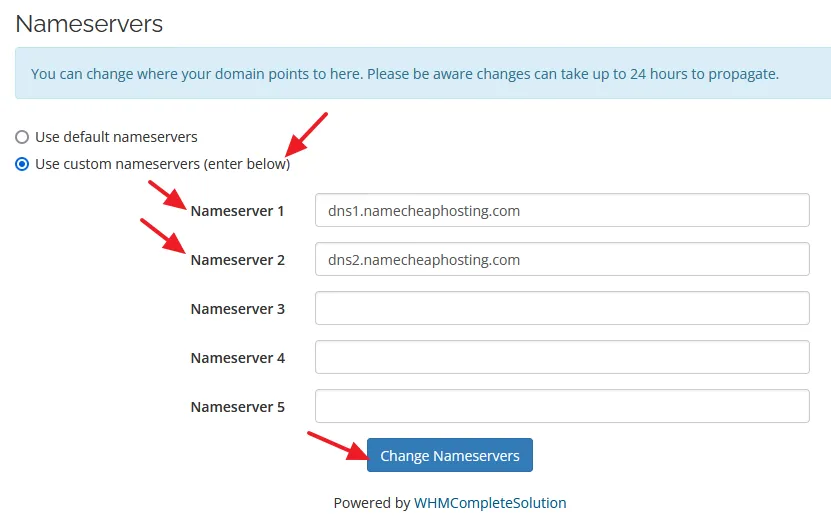
Below, I have shown how to update the nameservers of a domain powered by WHM-powered hosting.
- Login to your old hosting account.
- Click the domain Settings icon.
- Click the Manage Nameservers option.
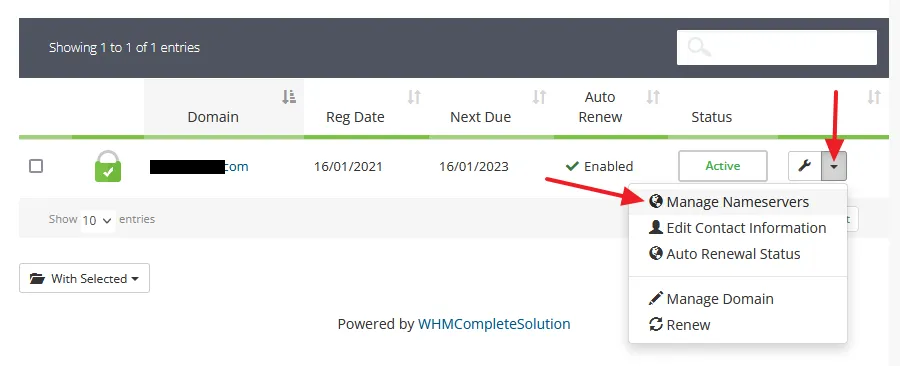
- Select the “Use custom nameservers” option and replace the old nameservers with Namecheap nameservers that Namecheap will provide you in the email.
- Click the Change Nameservers button.
Do remember that it takes sometime for updated nameservers to propagate worldwide. Normally they propagate quickly, within few minutes.
After updating the nameservers send an email reply to Namecheap Support with reference to Ticket ID that you have updated the domain nameservers. They will respond accordingly.
You have successfully migrated your hosting account to Namecheap and connected your domain to it. In the next section, I will guide you on how to transfer your domain to Namecheap.
02. How to Transfer Domain to Namecheap
In this section, I will guide you step-by-step on How to repurchase your domain on Namecheap, and then How to submit a Domain Transfer Ticket to Namecheap.
2.1 Get Domain Authorization Code
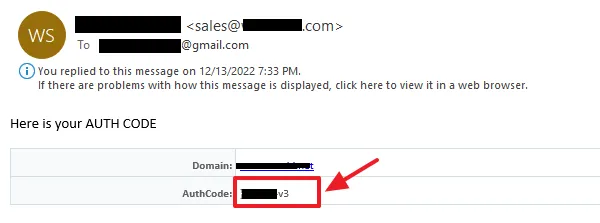
Before you repurchase your domain on Namecheap you have to do two things (1) Unlock your domain (2) Get the authorization code from your current(old) registrar (domain host). The authorization code is used for the security purpose. It verifies that you’re the real owner of the domain.
Send an email to your domain registrar’s Sales Department and ask them to issue your domain authorization code. Once they issue your domain authorization code it will also be unlocked. The authorization code will be used in the next section.
2.2 Repurchase Your Domain on Namecheap
Since you have unlocked your domain and got its authorization code, now it is time to repurchase your domain on Namecheap.
- Go to Namecheap Homepage and SIGN IN to your Namecheap account. If you don’t have a Namecheap account click the SIGN UP link and Create an Account.
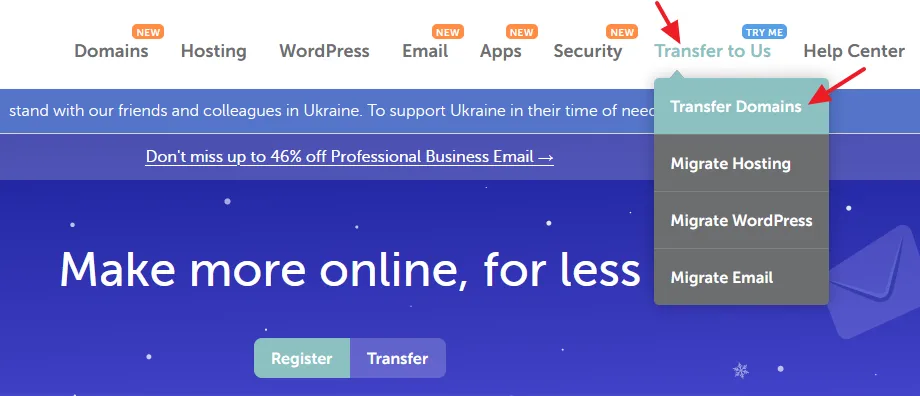
- Go to Namecheap Navigation and hover mouse over Transfer to Us tab.
- Click the Transfer Domains option.
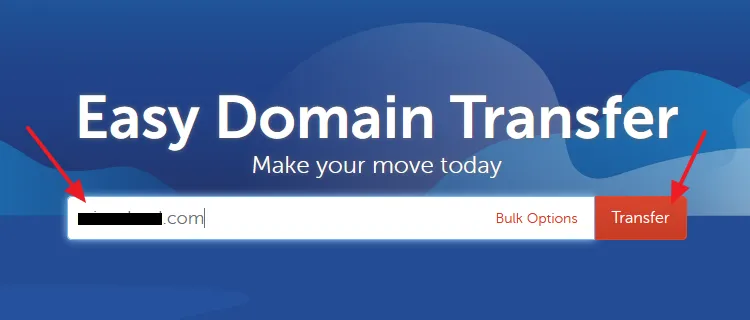
- Enter your domain name like “example.com”.
- Click Transfer.
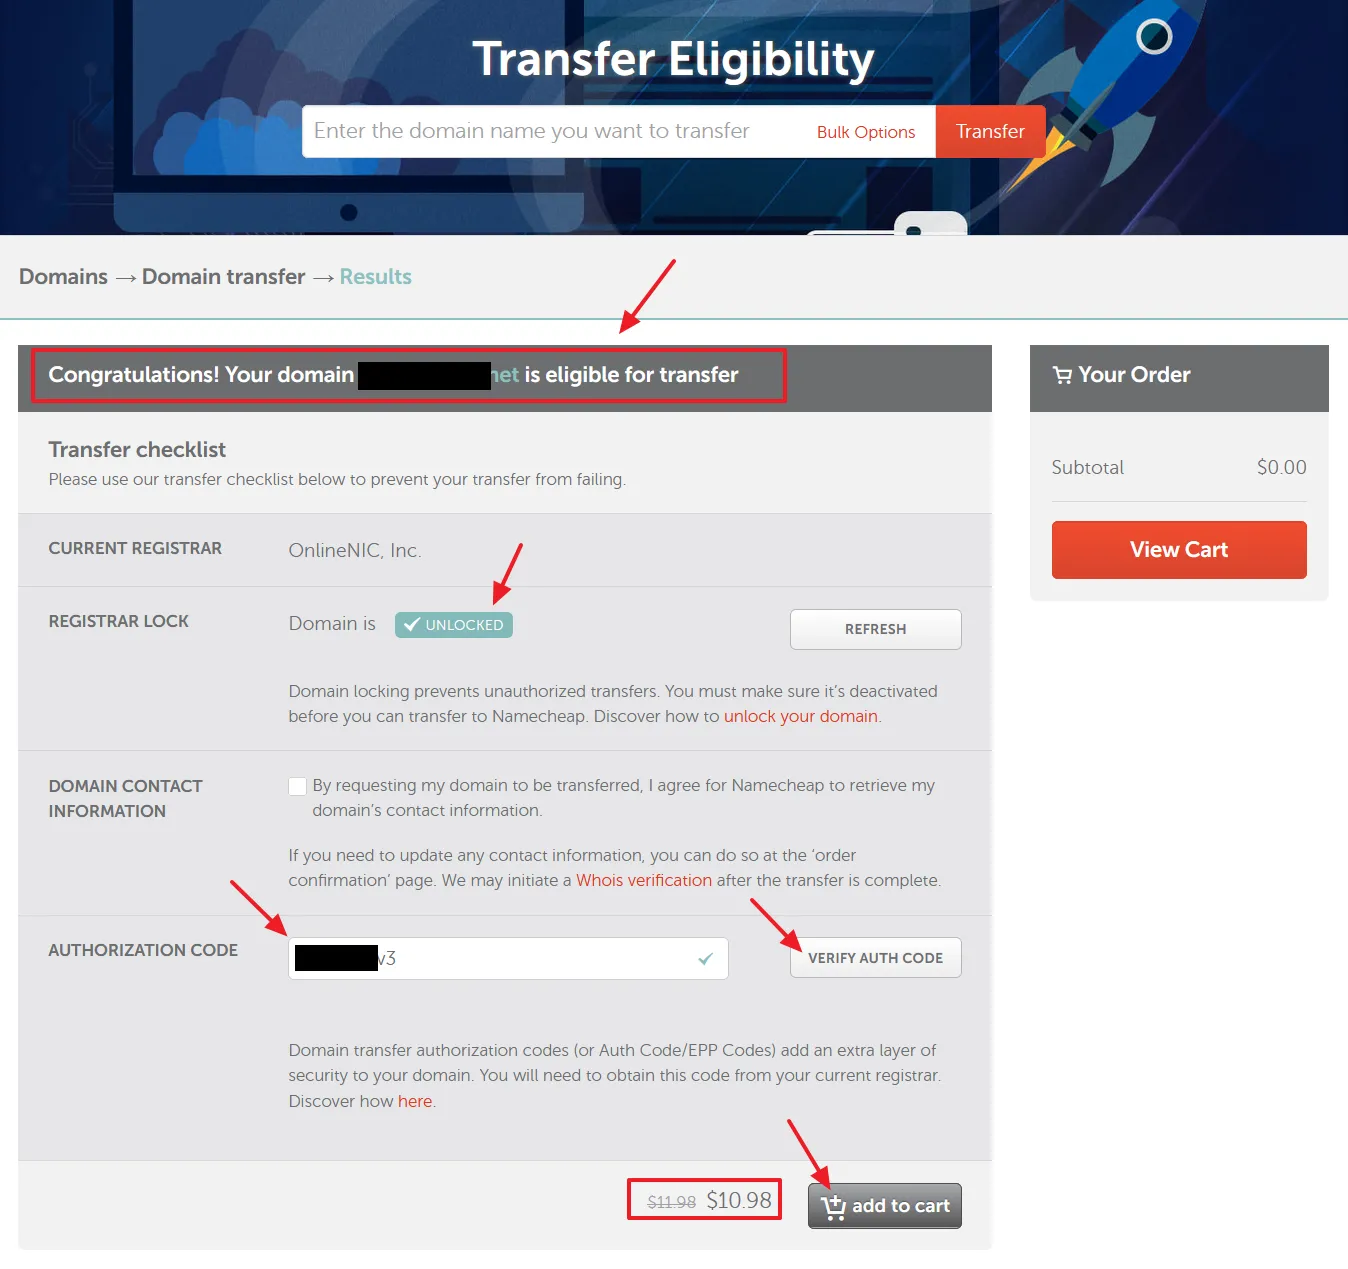
- Namecheap will also verify whether your domain is eligible to be transferred or not. If it is eligible you will see a message, “Congratulations! Your domain example.com is eligible for transfer”.
- The REGISTRAR LOCK tells you the status of your domain whether it is locked or not.
- In the AUTHORIZATION CODE paste/enter the authorization code that you have got from your domain registrar. Click the VERIFY AUTH CODE button. If it is correct you will see a Green Tick. The add to cart button will also be enabled.
- Click the add to cart button.
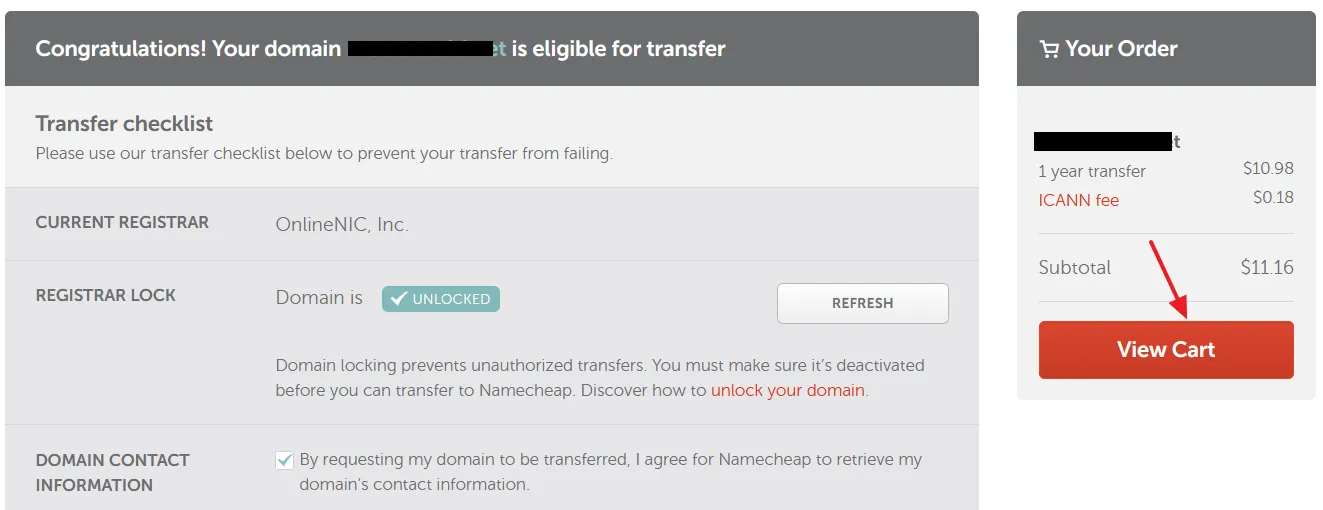
- Click the View Cart button.
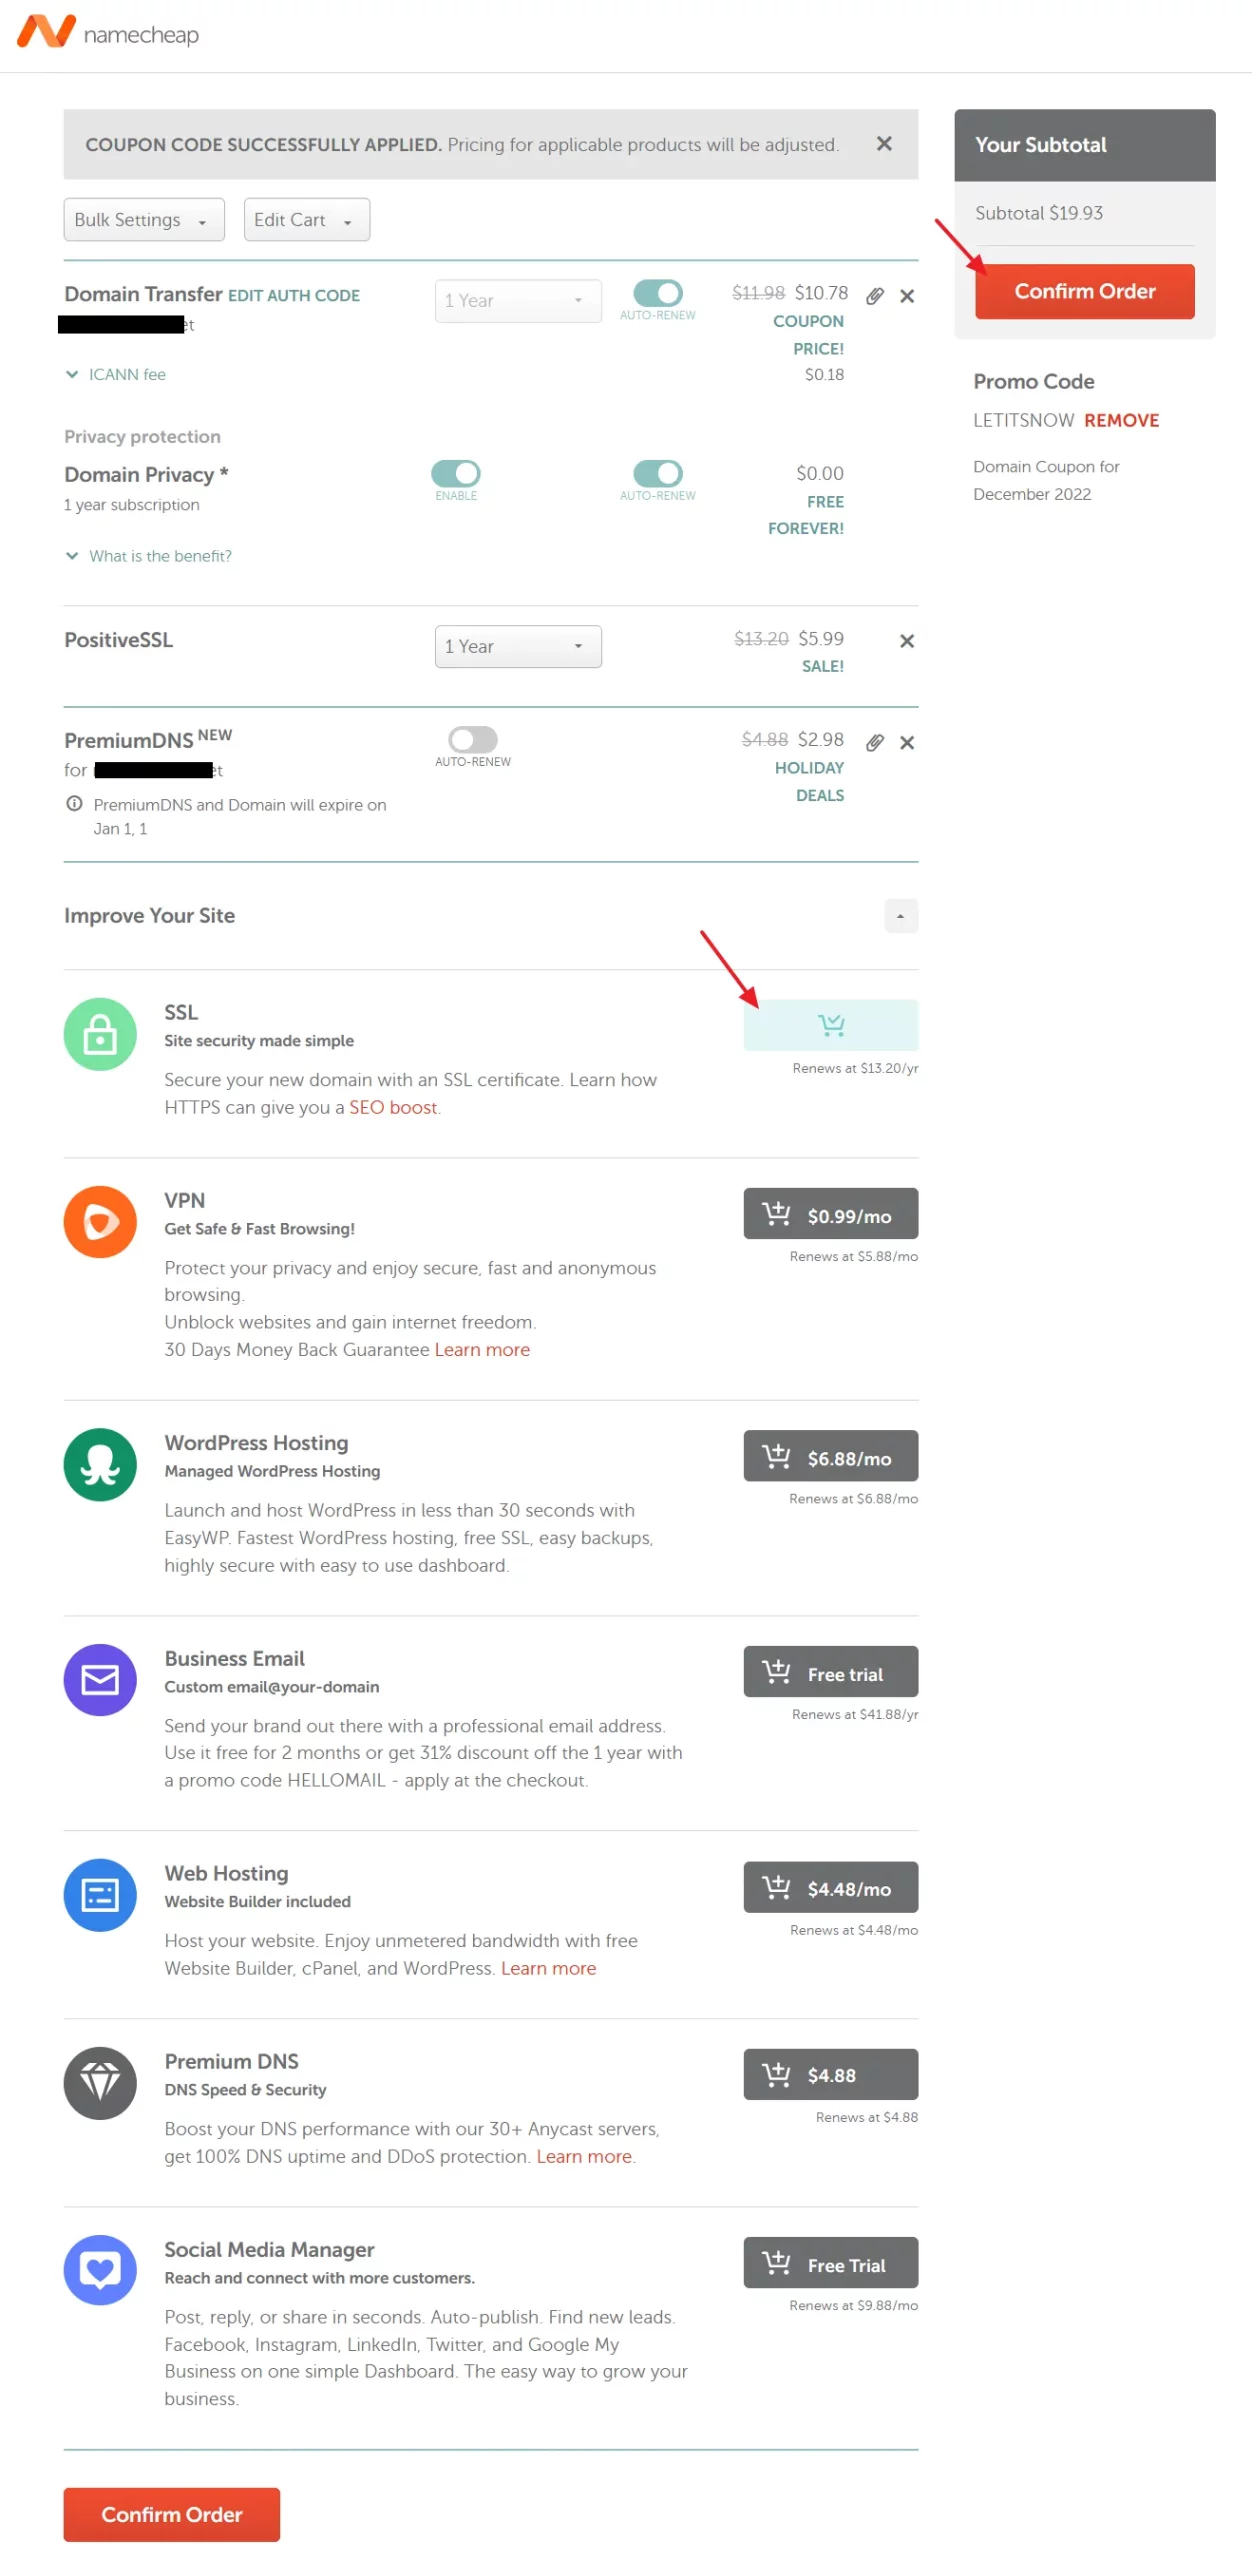
- Enable Domain Privacy*. It is a free service.
- Add SSL and Premium DNS. They are important for the security and speed of your website. Also enable AUTO-RENEW for all the services.
- Find the latest Namecheap Promo Codes and Deals, and add in the Promo Code field, if available.
- Click the Confirm Order button.
- Select a Payment Method and enter the details.
- Click the Continue button.
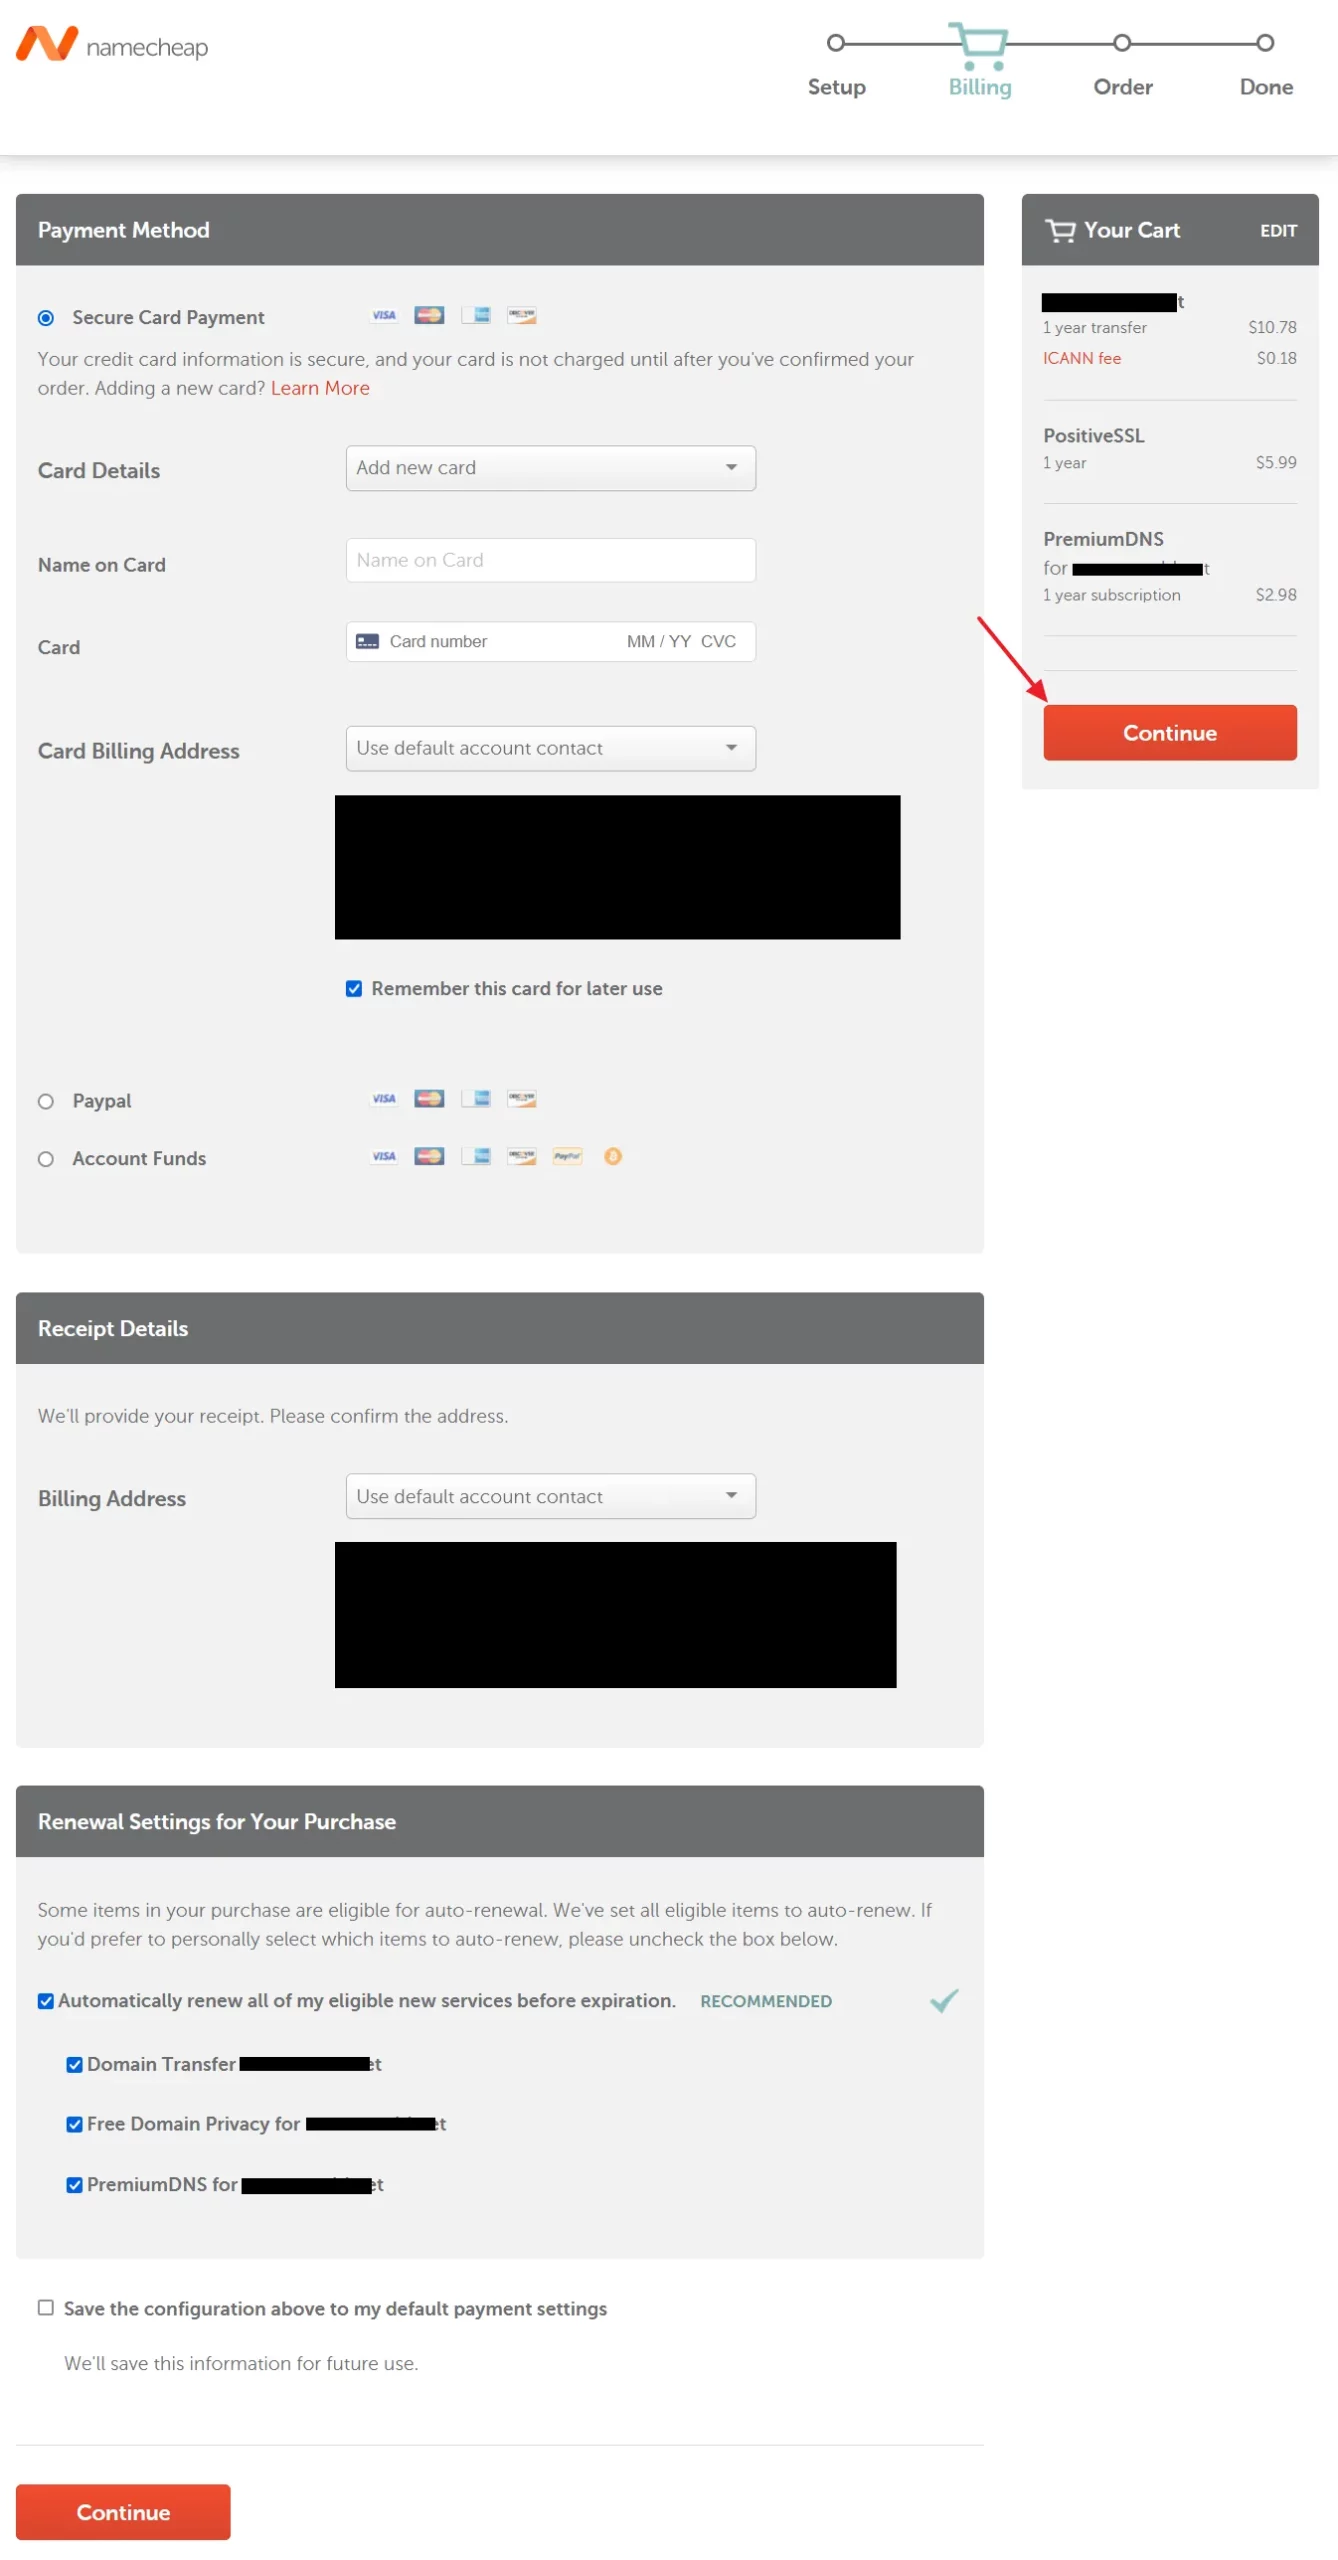
- Click the Pay Now button.
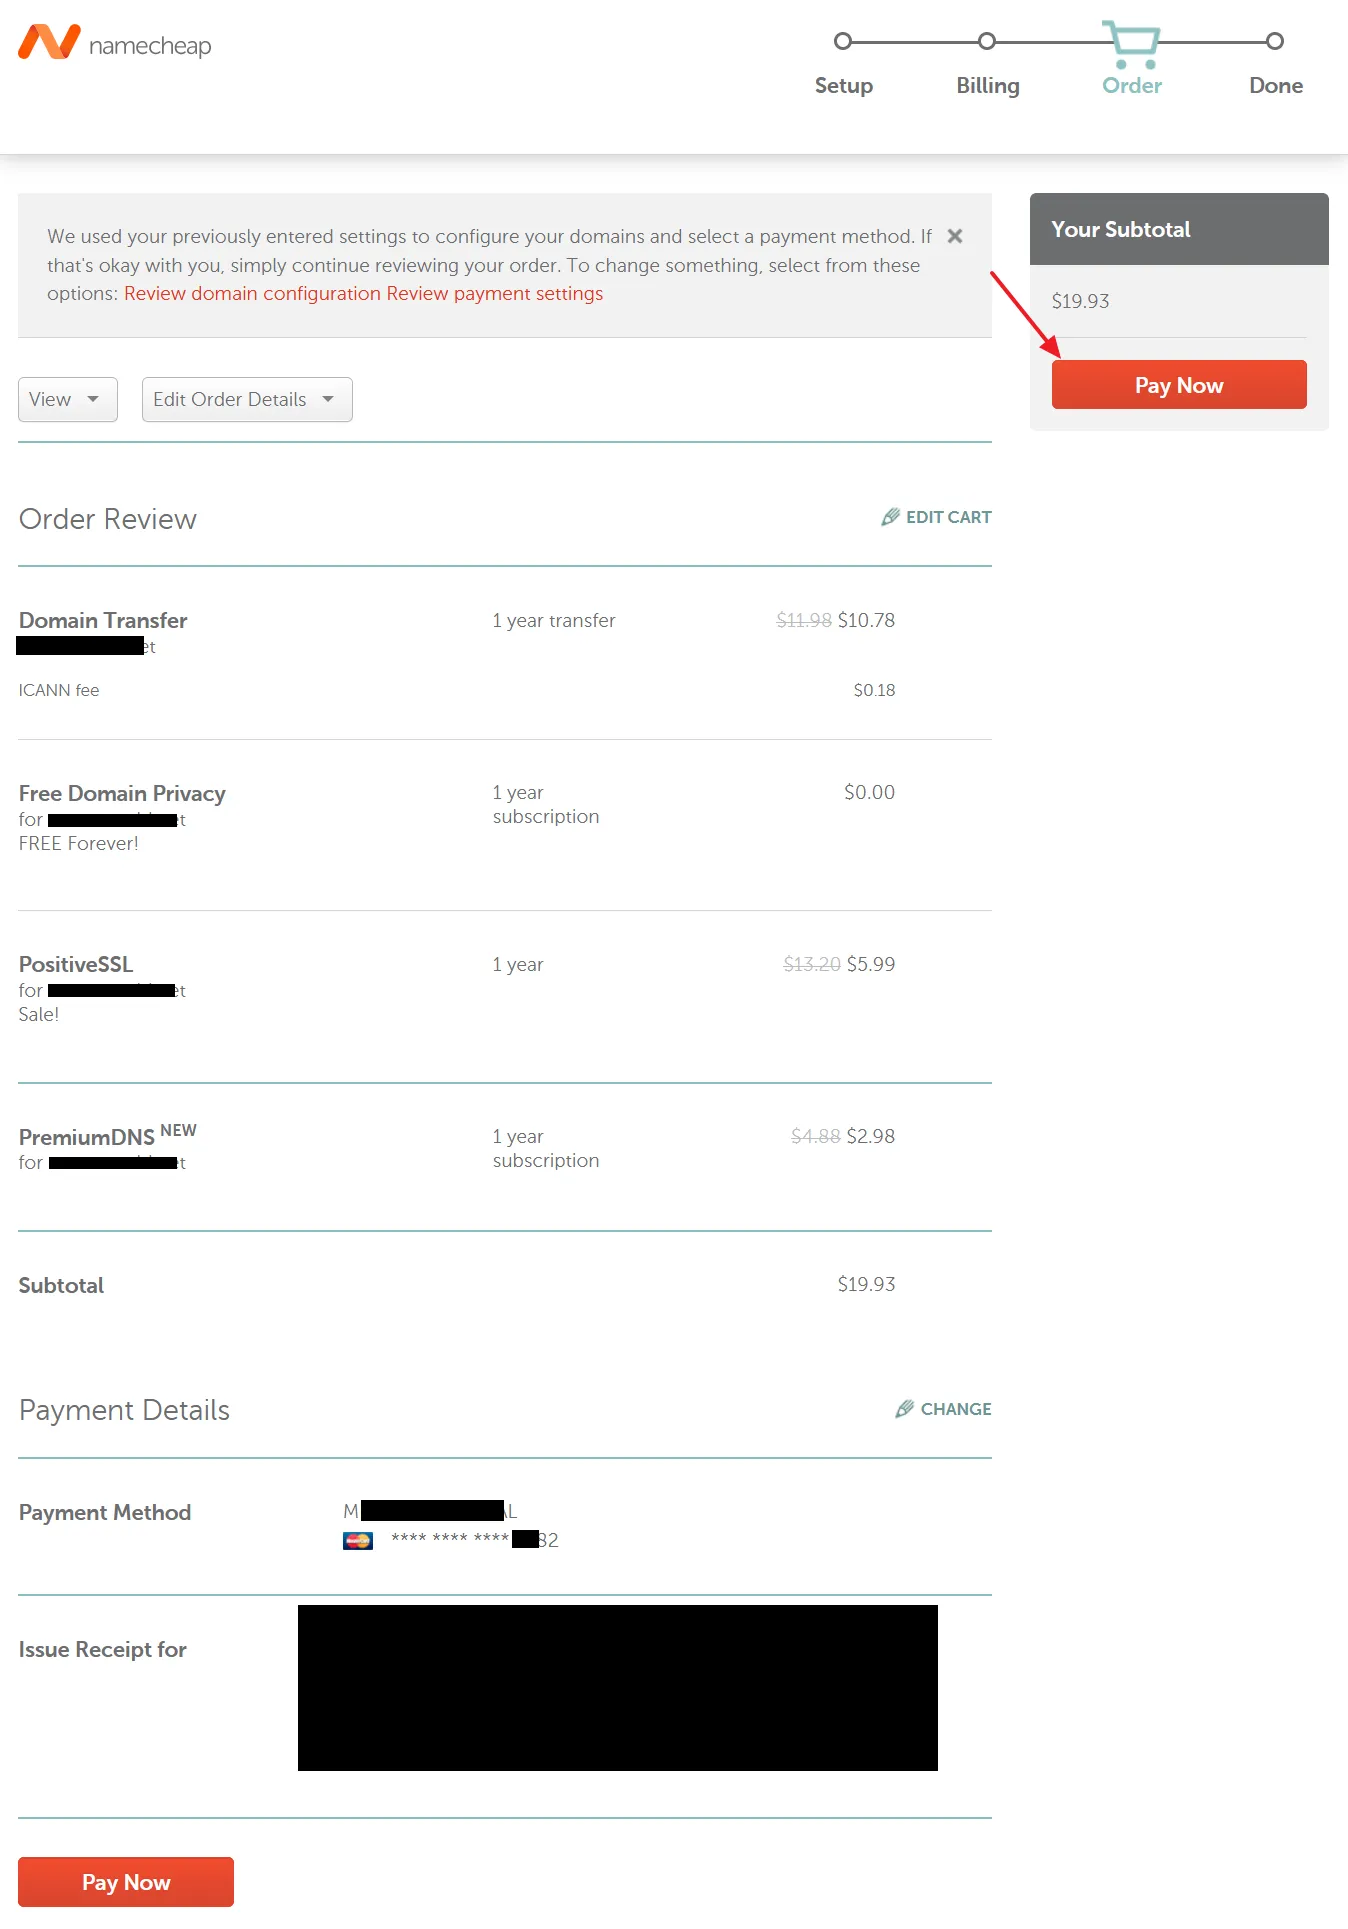
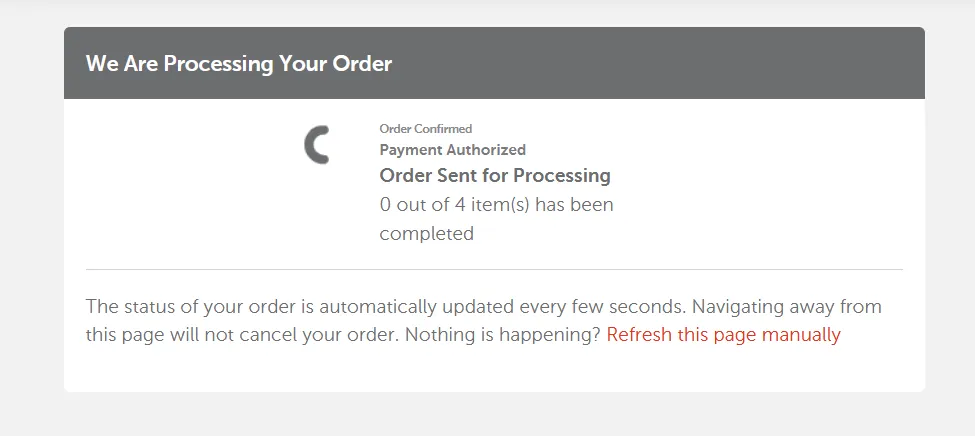
- Your order will be processed.
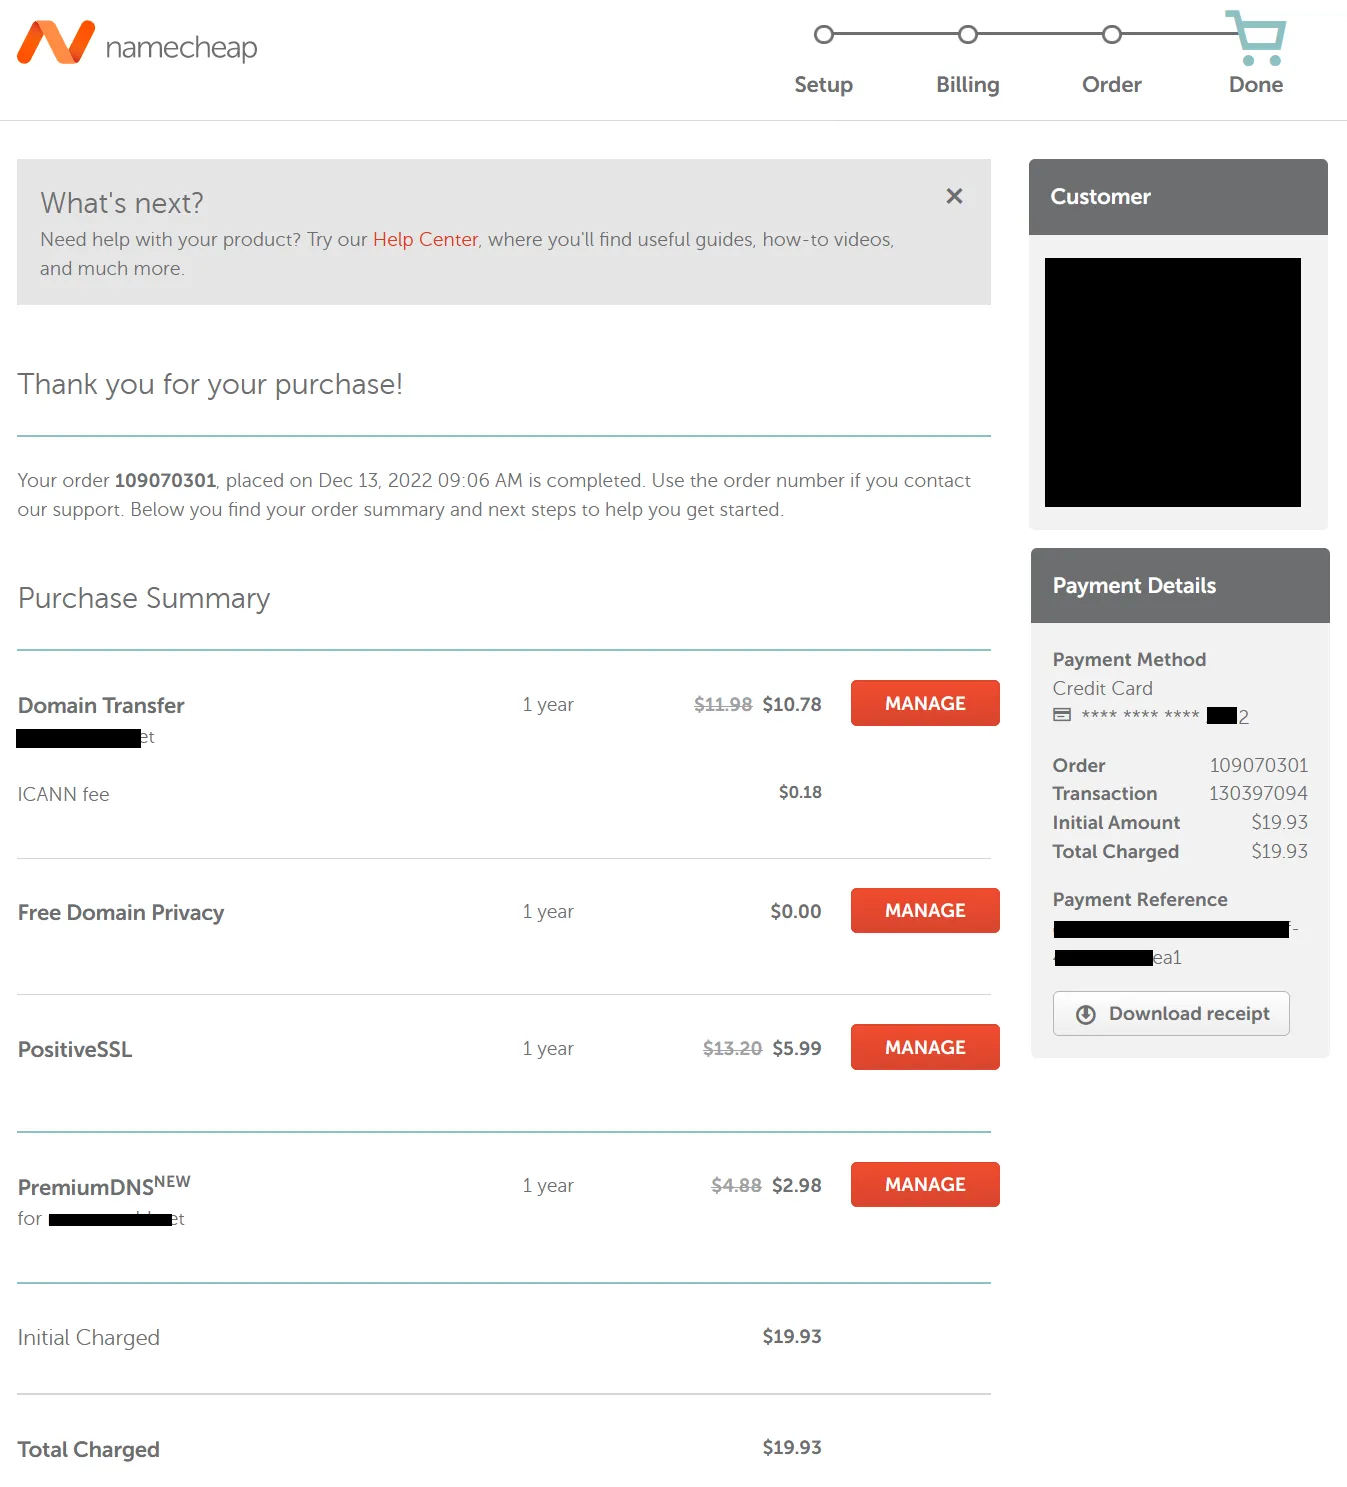
- If your payment is verified, it will show you the Purchase Summary.
- Now go to your Namecheap account and check the status of your domain transfer.
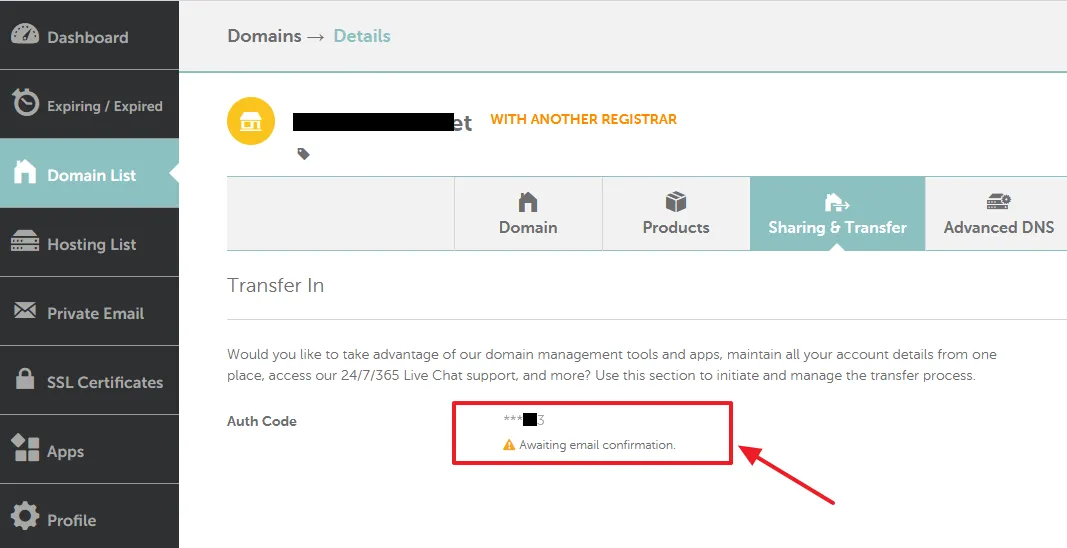
- On the Dashboard and Domain List section you can check the status of your domain transfer.
- Initially you will see a message, “Awaiting email confirmation“. Namecheap sends an email to your domain registrar to release your domain so that it will be transferred to Namecheap.
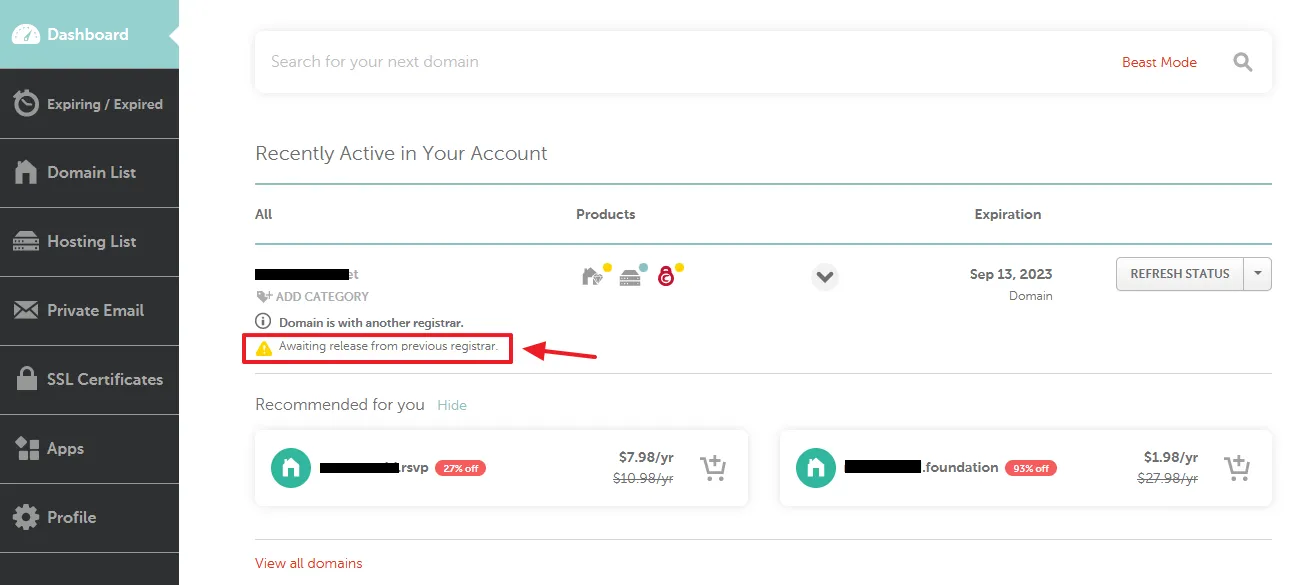
- After your domain registrar confirms the email, the status will be changed, as shown in the next step. Keep in mind that your old registrar before releasing your domain may send an email to confirm that you have requested for the transfer of the domain. If you receive such an email, Approve Transfer.
- After the email confirmation from your domain registrar(host) you can see the message under your domain on Namecheap Dashboard that, “Domain is with another registrar. Awaiting release from previous registrar”.
- It will take 5 to 7 days for your domain to be transferred to Namecheap. Namecheap sends you an email when migration is completed.
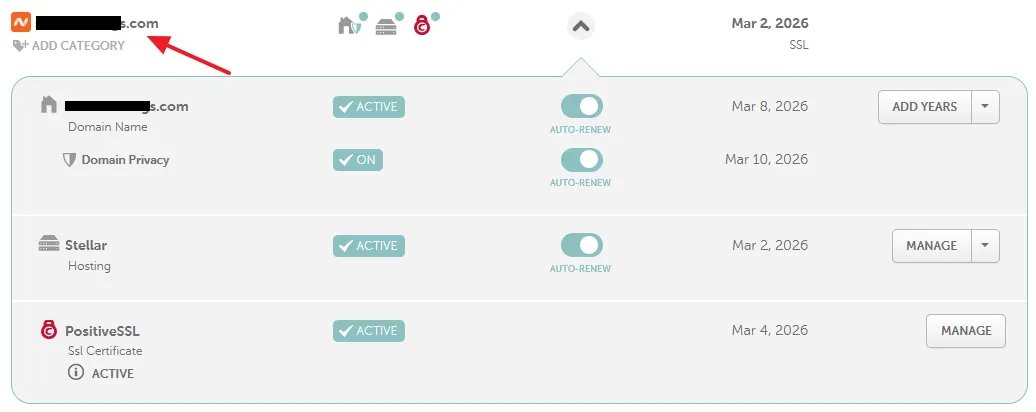
You can see that both domain and hosting are migrated and transferred to Namecheap successfully.
2.3 Things To Do After Domain is Transferred to Namecheap
After your domain is transferred to Namecheap you will get a Congratulation email “Domain Transfer Complete“.
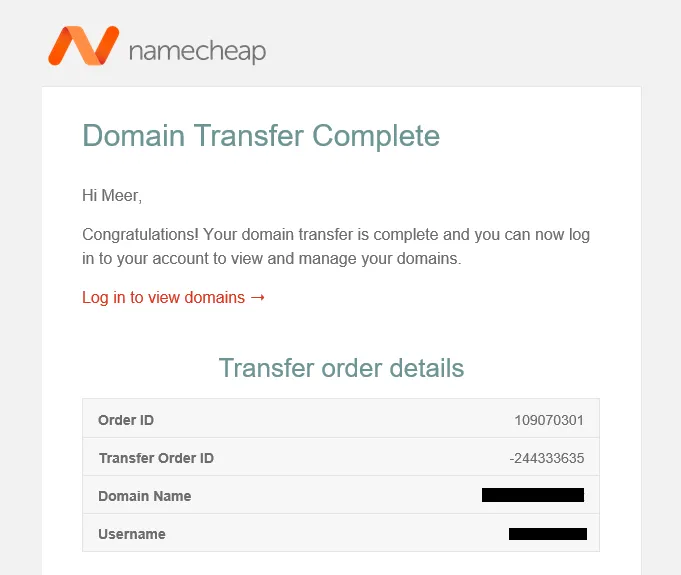
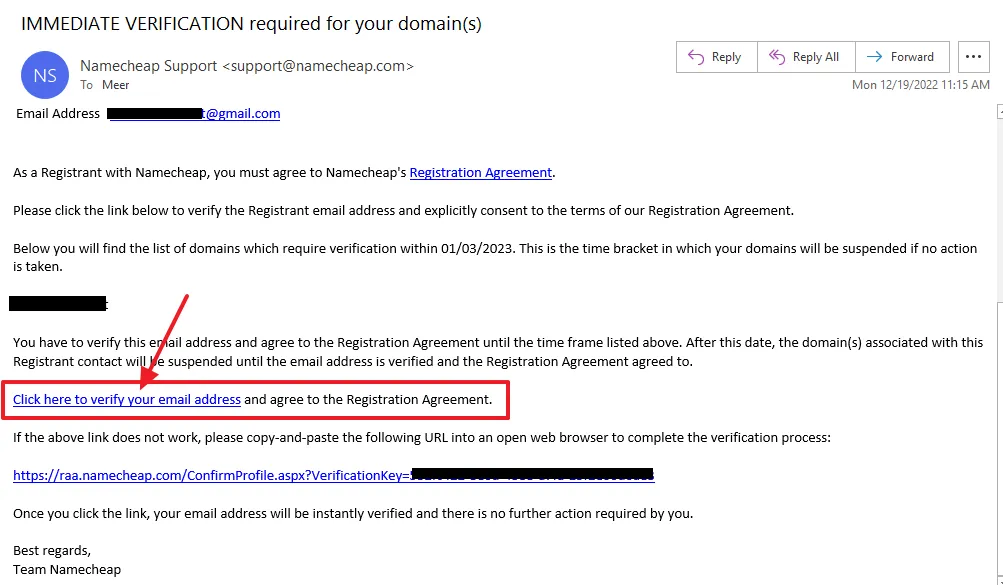
After this email, you may get another email from Namecheap with the title “IMMEDIATE VERIFICATION required for your domain“. You have to verify your email address and agree to the Registration Agreement.
- Scroll-down to the email content and click the link that says, “Click here to verify your email address and agree to the Registration Agreement“. After you click the link your email address will be verified.
Now login to your Namecheap account. You will see a message under your domain, “You have 15 days left to verify contact info“.
- Click the VERIFY CONTACTS button. Your contact info will be verified.
- Refresh the page, the notification under your domain will be disappeared and you will see MANAGE button instead of VERIFY CONTACTS.

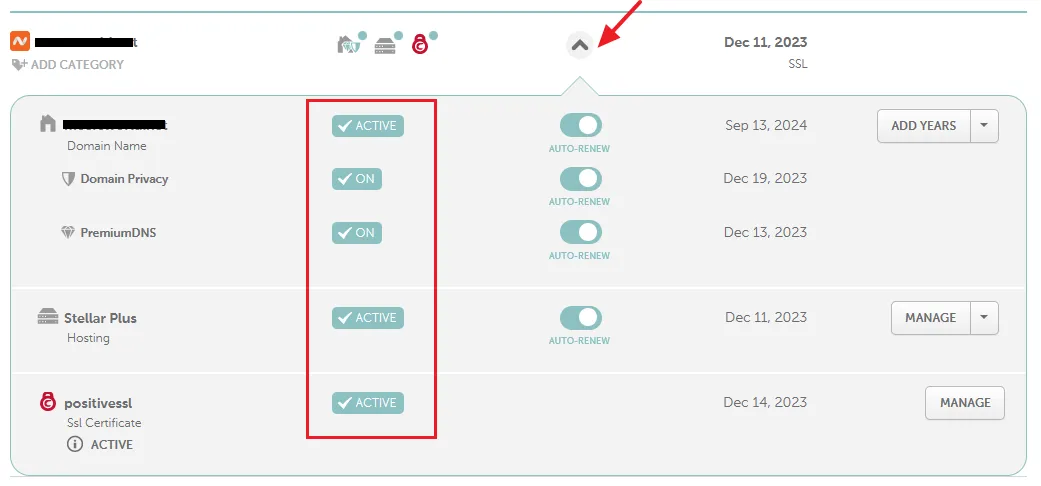
- The last thing you have to do is to activate the SSL(Positive SSL), and Premium DNS (If you have purchased). Contact the Namecheap Live Support and ask them to active SSL and Premium DNS for you.
- Activating Premium DNS can be bit confusing for a non-technical person. Firstly, you have to enable the Premium DNS from your domain’s Manage settings, and then add HOST RECORDS on Advanced DNS by copying them from your Namecheap cPanel (Domain Zone Editor). Read the Namecheap’s guide on activating Premium DNS and add Host Records.
- Below you can see that all the services are activated.
03. Update Namecheap cPanel Username & Password
In the Hosting Migration ticket you have provided the credentials of your cPanel account i.e. Username and Password to Namecheap. Though Namecheap takes care of your privacy, but it is still important to create a new password.
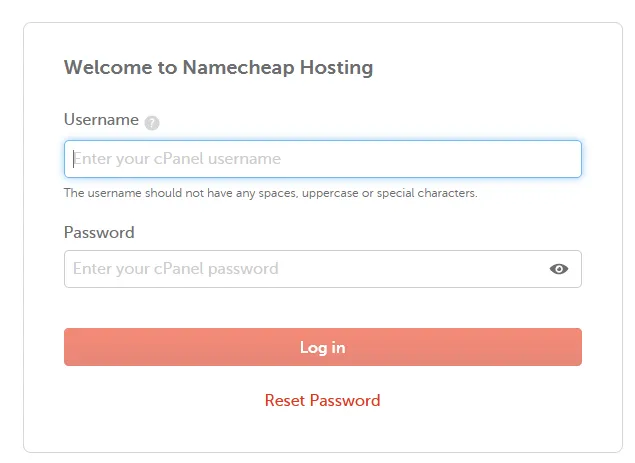
- Login to your Namecheap cPanel account.
- Enter your Username and Password.
- Click the Log In button.
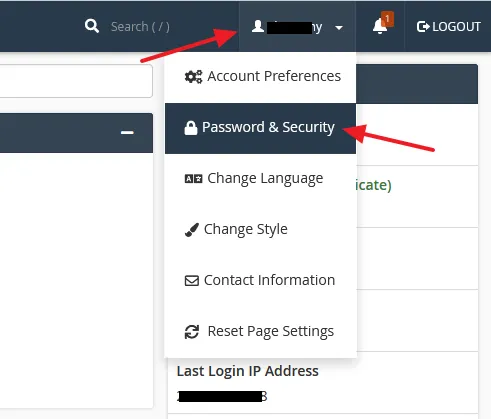
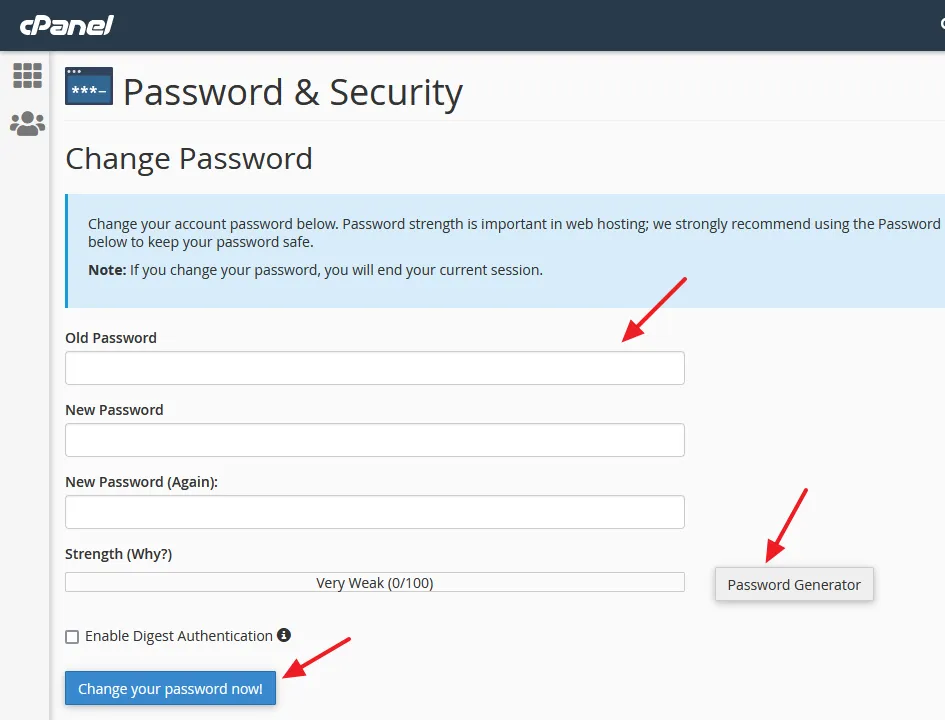
- On your cPanel account go to top-right corner and click the Downward Arrow associated with your Username.
- Click the Password & Security.
- Enter the Old (Current) Password of your Namecheap cPanel account.
- Enter a New Password or click the Password Generator to create a secure new password for you.
- Save the New Password in your computer.
- Click the Change your password now button.
Final Thoughts
So it was all about migrating your hosting and transferring your domain to Namecheap. I hope that this guide would have helped you to do things smoothly with great ease. If you have any confusion or issues related to migration contact Namecheap Support via their Live Chat or submit a Support Ticket.
If you like this post then don’t forget to share with the other people. Share your feedback in the comments section below.
Also Read
- How to Download & Restore Website Backup in cPanel
- How To Install WordPress In Namecheap Using Softaculous Tool
- How To Create Email Account In Namecheap cPanel | Access Webmail
- How To Show Google Analytics In WordPress | Site Kit By Google
- 5 Essential WordPress Plugins That A New Website Needs
- How to Export WordPress Posts With Images to Another Site



Leave a Reply