Do you want to migrate your custom domain Blogger blog to WordPress completely, with great ease? You’re in the right place.
In this tutorial, I will guide you step-by-step on how to migrate your custom domain Blogger blog to WordPress, the ultimate blogging platform.
It does not matter whether you are an expert or beginner, this guide is for everyone. Person having no knowledge about WordPress can easily migrate his custom domain Blogger blog to WordPress.
As you know that Blogger is a free blogging platform, powered by Google. When you create a blog on Blogger it gives you a subdomain of “blogspot.com”. Few years back Blogger introduced a new feature to enable Blogger users to redirect their subdomain to a custom domain, because blog with a custom domain always looks professional.
The migration process will import following things from Blogger to WordPress:
- Posts
- Comments
- Labels
- Media(Images)
- Permalinks(Post URLs)
- Authors
- RSS Feeds
Remember that WordPress does not have compatibility with the Blogger themes, the Import Process will not import your Blogger theme to WordPress. You have to use a new theme for your WordPress blog.
In addition to Blogger-themes, Import Process does not import Blogger Pages and Widgets to WordPress. You have to manually create pages in WordPress and copy their content from Blogger. Every blog has few pages, like About Us, Privacy Policy, Contact Us, etc, so it is not a big deal to manually add pages on WordPress.
RELATED:
If you want to migrate your Blogger blog with “.blogspot.com” domain to WordPress, read this tutorial:
Following topics will be covered in this tutorial, follow them in the sequence.
- Custom Domain and Web Hosting
- Export Blogger Content
- Delete CNAME & A Records
- Delete Custom Domain On Blogger
- Install WordPress
- Import Blogger Content In WordPress
- Configure Permalinks Settings
- Script For Mismatch Slugs
- Import Blogger Images Completely
- Redirect Blogger URLs End With “?m=1”
- Redirect RSS Feeds
- Can You Delete Blogger Blog After Migration
- Professional WordPress Themes
01. Custom Domain and Web Hosting
In the migration process you must use the same custom domain that you have used to redirect your Blogger blog. If you haven’t bought web hosting for that custom domain yet, visit your domain registrar(hosting company) and buy web hosting.
Domain registrar is the hosting company from which you bought your domain. Some of the popular domain and hosting companies are Namecheap, Bluehost, Hostgator, GoDaddy, Siteground, etc.
Once you buy web hosting you will get your cPanel account link and credentials. cPanel account is the place where you install WordPress, create email accounts, manage domains, create & manage databases, view resource usage, control all your website activities, and more.
If your domain registrar is Namecheap you can go through this tutorial to learn how to buy domain and web hosting:
- How To Buy Namecheap Domain & Web Hosting – Step By Step.
- How Much Monthly Bandwidth Is Required For Website Visitors
02. Export Blogger Content
In this section, I will guide you on how to export your Blogger content. Export on Blogger is done by taking the backup of your content.
- Login to your Blogger account.
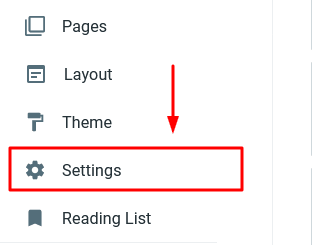
- Click “Settings” from the sidebar.
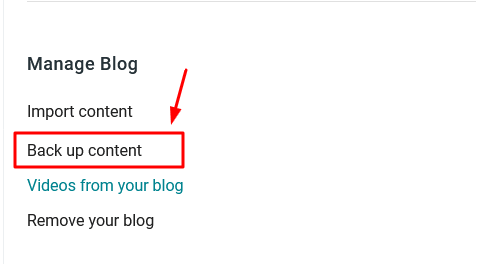
- Scroll down to “Manage Blog” section and click the “Back up content“.
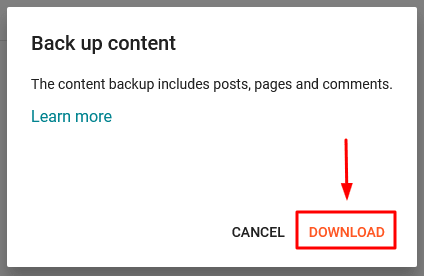
- A popup box will ask you to “Back up content”, click the “Download” to save the backup on your computer.
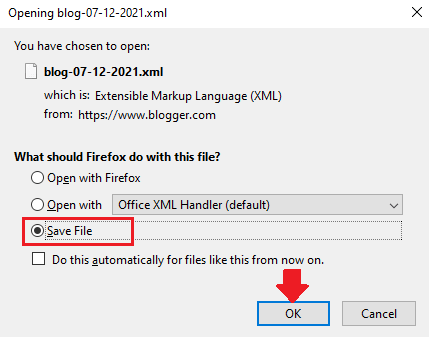
- Choose “Save File”.
- Click the “OK” button.
- Save the backup on your computer. Blogger saves Back-up in an XML file. The name contains the word “blog” and current date like “blog-07-12-2021.xml”.
03. Delete CNAME & A Records
In this section, I will guide you on how to identify and delete the CNAME & A Records from your domain’s DNS Settings.
When you redirect your Blogger blog to a custom domain Blogger asks you to add two CNAME Records on your domain’s DNS Zone File or DNS Settings. There are two reasons for that (1) To verify that you’re the owner of the custom domain (2) To map your Blogger domain to your custom domain.
The A Records are added in the DNS Settings to redirect custom domain to “www”.
Following are those 4 A Records:
- @ 3600 In A 216.239.32.21
- @ 3600 In A 216.239.34.21
- @ 3600 In A 216.239.36.21
- @ 3600 In A 216.239.38.21
You must have a recall, now it is time to delete those CNAME and A Records because you don’t need them anymore.
Follow the steps to delete CNAME and A Records from DNS Zone Editor on your cPanel account.
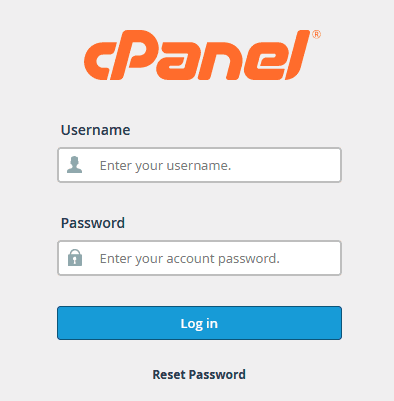
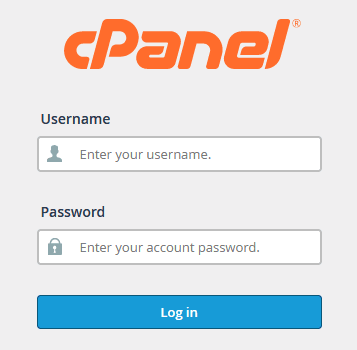
- Login to your cPanel account. The link to cPanel account, Username and Password are provided to you by your web hosting provider.
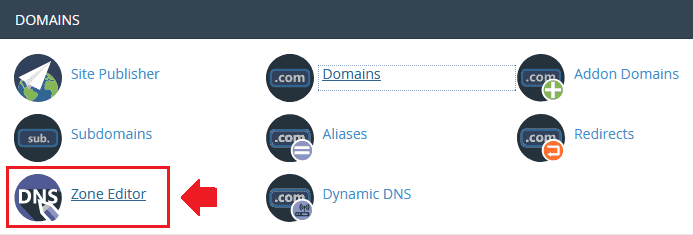
- Under the DOMAINS section, click the “Zone Editor“.
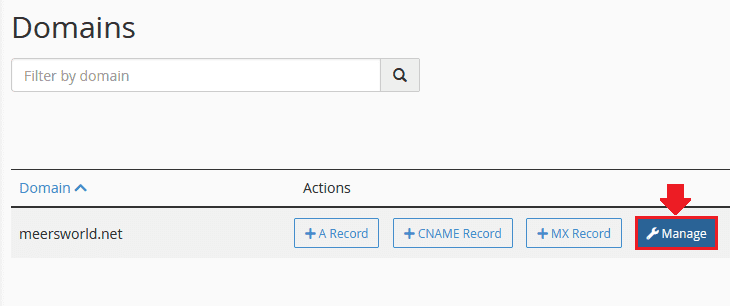
- Click the “Manage” button.
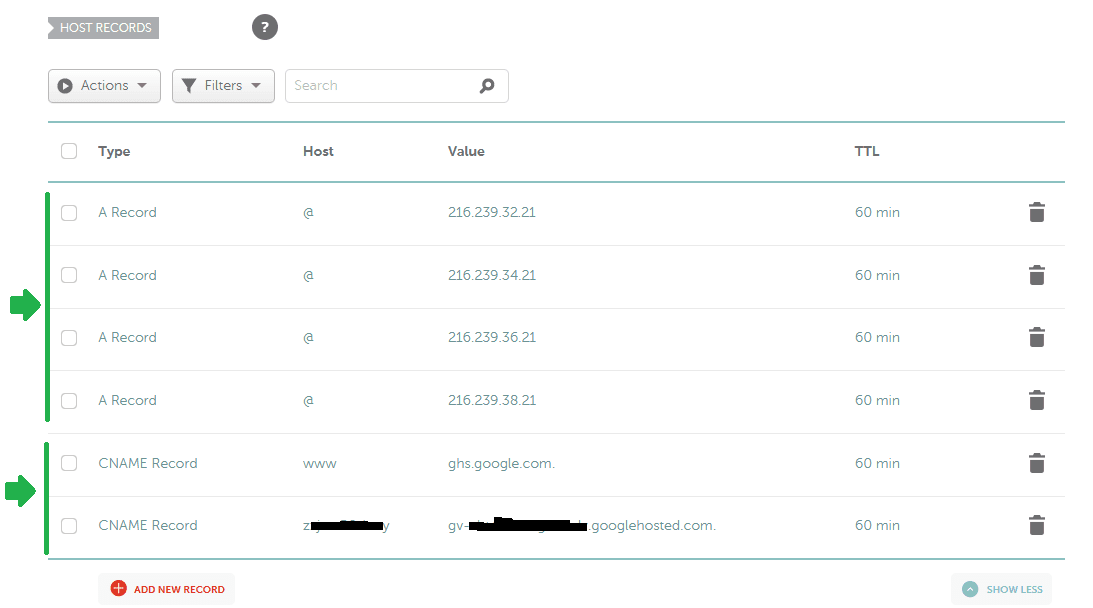
- Delete both the CNAME Records. First CNAME Record is [“www”, “ghs.google.com”], which is same for everyone. The second CNAME Record will be something like [“xcvnyreu”, “gv-hjyrfkllkj.googlehosted.com”], which is unique for each user, but you can judge from its end part “googlehosted.com”, which is same for all.
- If you had added 4 A records as I have listed above, delete them as well. Remember that not everyone adds A Records during the “Blogger to custom domain redirection” process, so if you don’t find A Records, don’t worry.
You’re done with deleting CNAME and A Records. Here you have to look for one more thing i.e. Nameserver Settings.
The nameserver points domain name to the company that controls its DNS settings.
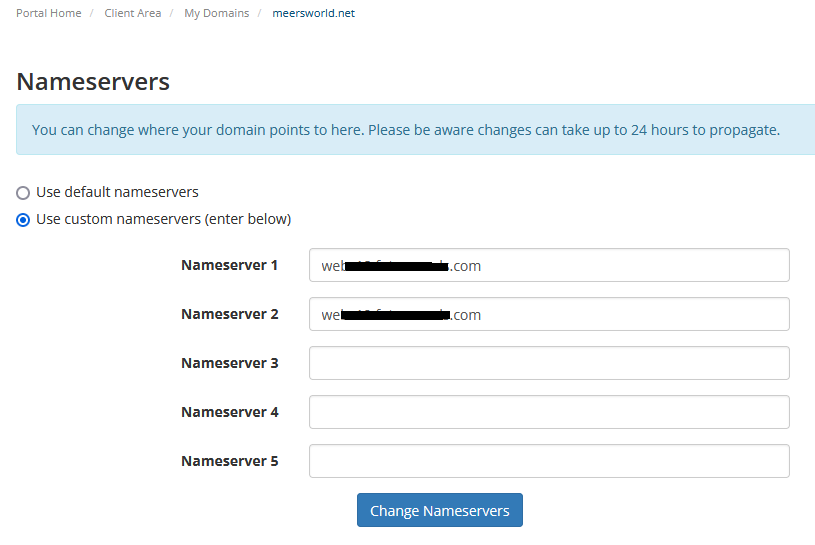
When you buy web hosting you are provided with two nameservers that are already configured in your Nameserver Settings. If you have changed your nameservers previously then update them, and if you haven’t changed you don’t need to do anything.
- Go to Domain DNS page again, find Nameservers section and click “Manage” or “Manage Nameservers“. On some hostings you can find the “Nameserver Settings” by logging into your Client Area.
- Make sure “Custom” or “Custom nameservers” option is selected. Compare the nameservers with the nameservers that your web hosting provider has provided to you. They must be same.
04. Delete Custom Domain On Blogger
Now it is time to free your custom domain from your Blogger blog.
- Login to your Blogger account.
- Scroll down to “Publishing” section and click the “Custom domain“.
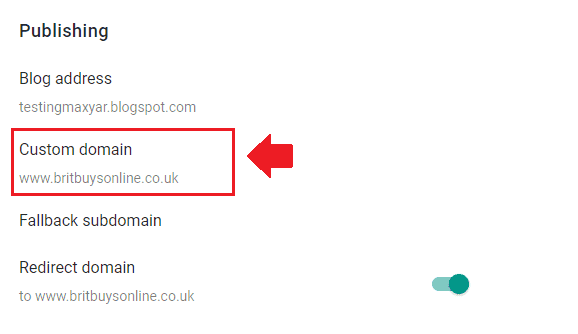
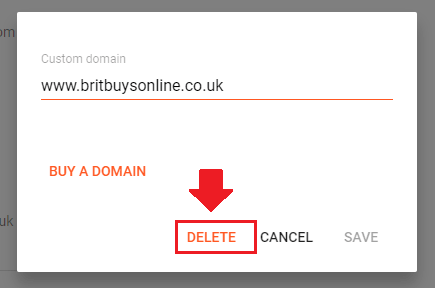
- Click the “DELETE“.
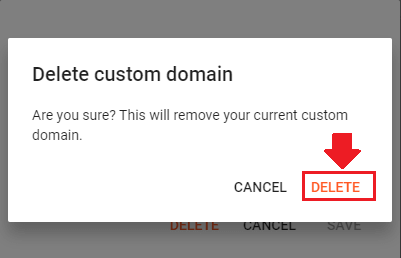
- It will ask your for the confirmation, “Are you sure? This will remove your current custom domain”.
- Click “DELETE“.
05. Install WordPress
Since you have purchased a web hosting, you’re ready to install WordPress on your cPanel account. Majority of your cPanel accounts offer an advanced tool called Softaculous, which helps you to install WordPress quickly with great ease.
Once you install WordPress you will be able to login to your WordPress admin section, from where you can manage your WordPress blog.
I have created a separate tutorial that guides you step-by-step on how to install WordPress using the Softaculous Tool.
06. Import Blogger Content In WordPress
In this section, I will guide you on importing your Blogger content(backup) to WordPress.
- Login to your WordPress admin section. You can access your WordPress admin via the URL https://www.Your_Domain.com/wp-admin/. Replace “Your_Domain.com” with your domain name.
- Go ahead and click “Tools” from the sidebar.
- Click “Import“.
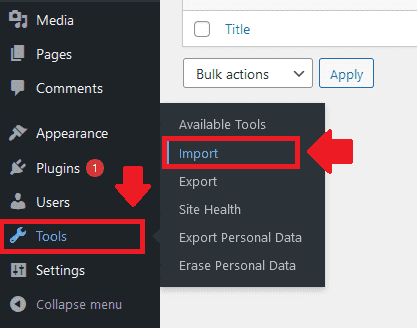
- Under the “Blogger” section, click the “Install Now” link.
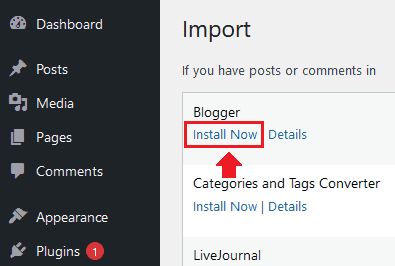
- Click the “Run Importer” link.
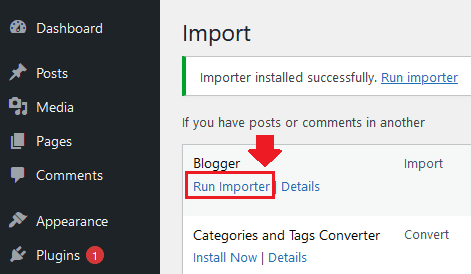
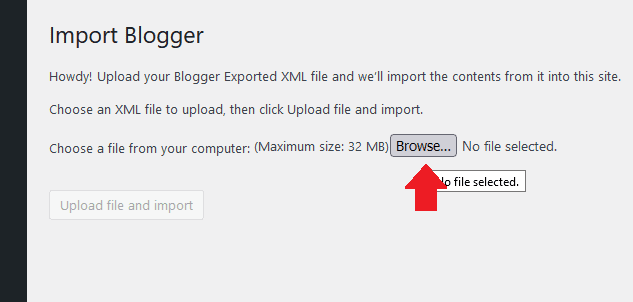
- To load the Back Up file of your Blogger blog, go ahead and click the “Browse” button. It is the same Back Up File that you have created in the section “Export Blogger Content” above.
- Note: Here you can also see “Maximum size: 32 MB”. It means that you cannot upload XML file if its size is more than 32 MB. If you try to upload, you will get this error: “The uploaded file exceeds the upload_maximum_filesize directive in php.ini”. The default “Maximum Size” varies from hosting to hosting. It could also be 16 MB, 128MB, etc.
In case the “maximum size” of your XML file is more than the maximum limit, you’re needed to change the “Maximum size” for your uploads. Read this tutorial:
- Select your Blogger Back Up File from your computer and click the “Open” button.
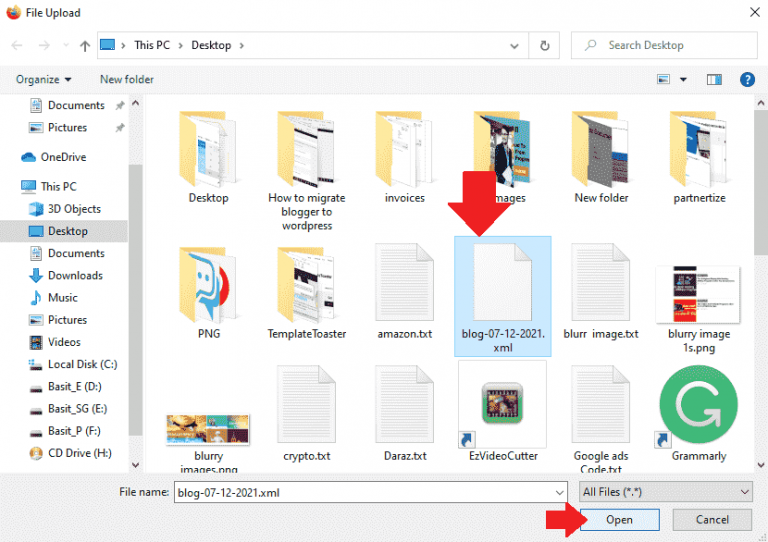
- The Back Up file will be uploaded on your Import Blogger page. Now click the “Upload file and import” button.
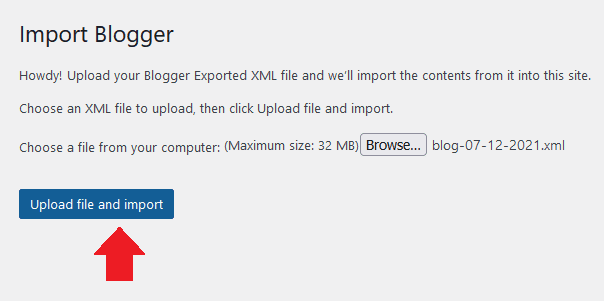
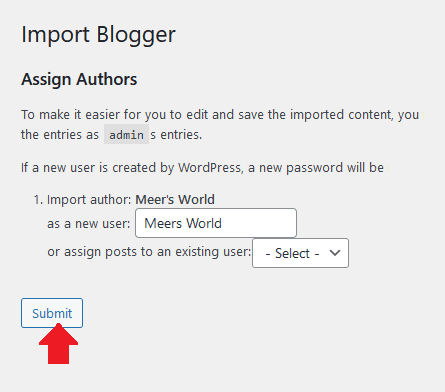
- Next it will ask you to Assign Authors to your imported content. You can assign content to single author as well as multiple authors. If you had multiple authors on your Blogger blog, you can create a new user account for each author in WordPress.
- You can also assign content to existing authors of your WordPress blog.
- Click the “Submit” button to continue.
- Note: You can change/assign author for any blog post, later.
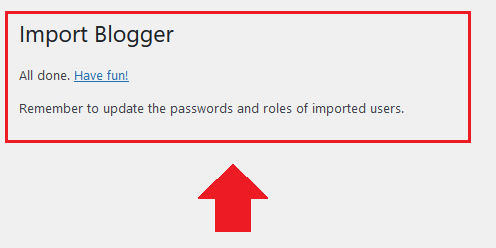
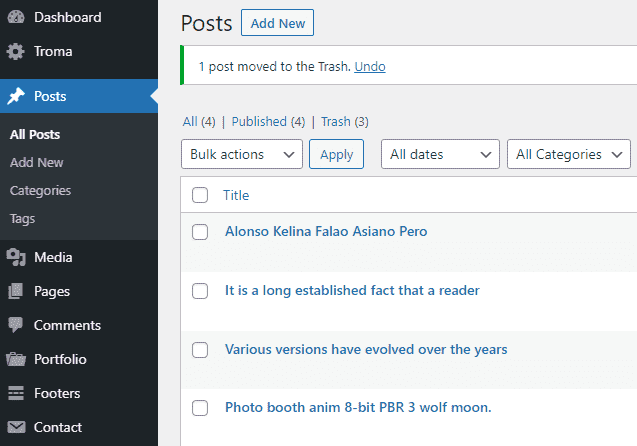
- Here you can see that the Blogger content has been successfully imported to your WordPress blog. It will show you a message, “All done. Have fun!“.
- On WordPress admin section, you can “Create/View/Edit/Delete” your articles on the “Posts” page.
- Since the migration process is not finished yet, so do not open any post.
07. Configure Permalinks Settings
Permalink is the permanent URL of a blog post or page that uniquely identifies them on internet. It is meant to remain unchanged, that’s why it is called permanent URL. On WordPress and Blogger permalink is created from domain name, date of creation and slug.
In the below permalink, the portion highlighted in orange is domain, the portion highlighted in red is date of creation, and the portion highlighted in blue is a slug. When you create a new post, slug is created from the post title. You can change the slug before publishing the post.
- https://www.example.com/2021/09/how-to-do-affiliate-marketing.html
In WordPress, Permalinks settings define the URL structure for blog posts. The default URL structure of blog posts in WordPress are different from the blog posts of Blogger.
To match the URL structure of WordPress blog posts with the Blogger blog posts, you are required to configure the Permalinks Settings in WordPress.
Once the Permalinks settings are configured the URLs of your Blogger posts in WordPress will be similar to the below URL structure. This URL structure will also be for your new WordPress posts.
- https://www.example.com/2021/09/how-to-do-affiliate-marketing.html
Now follow these steps to configure the permalinks structure for your Blogger posts on WordPress:
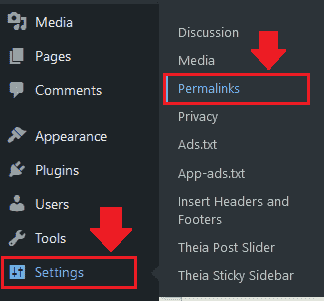
- Go to “Settings” from your WordPress sidebar.
- Click the “Permalinks”.
- Choose the “Custom Structure” and enter the below text into the textbox.
/%year%/%monthnum%/%postname%.html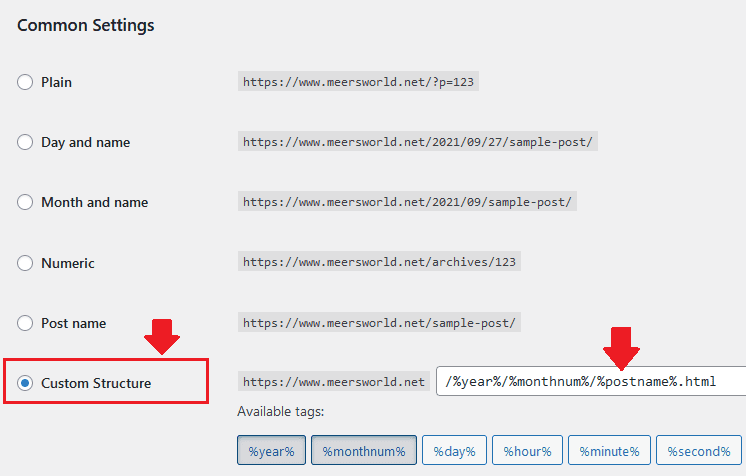
08. Script For Mismatch Slugs
In the above section, I have already defined what is slug in the URL of a blog post. After import, sometimes WordPress modifies Blogger post slugs (1) By adding some words or characters in the slug (2) By changing the order of words or characters in the slug.
When the slugs of old posts are changed you get “404 Page Not Found” error. It could negatively affect your blog’s SEO.
Let’s say, this is an original(old) URL of a Blogger blog post imported in WordPress:
- “www.example.com/2021/25/create-money-from-a-blog.html”.
After the import WordPress can change it to:
- “www.example.com/2021/25/create-from-money-a-blog-23.html”.
To get rid of this issue you have to add a small script/code into your WordPress theme’s “functions.php” file and execute.
Follow these steps to learn How to add the code and How to execute:
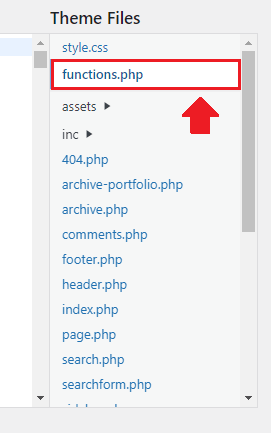
- Go to “Appearance” and click the “Theme Editor”.
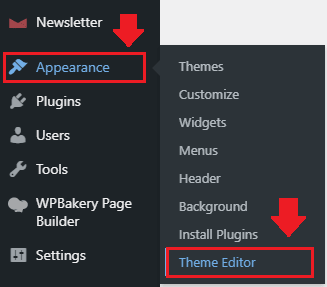
- Click the “functions.php” located at your right side under the “Theme Files” section.
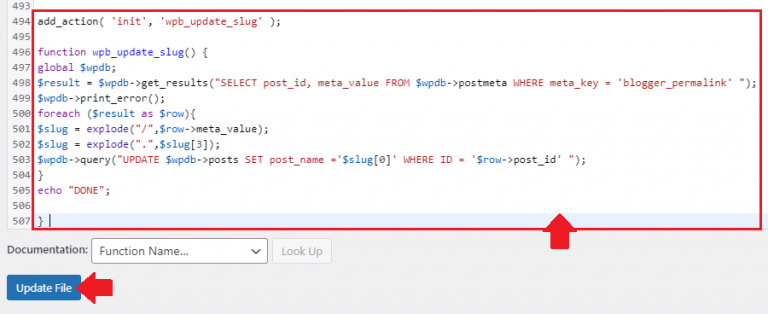
- Paste the below code into the bottom of the “functions.php” and click the “Update File”.
add_action( 'init', 'wpb_update_slug' );

function wpb_update_slug() {
global $wpdb;
$result = $wpdb->get_results("SELECT post_id, meta_value FROM $wpdb->postmeta WHERE meta_key = 'blogger_permalink' ");
$wpdb->print_error();
foreach ($result as $row){
$slug = explode("/",$row->meta_value);
$slug = explode(".",$slug[3]);
$wpdb->query("UPDATE $wpdb->posts SET post_name ='$slug[0]' WHERE ID = '$row->post_id' ");
}
echo "DONE";

} 
- Now open any post/article from your WordPress blog to execute the code. This code will be automatically executed when a post is opened.
- Open “functions.php” again and delete the code because you don’t need this code anymore. The values have been added into the database.
- Once you delete the code, Save the “functions.php”.
NOTE: If “Update File” doesn’t update “functions.php” then you have to open “functions.php” from your cPanel account and add the code in “functions.php”, as I have shown above.
To find “functions.php” file on cPanel account follow the steps:
- Login to you cPanel account.
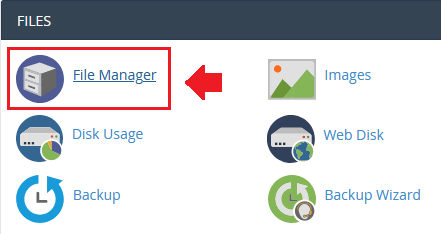
- Click the “File Manager”.
- Open “public_html” directory.
- Open “wp-content” folder.
- Open “Themes”.
- Open your current theme’s folder.
- Open “functions.php” to insert the code, as we have shown above.
- Once you execute the code by visiting one of your blog post, remove/delete the code from “functions.php”.
- Save your “functions.php” file.
09. Import Blogger Images Completely
When you import Blogger content to WordPress most of your images are imported, but some images are still loaded on your blog posts from Blogger. All your images must load from your WordPress Media Library not from external links.
To import all you Blogger images to WordPress completely you can use a plugin called “Import External Attachments”. It works by searching the image URLs loading from external sources such as Blogger. Once it identifies such images it imports them to your WordPress Media Library and updates their URL.
I have created a separate tutorial in detail that guides you on how to use the “Import External Attachments” plugin and how to import your remaining Blogger images to WordPress Media Library completely, follow this:
10. Redirect Blogger URLs End With “?m=1”
For some of your blog posts Blogger creates separate URL for mobile/smartphone devices, which ends with “?m=1” like “http//www.example.com/how-to-earn-online.html?m=1”.
Contrary to Blogger, WordPress does not create URLs end with “?m=1”, and that’s why when such URLs are opened from Google search results WordPress shows you the “404 Page Not Found” error.
To avoid “404 Page Not Found” error you have to add a code of few lines into “.htaccess” file, that redirects those Blogger URLs end with “?m=1” to their corresponding normal URLs on your WordPress blog.
I have created a separate tutorial in detail:
11. Redirect RSS Feeds
RSS stands for Really Simple Syndication. The RSS Feeds is a file that contains a summary of updates from a website/blog in the form of a list-of-posts with URLs. It allows you to stay up-to-date on new content from websites you like.
If you had subscribers who followed your RSS feeds on Blogger, will not be able to get new updates of your WordPress blog. So to redirect your Blogger RSS Feeds Request to WordPress RSS Feeds you have to add a code of few lines into your “.htaccess” file.
Follow these steps:
- Login to your cPanel Account.
- Click the “File Manager“.
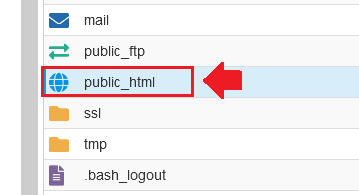
- Click the “public_html“.
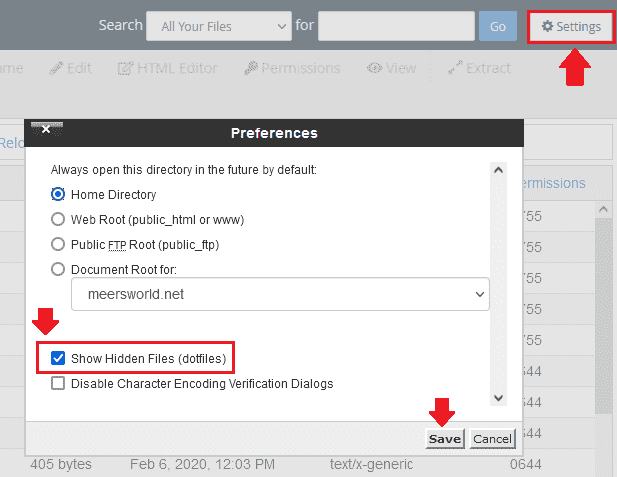
- Click “Settings” located at your top-right corner.
- Tick the “Show Hidden Files (dotfiles)”.
- Click “Save“.
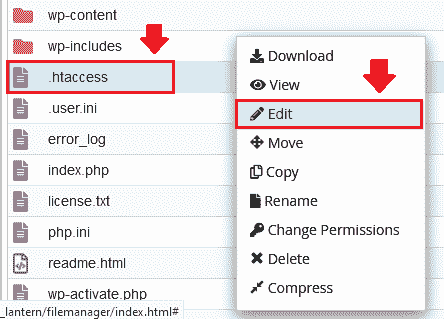
- Right-click on “.htaccess” file and click “Edit”.
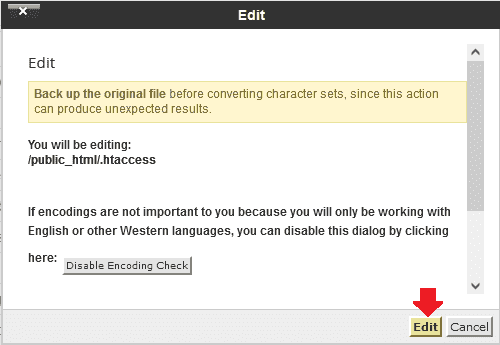
- As a precautionary measure it will ask you to take the backup of your “.htaccess” file before editing because it is an important file. You can take its backup in two ways (1) By making a copy of it there (2) By downloading it in your computer.
- Click the “Edit“.
- Copy the below code and Paste somewhere at the top of your “.htaccess” file, as I have shown. Once you Paste the code, save your “.htaccess” file.
#Redirect Blogger Feeds Request To WordPress Feeds Starts
<IfModule mod_rewrite.c>
   RewriteEngine on
   RewriteRule atom.xml /feed? [L,R=301]
   RewriteRule rss.xml /feed? [L,R=301]
   RewriteRule ^feeds/posts/?.*$ /feed? [L,R=301]
   RewriteRule ^feeds/comments/?.*$ /comments/feed? [L,R=301]
</IfModule>
#Redirect Blogger Feeds Request To WordPress Feeds Ends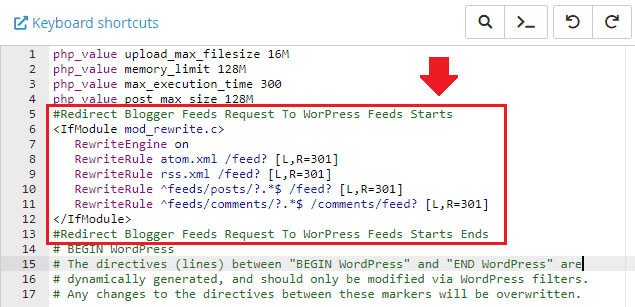
Congratulations! The migration of your custom domain Blogger blog to WordPress completes here.
12. Can You Delete Blogger Blog After Migration?
After migrating your custom domain Blogger blog to WordPress your question would be, “Can you delete your Blogger blog?” Answer is yes, but I recommend you to wait for a week or two, just to make sure everything works fine on your WordPress blog.
If you don’t find any problem then delete your Blogger blog, there is no point for having it because everything is now on your WordPress blog. But yes, don’t forget to take the backup of your Blogger content and theme, before deleting.
13. Professional WordPress Themes
Unfortunately you can’t import your Blogger theme/template to WordPress because there is no compatibility. Even if you import Blogger theme to WordPress it will be all messed. So you have two options (1) Use a free builtin WordPress theme with limited features (2) Purchase a quality professional WordPress theme.
Advanced, modern, fully-customizable, and SEO-Ready professional WordPress themes are always a blessing for blogs and websites. You can find hundreds of thousands of affordable professional WordPress themes from world’s largest market place. Read: How to Buy a Theme on Themeforest & Download.
WordPress is all about plugins. If you want extra features and functionality in your WordPress blog you can install state-of-the-art WordPress plugins. Find Here.
So it was all about migrating your custom domain Blogger blog to WordPress, the best blogging platform. For a new user Blogger is much user-friendly as compared to WordPress, and that’s why when people move to WordPress from Blogger they find WordPress a bit difficult. Don’t worry, once you are used to, you will love it and realize how flexible and amazing WordPress is!
If you like this post then don’t forget to share with other people. Share your feedback in the comments section below.
Here are some important WordPress tutorials that you might find interesting and helpful:
- 5 Essential WordPress Plugins That A New Website Needs
- How To Configure WP Mail SMTP For Sendinblue Mailer – WordPress
- How To View Google Analytics In WordPress Dashboard | Site Kit By Google
- How To Connect AdSense With WordPress & Display Google Ads | Site Kit
You can find more content on WordPress Here.



Leave a Reply