Do you want to setup a custom domain on Tumblr? You’re in the right place. In this tutorial, I will guide you step-by-step on how to buy a custom domain on Tumblr, How to transfer your existing custom domain to Tumblr, and How to connect/redirect your Tumblr domain to an existing custom domain.
A domain is a URL trough which a website or blog is accessed on internet through a browser.
The domains on Tumblr are the subdomain of “Tumblr.com“. For example, this domain “https://comedycentral.tumblr.com/” is a subdomain of “tumblr.com“. It tells you that the “comedycentral” is the property of “tumblr.com“.
A custom domain is a standard domain which is not a subdomain or part of another domain. A person who buys/registers a custom domain is its owner and has full authority over it. For example the domain “meersworld.net” belongs to me that I bought from Namecheap.
Tumblr offers three options for domains (1) Buy a new domain directly on Tumblr (2) Transfer an existing custom domain registered with another registrar to Tumblr (3) Connect an existing custom domain registered with another registrar to your Tumblr domain without transferring it to Tumblr.
Following topics will be cover in this post:
- Benefits of Custom Domain on Tumblr?
- What Happens After Your Setup a Custom Domain on Tumblr?
- How To Buy a Custom Domain on Tumblr
- How to Transfer an Existing Custom Domain to Tumblr
- How to Connect an Existing Custom Domain to Tumblr Domain
RELATED
- How To Add Google Analytics ID In Tumblr | Measurement ID
- How To Setup & Activate Post+ in Tumblr | Make Money
- Tumblr Help for Beginners | Guides | Step-By-Step Tutorials
01. Benefits of Custom Domain on Tumblr?
Following are the few reasons why you should use a custom domain on Tumblr:
- For complete ownership and authority. Even if Tumblr removes your blog, you will have your custom domain.
- Custom Domains look more professional and makes your blog unique from the other blogs. You can create your own professional business email Ids.
- You can apply to different affiliate programs and make money online.
An email ID created from a domain is called Business email ID or Private email ID. For example “info@johncomedy.com” is a business email. Email IDs created on Gmail, Yahoo, Hotmail, etc, are called public Email IDs.
02. What Happens After Your Setup a Custom Domain on Tumblr?
Let’s say John has a Tumblr blog “comedycentral.tumblr.com“. He has also bought a custom domain let’s say “johncomedy.com“.
After setting up the custom domain “johncomedy.com” on Tumblr he can redirect “comedycentral.tumblr.com” to “johncomedy.com“. Do remember that everything on your Tumblr blog will remain same, only your Tumblr domain will point to your custom domain.
For your understanding I have shown the two versions of John’s blog below, one with subdomain and one with custom domain.
John’s blog with Tumblr’s typical subdomain “comedycentral.tumblr.com“.

John’s Tumblr blog after been redirected to custom domain “johncomedy.com“.
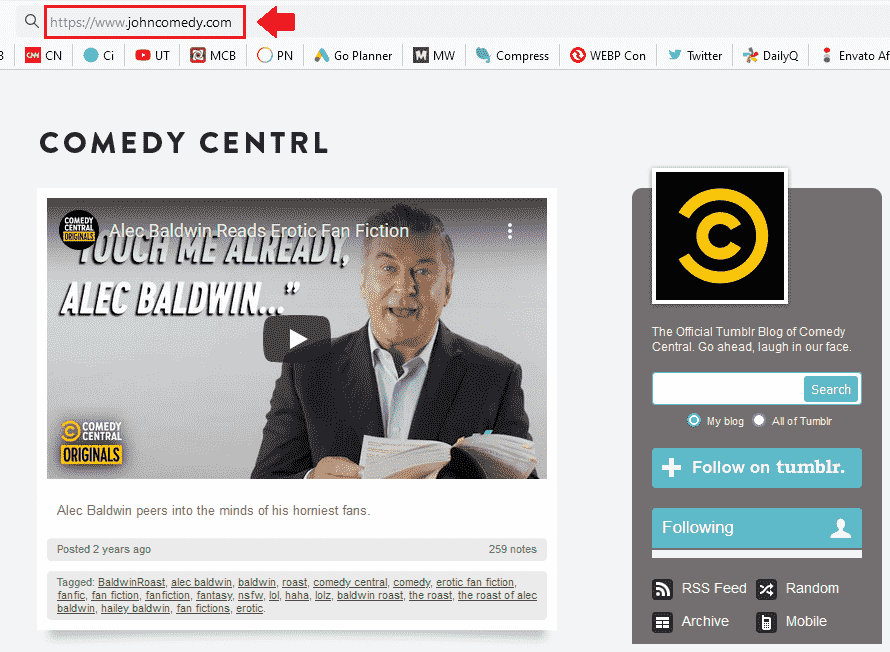
03. How To Buy a Custom Domain on Tumblr
In this section, I will guide you on how to buy a new custom domain directly on Tumblr.
- On your Dashboard, go to Tumblr Settings from the sidebar.
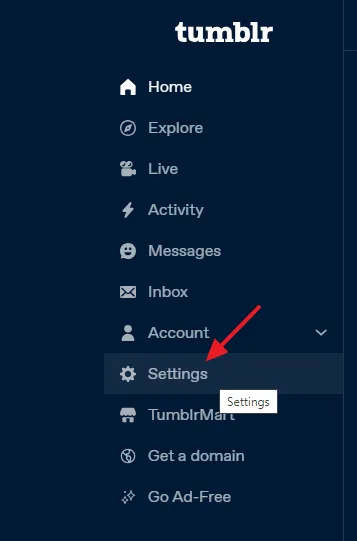
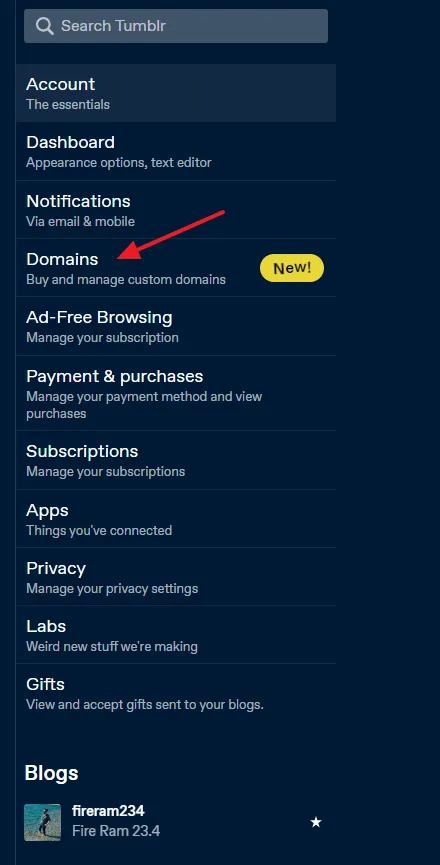
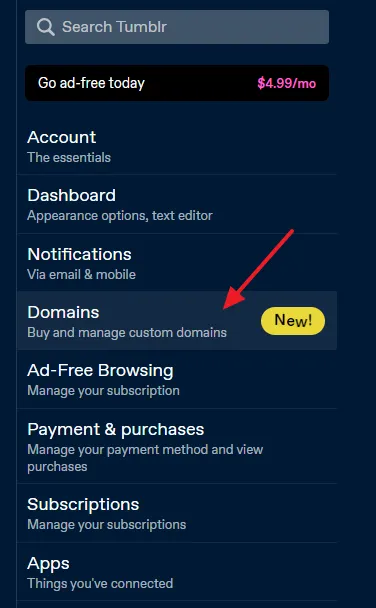
- Click on the Domains from the right sidebar.
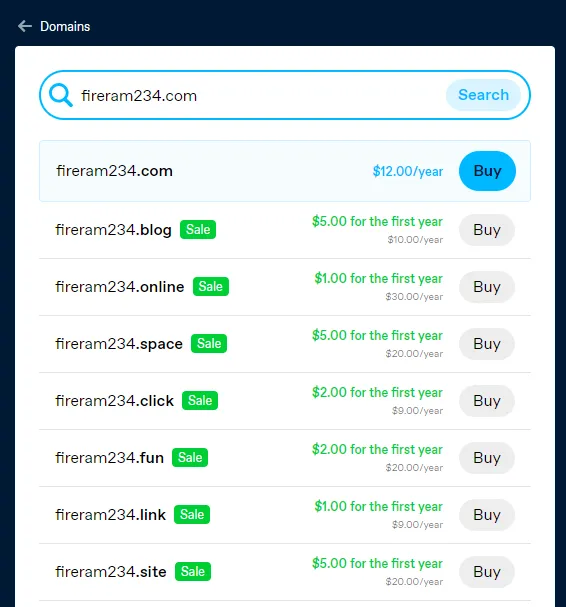
- Enter your custom domain name in the search bar.
It also suggests you some custom domains with the same name as your Tumblr domain/username. For example, my Tumblr domain is fireram234.tumblr.com that’s why it is suggesting fireram234.brand, fireram234.fan, fireram234.blog, fireram234.com, etc. You can click on them to buy.
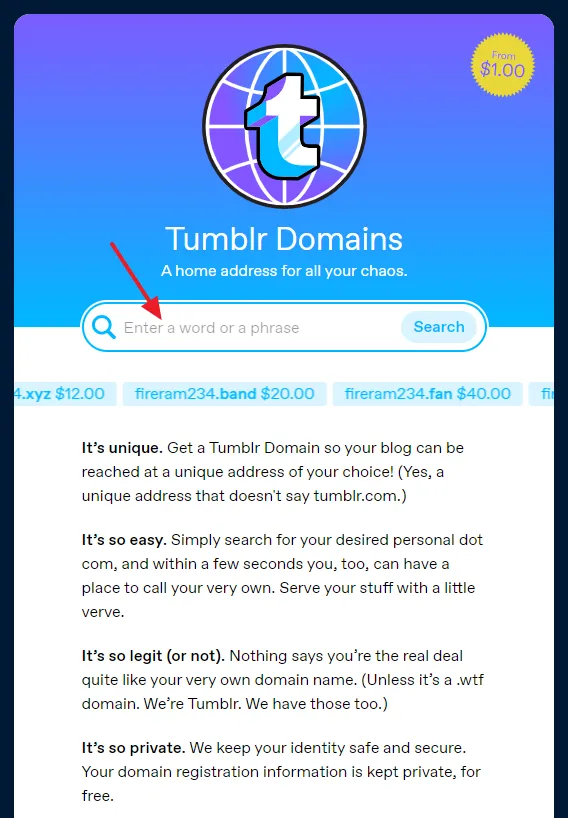
- I have entered “fireram234.com” in the search bar. First of it will check for its availability. You can see that on the search results it is showing me its yearly cost which is $12 USD. It also suggests relevant domains with different extensions and prices.
- Click on the Buy button.
- Provide your Contact Information, Billing Details, and Payment Details.
- Click on the Pay now button.

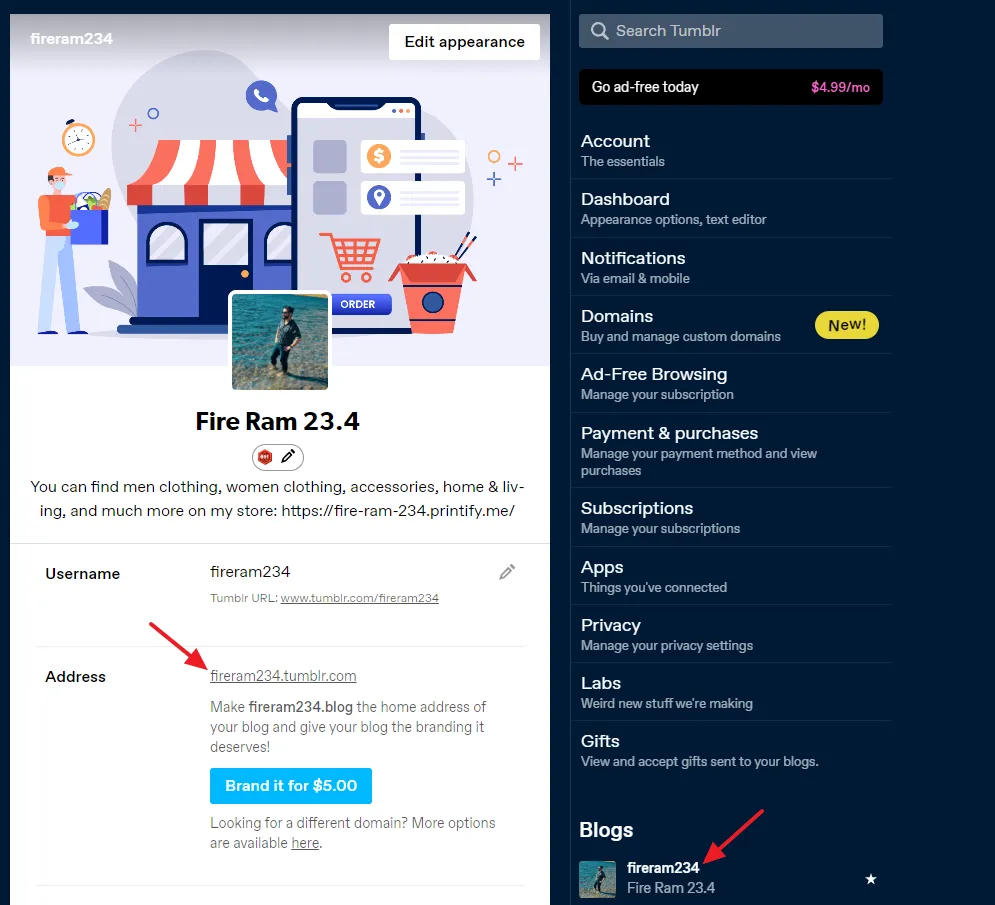
- After you purchase the domain, go to Blogs section from the right sidebar and click on your blog.
- Scroll-down to Address section. Your Tumblr domain will be replaced by your custom domain that you have bought. Click on it to open on the browser.
04. How to Transfer an Existing Custom Domain to Tumblr
In this section, I will guide you on how to transfer an existing custom domain registered with another registrar such as GoDaddy, Namecheap, etc, to Tumblr.
- Go to Settings from Tumblr Dashboard and click on the Domains from the right sidebar.
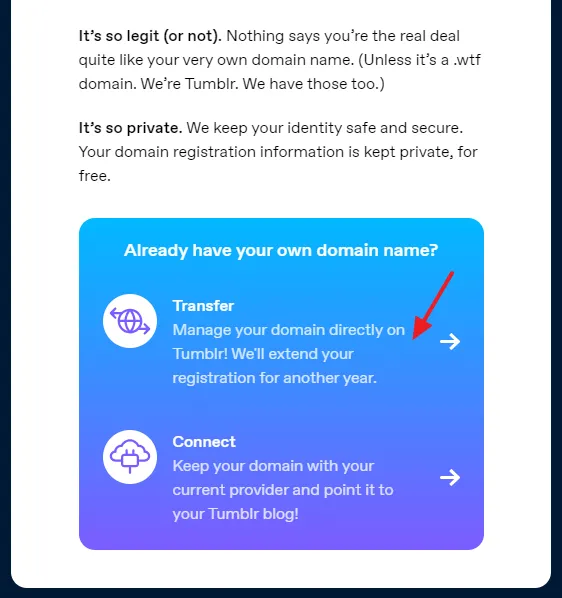
- Scroll-down to Already have your own domain name? section and click on Transfer that says, “Manage your domain directly on Tumblr! We’ll extend your registration for another year”.
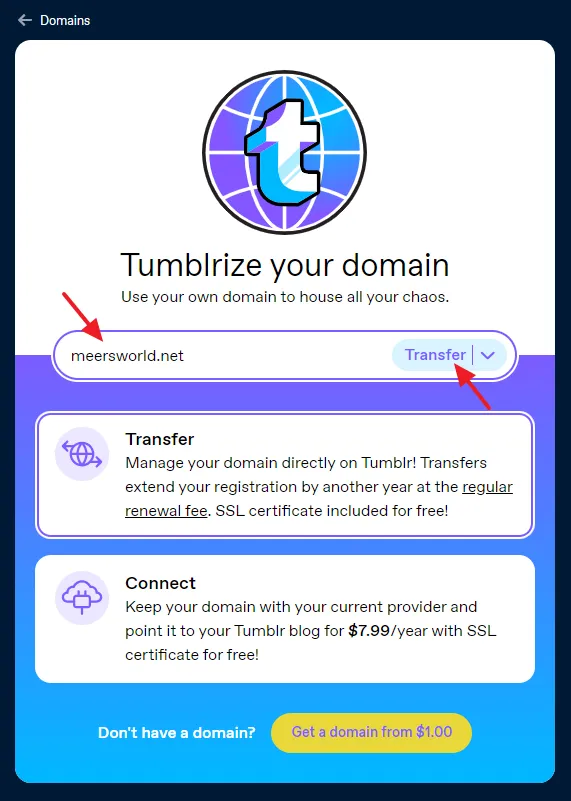
- Enter your domain that you want to transfer to Tumblr and click on the Transfer.
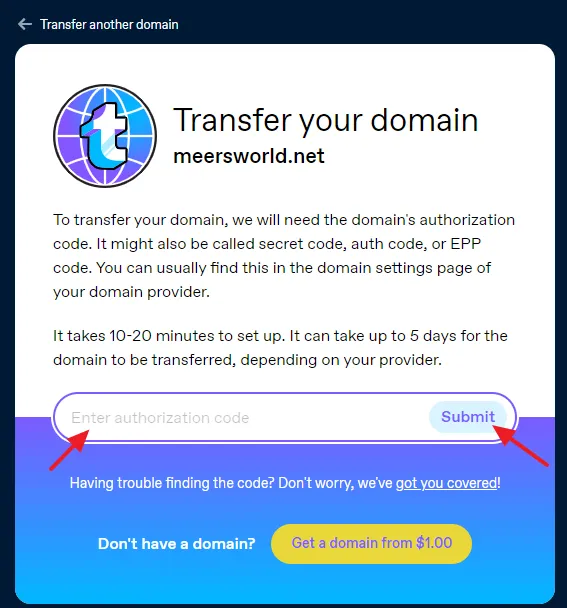
- Provide your domain’s authorization code which is also called Secret Code, Auth Code, and EPP. You can get this code from your domain settings. If you don’t know how to get this code, ask your domain hosting provider/registrar to provide you the code. You can also get help from this article: Transfer a Domain to Tumblr.
- After you enter the Authorization Code click on the Submit button. Complete the checkout process. It takes 10 to 20 minuted to set up. It may take up to 5 days for your domain to be transferred to Tumblr.
05. How to Connect an Existing Custom Domain to Tumblr Domain
In this section, I will guide you on how to connect an existing custom domain registered with another registrar to your Tumblr domain without transferring it to Tumblr.
To redirect your Tumblr domain to a custom domain you must add a DNS Record in your custom domain DNS Settings.
DNS stands for Domain Name Service. A DNS Record is also called Zone file, it is a database record which is used to map a URL to an IP Address.
Tumblr supports Two-Level and Three-Level domains.
Domain with one dot(.) are Two-Level domains whereas domain with two dots(.) are Three-Level domains.
Examples of Two-Level Custom domains: “meersworld.net”, “example.com”, etc.
Examples of Three-Level Custom domains: “www.meersworld.net”, “britbuysonline.co.uk”, etc.
If “britbuysonline.co.uk” had “www” attached like “www.britbuysonline.co.uk” it would have been a Four-Level domain.
You must have understood the difference between Two-Level and Three-Level custom domains, now it must be easier for you to know whether your custom domain is Two-Level or Three-Level.
Do remember that Two-Level domain always opens WITHOUT “www“. For example “twitter.com” is a Two-Level domain. Even if you add “www” to “twitter.com” like “www.twitter.com” it redirects to “twitter.com”, always!
NOTE (Important!):
- If you have Two-Level custom domain follow “01. Create DNS Record For Two-Level Custom Domain” guide.
- If you have Three-Level custom domain follow “02. Create DNS Record For Three-Level Custom Domain” guide.
01. Create DNS Record For Two-Level Custom Domain
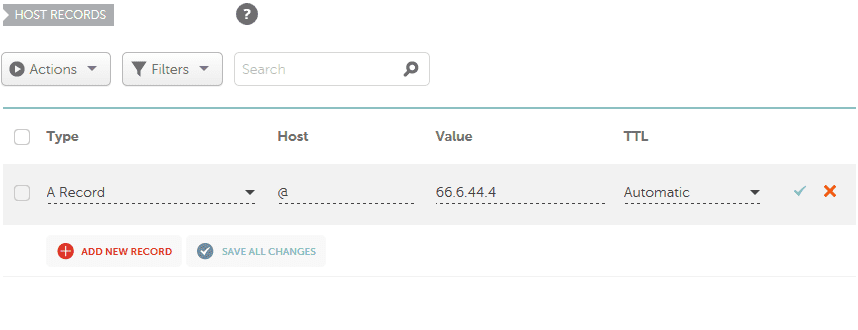
For a Two-Level custom domain you have to create an A Record for IP Address “66.6.44.4“, as I have shown below.
What is an A-Record? An “A Record” indicates the IP address of a given domain.
Follow the steps to create A Record for your custom domain on Namecheap. If your domain is registered with another registrar these settings will be different.
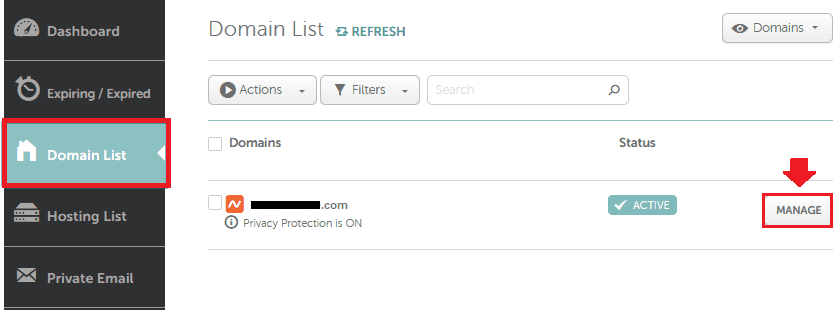
- Login to your Namecheap account and go to “Domain List” section.
- Click on the “MANAGE” button.
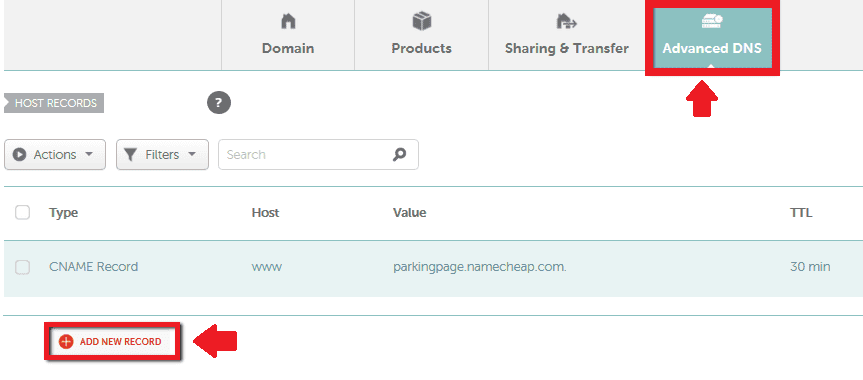
- Click on the “Advanced DNS” tab.
- Now click on “ADD NEW RECORD” link to create A Record.
- Choose the “A Record” from the dropdown list.
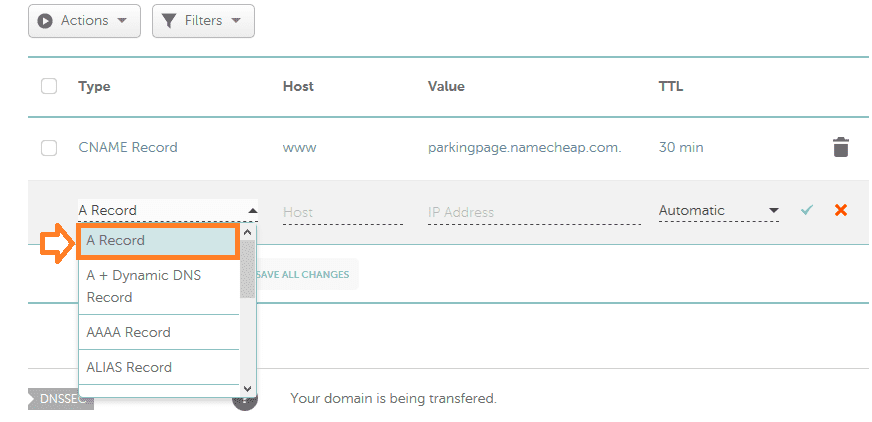
- In the “Host” field enter “@“. @ means your root-site/domain like “scalefortune.com“.
- In the “Value” field enter “66.6.44.4“. Value means the destination URL where your custom domain will point to. 66.6.44.4 is the IP address of Tumblr.
- Let “TTL” be automatic or choose 60.
- Click on the “Tick” icon to save the record.
Note (Important!): You have successfully created the A Record for your custom domain, now jump to the last section “03. Connect Custom Domain to Tumblr Domain“.
02. Create DNS Record For Three-Level Custom Domain
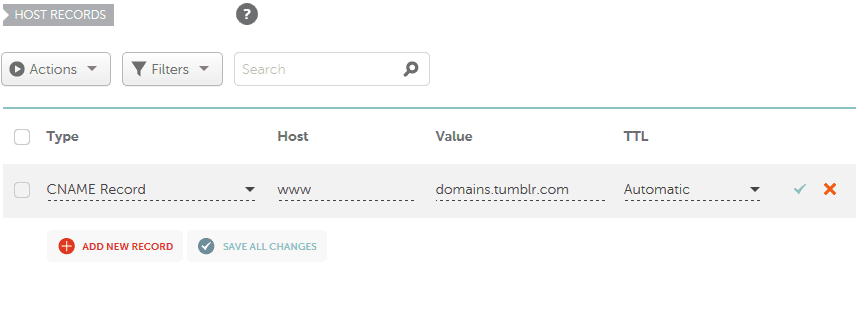
For Three-Level custom domains you have to create a CNAME Record for “domains.tumblr.com“, as I have shown below.
What is CNAME Record? CNAME stands for Canonical Name. CNAME Record is a type of DNS record that points to another domain address rather than an IP address.
Follow the steps to create CNAME Record for your Three-Level custom domain on Namecheap.
- Login to your Namecheap Account and go to “Domain List” section.
- Click on the “MANAGE” button.

- Click on the “Advanced DNS” tab.
- Click on the “ADD NEW RECORD” link to create CNAME record.

- Choose the “CNAME Record” from the dropdown list.

- In the “Host” field type “www“. It means “www.scalefortune.com.“, “www.example.com.”, etc.
- In the “Value” field type “domains.tumblr.com“. It is the destination URL where your domain will point to.
- Let “TTL” be automatic or choose 60.
- Click on the “Tick” icon to Save the CNAME Record.
You have successfully created a CNAME record for your custom domain. Now follow the last section “03. Connect Custom Domain to Tumblr Domain“.
03. Connect Custom Domain to Tumblr Domain
In the above sections, I have guided you on how to add A Record and CNAME Record, now here I will guide you on how to connect/redirect your Tumblr domain to your custom domain.
- Go to Settings from Tumblr Dashboard and click on the Domains from the right sidebar.
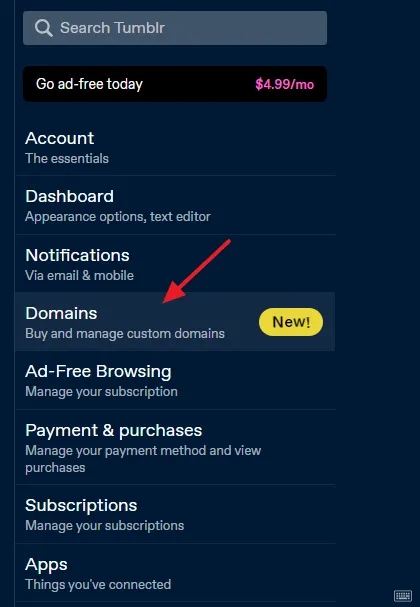
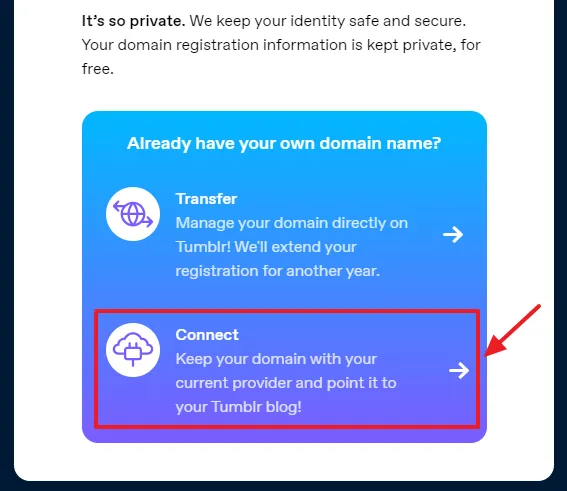
- Scroll-down to “Already have your own domain name?” Click on the Connect that says, “Keep your domain with your current provider and point it to your Tumblr blog!”.
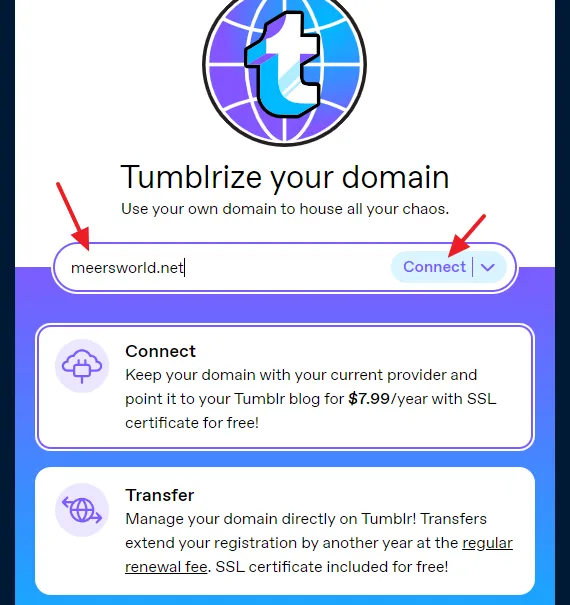
- Enter your custom domain and click on the Connect. It shows a message whether your domain is connected to Tumblr or not. If it connects, your Tumblr blog will point to your custom domain.
Custom Domain Testing Errors
Tumblr “Domain testing” returns two type of errors (1) A Record Error (2) CNAME Record Error. These errors come when you don’t create DNS records correctly in your custom domain’s DNS Settings.
I have discussed these 2 Errors in this section, after “What Error Page Tells You?”.
What Error Page Tells You?
If you see a Tumblr Error Page loading on your custom domain instead of your Tumblr blog, it means that you haven’t configured your Custom Domain and Tumblr blog properly.
At first, you will see this error page that says:
“There’s nothing here. Whatever you were looking for doesn’t currently exist at this address. Unless you were looking for this error page, in which case: Congrats! You totally found it.“

After few seconds you will be redirected to this URL: https://www.tumblr.com/explore/recommended-for-you, where Tumblr shows “For You, Trending, Staff Picks, More“, etc.

01. A-Record Error
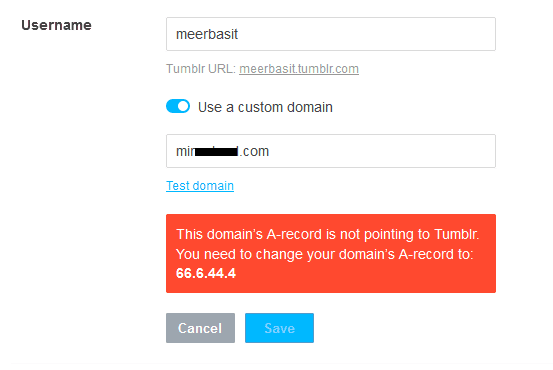
A-Record error occurs for Two-Level domains when the DNS record for IP address “66.6.44.4” is not created correctly or your A-Record is pointing to some other IP Address like your hosting-server’s IP Address.
If your A-Record is pointing to some other IP Address, replace that IP Address with the “66.6.44.4” in the “Record/Value” field.
This is the error: “This domain’s A-record is not pointing to Tumblr. You need to change your domain’s A-record to: 66.6.44.4“.
You can also see that the “Save” button is deactivated.
02. CNAME-Record Error
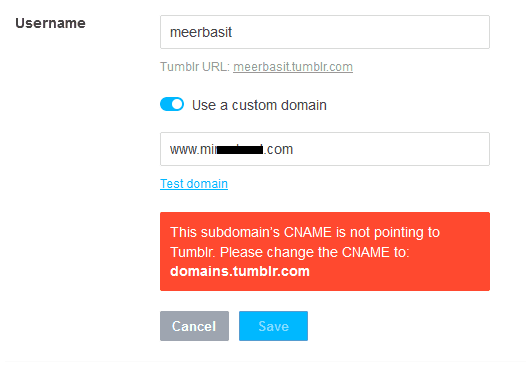
CNAME-Record Error occurs for Three-Level domains when the DNS Record for the Destination URL “domains.tumblr.com“, is not created correctly or your CNAME Record is pointing to your own custom domain.
If your CNAME Record is pointing to your own domain replace your domain with the “domains.tumblr.com” in the “Record/Value” field.
This is the error: The subdomain’s CNAME is not pointing to Tumblr. Please change the CNAME to: domains.tumblr.com”.
So it was all about buying your own domain for Tumblr. I tried my best to help you in the easiest way. If you like this post then don’t forget to share with the other people. Share your feedback in the comments section below.
Also Read


Leave a Reply