Do you want to install Typo3 CMS on XAMPP to run your projects & websites locally in Windows? You’re in the right place.
In this tutorial, I will guide you step-by-step on How to download and extract Typo3 to XAMPP htdocs directory, set up environment for Typo3 on XAMPP, create a database for Typo3 on phpMyAdmin, and install Typo3 on XAMPP.
TYPO3 CMS is an advanced, enterprise-class, open-source, PHP-based Content Management System, used worldwide to build and manage all types of websites which includes small sites for non-profits to multilingual enterprise solutions for large corporations.
If you haven’t installed XAMPP in Windows, follow this tutorial:
If you have not set root password on phpMyAdmin, follow this tutorial:
Following topics will be covered in this post:
- How to Download and Extract Typo3 to XAMPP htdocs
- Set Up Environment for Typo3 on XAMPP
- How to Create a Database for Typo3 on phpMyAdmin
- How to Install Typo3 CMS on XAMPP in Windows
01. How to Download & Extract Typo3 to XAMPP htdocs
In this section, I will guide you on how to download and extract Typo3 to XAMPP htdocs directory. The htdocs is the root directory of XAMPP where you place and run apps and websites.
- Open the Typo3 Download Page.
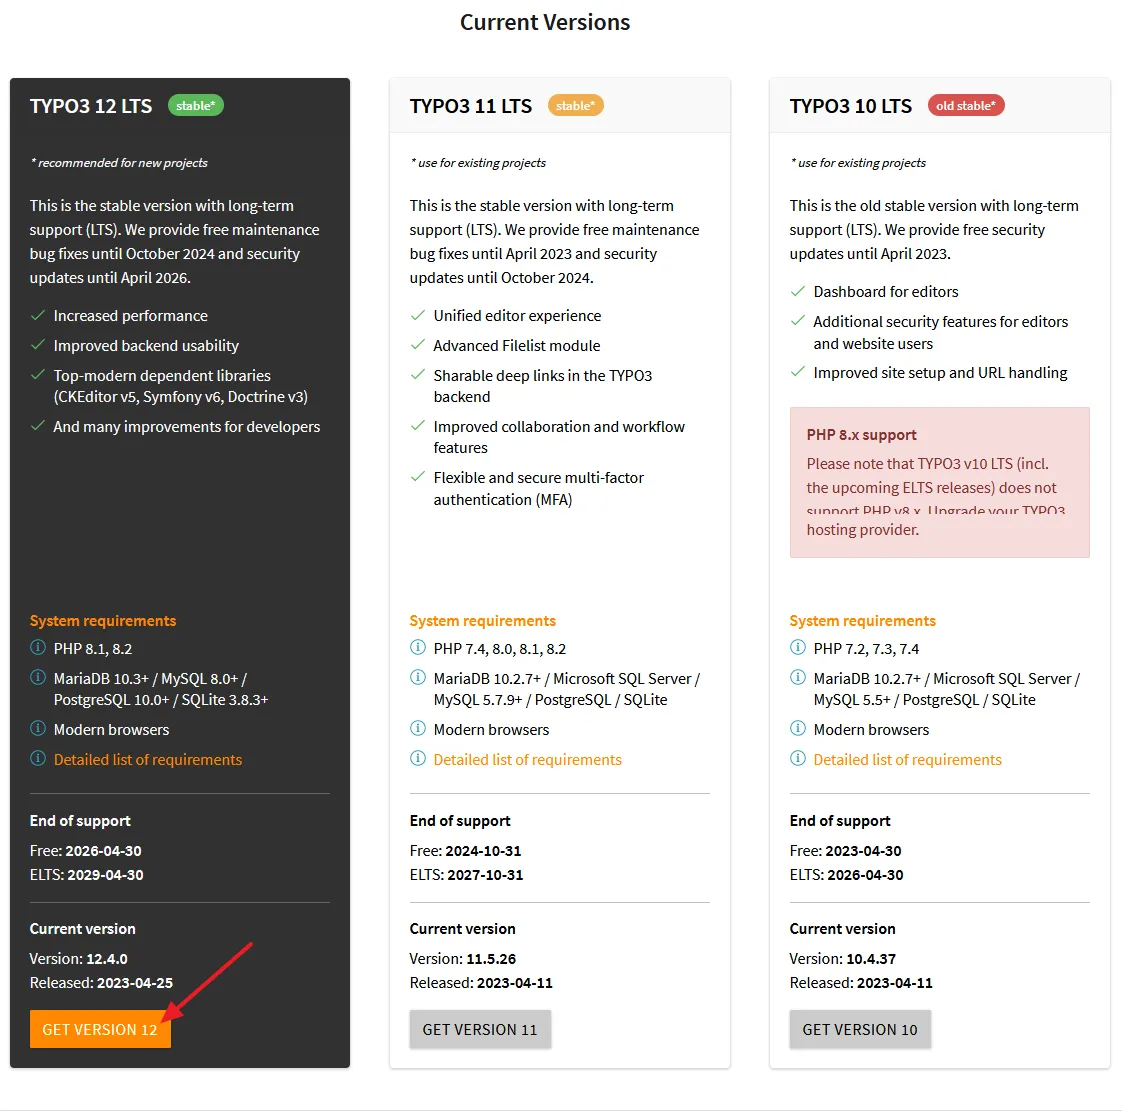
- Go to Current Versions section. You can see the different versions of Typo3.
- At left side, you can see the latest version of Typo3. Here it is TYPO3 12 LTS stable.
- Scroll-down to its bottom and click on the GET VERSION 12 button.
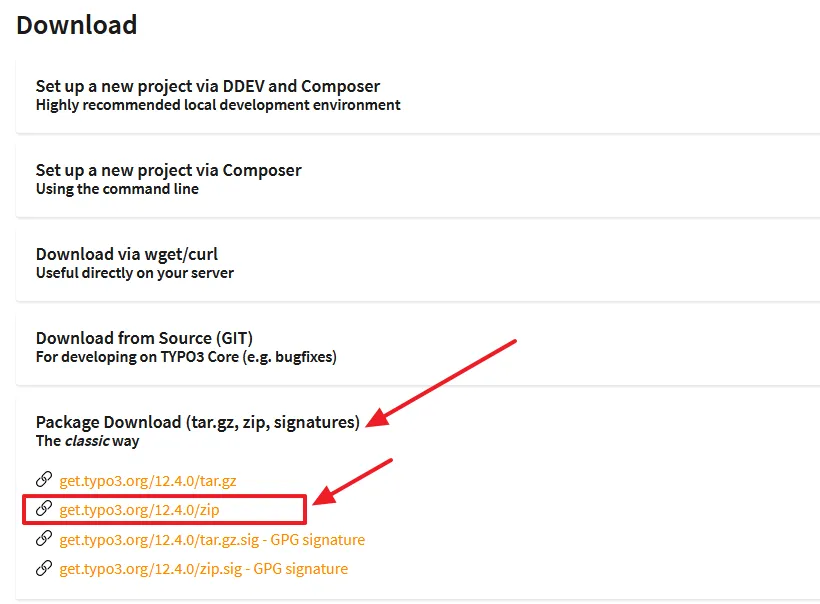
- Under the Download click on the Package Download (tar.gz, zip, signatures) The classic way to expand the download options.
- Click on the get.typo3.org/12.4.0/zip link.
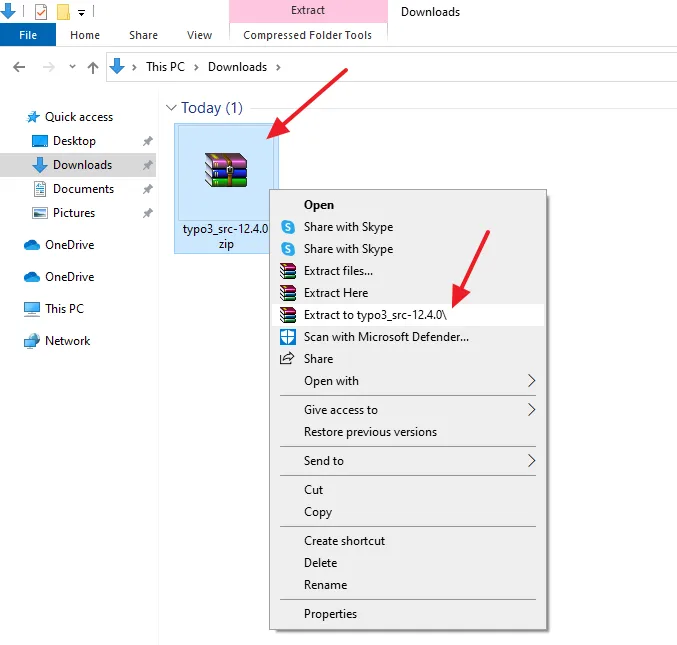
- Right-click the Typo3 zip file that you have downloaded to your computer.
- Click on the Extract to typo3_src-12.4.0\.
- Open the Typo3 extracted folder.
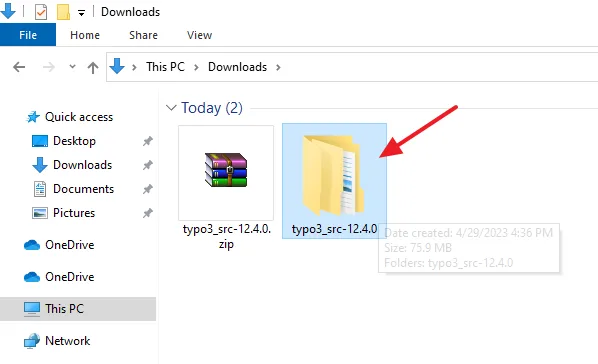
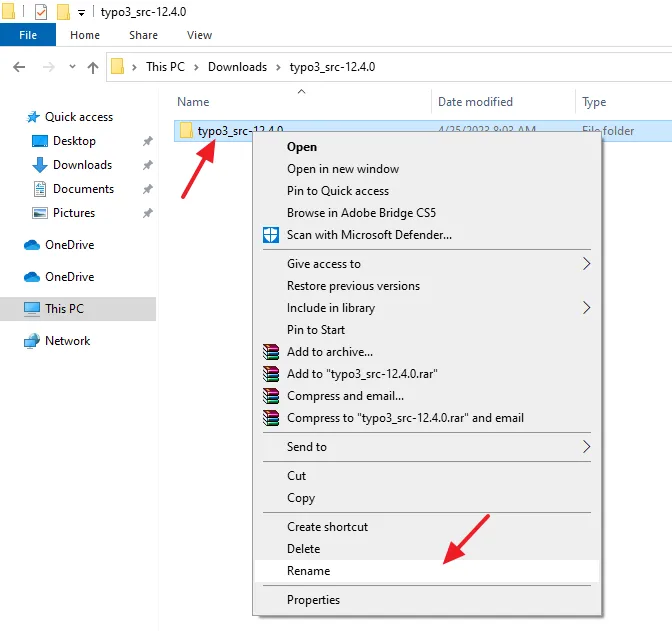
- There will be another folder with the same name typo3_src_version. Right-click on the folder and click on the Rename to change its name with your website or project name.
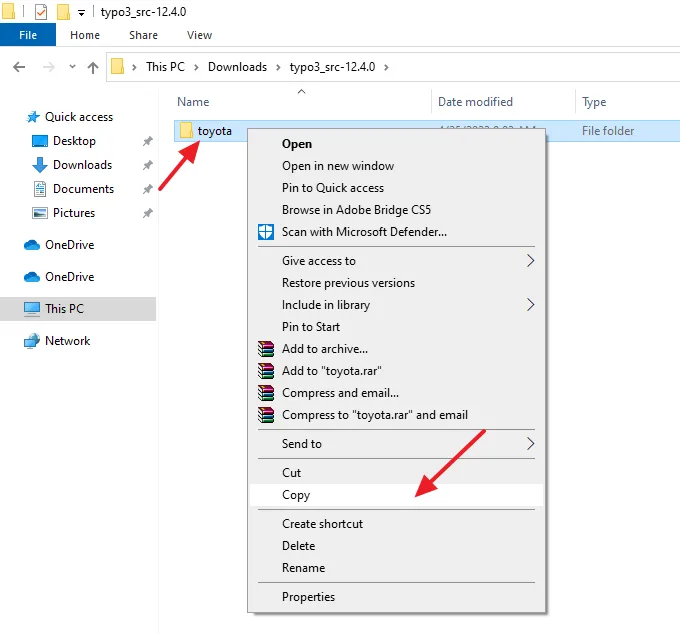
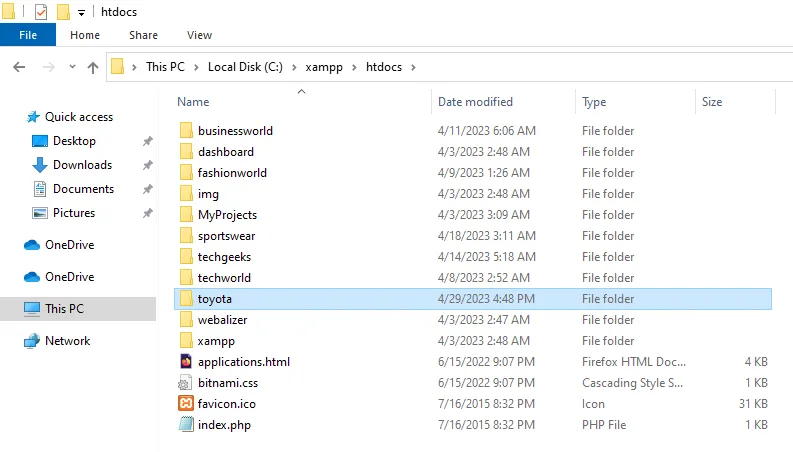
- You can see here that I have renamed it to toyota. Right-click on it and click on the Copy.
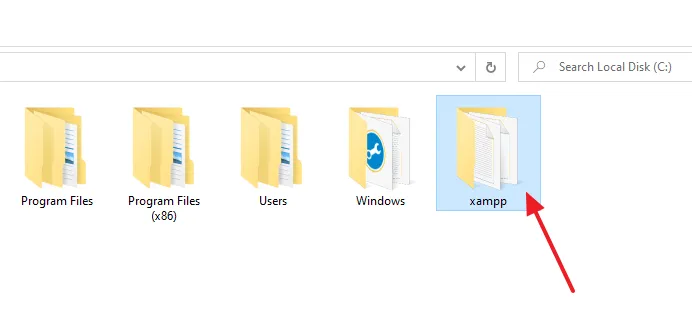
- Open you XAMPP folder.
- Open the htdocs folder.
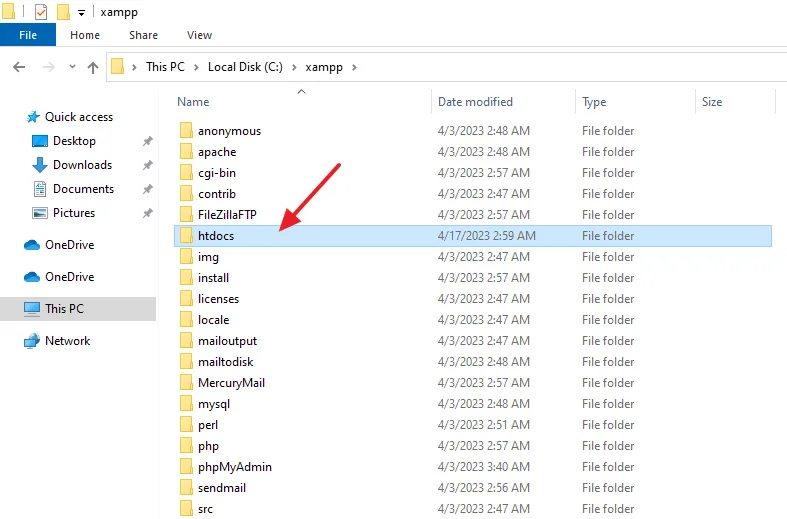
- Right-click on the white space and click on the Paste to copy your Typo3 folder here.
02. Set Up Environment for Typo3 on XAMPP
In this section, I will guide you on how to set up environment for Typo3 on XAMPP by configuring php.ini file and httpd.conf file.
01. Configure php.ini File
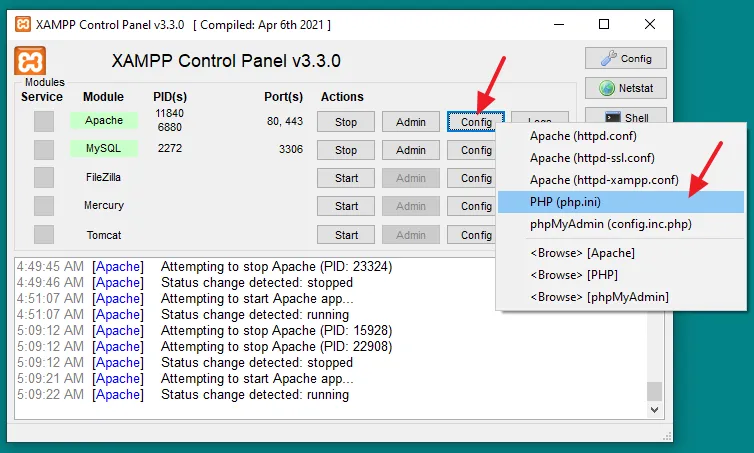
- Open the XAMPP Control Panel.
- Click on the Config button of Apache Module.
- Click on the PHP (php.ini) to open it.
Update the the variables in the php.ini file with the values shown below.
max_input_vars=1000
upload_max_filesize=64M
memory_limit=512M
max_execution_time=600
include_path=".;C:\xampp\php\PEAR
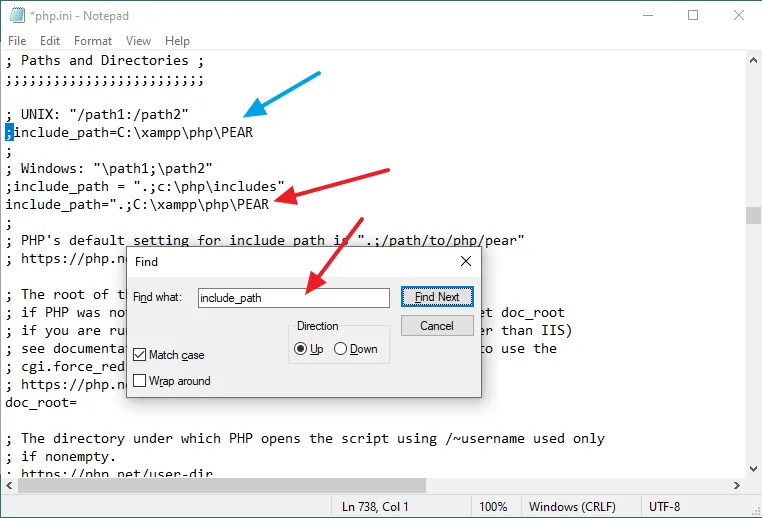
Here I am guiding you on how to change the values of Include_path and max_input _vars. Similarly you can update other three as well.
- First of all go to Unix: ” /path1:/path2″ and disable the include_path=C:xampp\php\PEAR by adding Semicolon “;” in the beginning.
- Now go to Windows: “\path1;\path2” and disable the include_path=”.;c:\php\includes” and add this include_path=”.;C:\xampp\php\PEAR. If XAMPP is installed on another drive, replace C with its name.
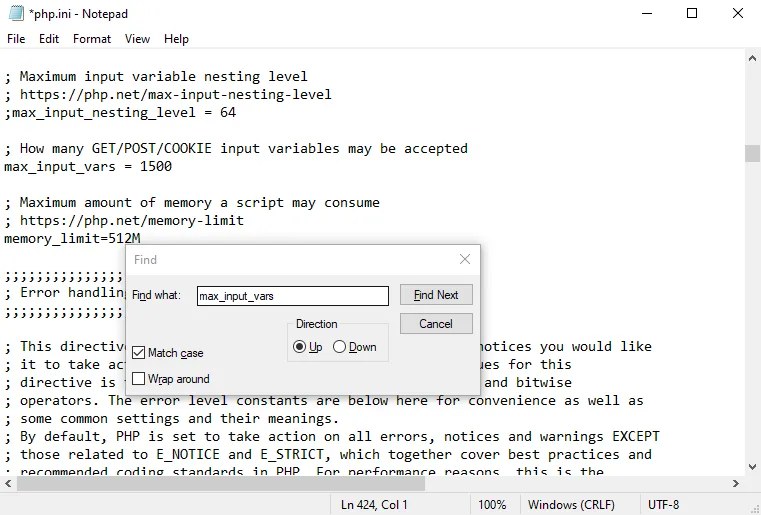
- Find max_input_vars and change it s value to 1500, like this: memory_limit=512M.
Now enable these PHP extensions in the php.ini file if they are disabled.
extension=intl
extension=gd
extension=mbstring
extension=pdo_mysql
extension=zip
extension=fileinfo
extension=openssl
extension=mysqli
extension=pdo_mysql
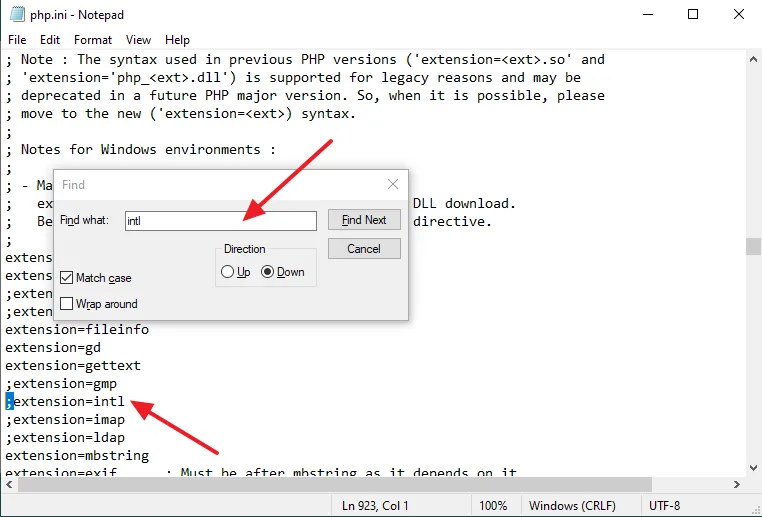
Here I am guiding you on how to enable the intl extension. Similarly you can enable all the other extensions.
- Find the intl extension and remove the Semicolon “;” from its beginning.
- Save the php.ini file and close it.
02. Configure httpd.conf file
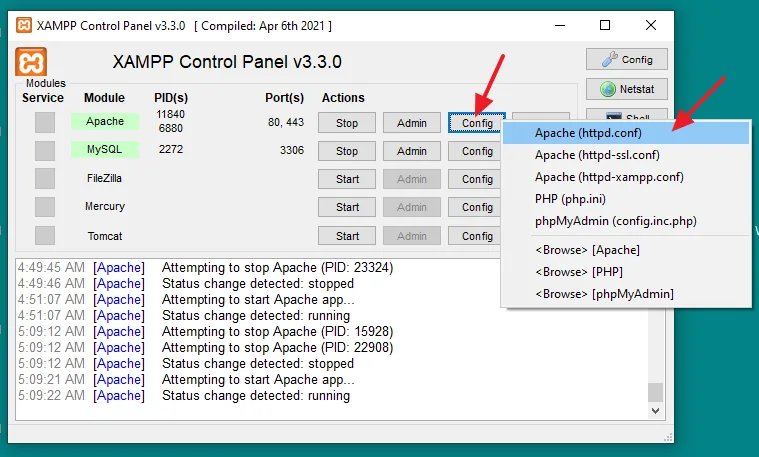
- Now go to XAMPP Control Panel and click on the Config button of Apache Module.
- Click on the Apache (httpd.conf) to open it.
Go to bottom of the file and Paste the following code and Save the httpd.conf file.
# Windows apache thread stack size
<IfModule mpm_winnt_module>
ThreadStackSize 8388608
</IfModule>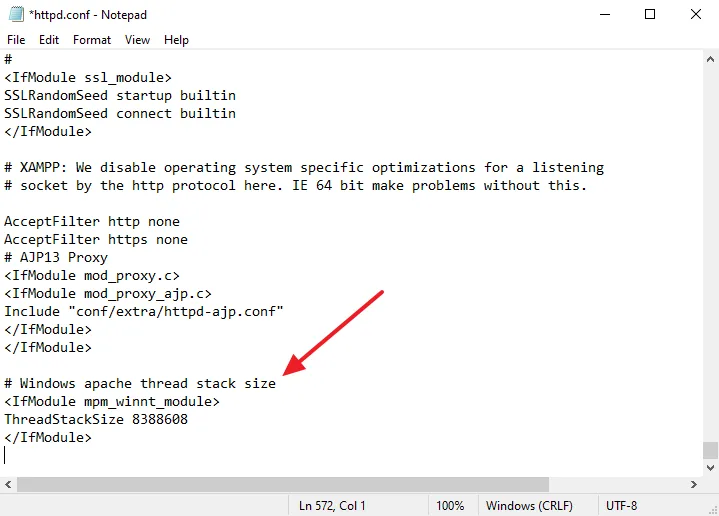
This code is added because of this warning that Typo3 shows you during the installation:
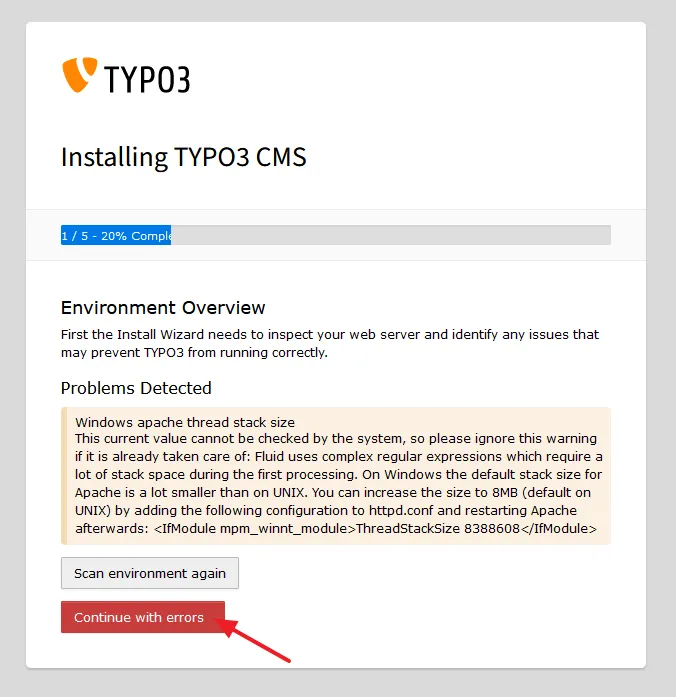
Windows apache thread stack size
This current value cannot be checked by the system, so please ignore this warning if it is already taken care of: Fluid uses complex regular expressions which require a lot of stack space during the first processing. On Windows the default stack size for Apache is a lot smaller than on UNIX. You can increase the size to 8MB (default on UNIX) by adding the following configuration to httpd.conf and restarting Apache afterwards: ThreadStackSize 8388608
03. How to Create a Database for Typo3 on phpMyAdmin
In this section, I will guide you on how to create a database for Typo3 on phpMyAdmin where the data will be stored.
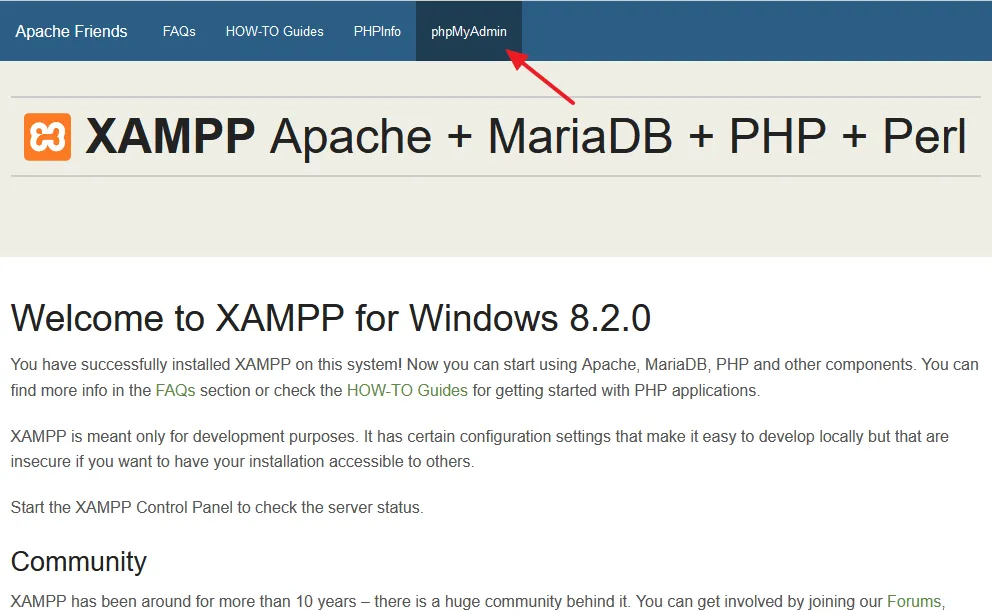
- Open XAMPP localhost like this: http://localhost/.
- Click on the phpMyAdmin tab. You can directly open the phpMyAdmin like this: http://localhost/phpmyadmin.
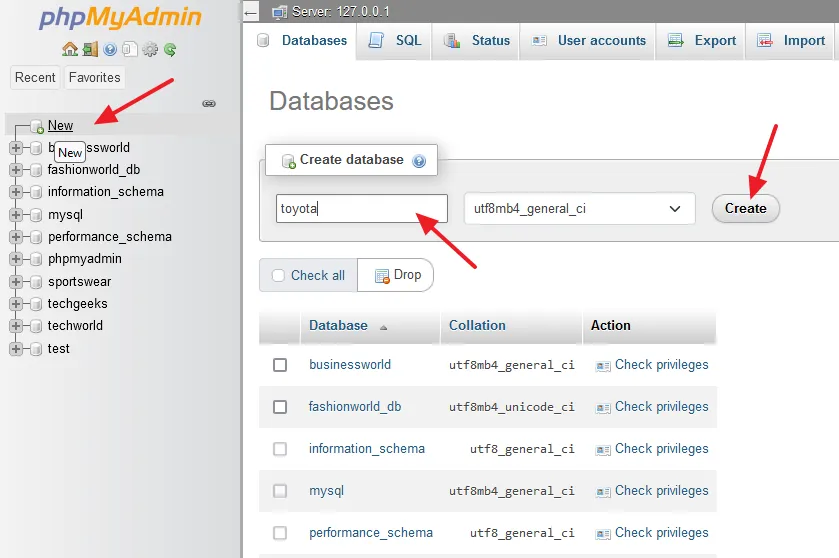
- Click on the New located in the sidebar to create a new database on phpMyAdmin.
- At your right side under the Create database enter the Name of your database.
- Click on the Create button.
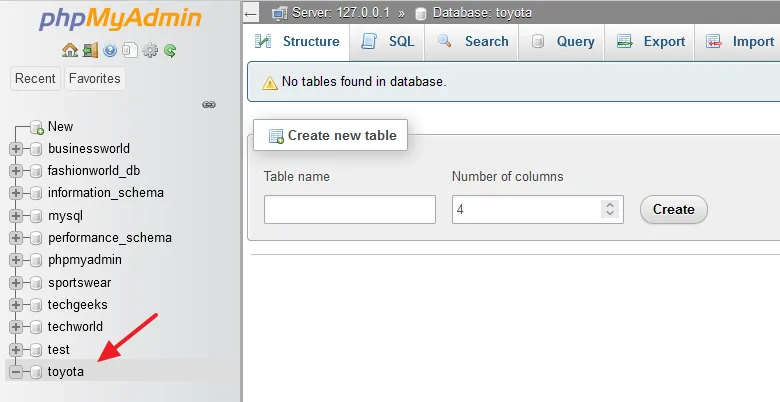
- You can see that the database toyota is created on phpMyAdmin. The tables in the database will be automatically created and filled during the Typo3 installation.
04. How to Install Typo3 CMS on XAMPP in Windows
The environment is ready, follow the steps to install Typo3 CMS on XAMPP in Windows.
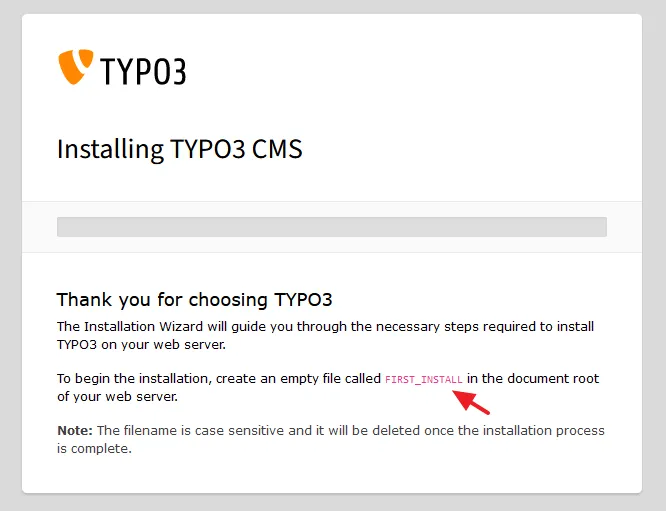
- Browse your Typo3 folder/site like this: http://localhost/Typo3_Site_Name, for example, http://localhost/toyota.
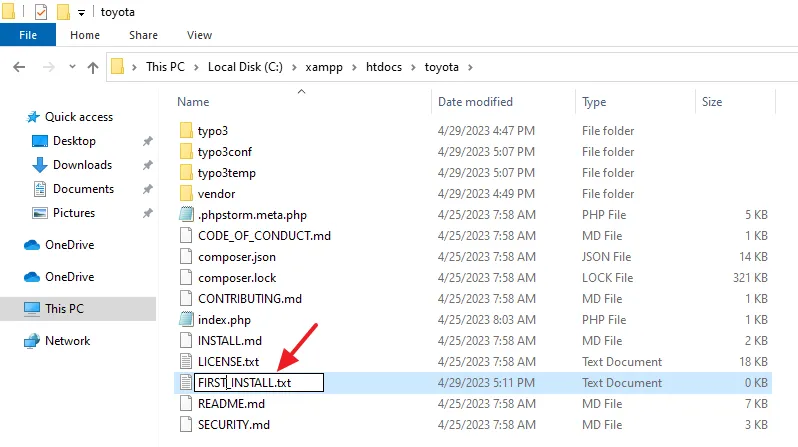
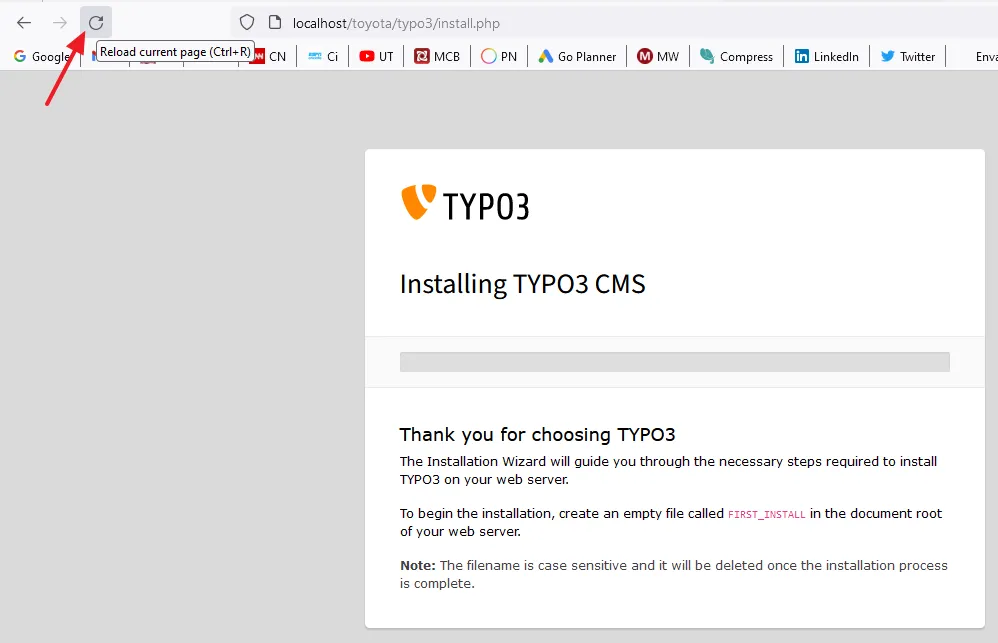
- Typo3 is telling you that to begin the installation, create an empty file called FIRST_INSTALL in the document root of your web server.
Follow the next steps to learn about how to create an empty file with the name FIRST_INSTALL.
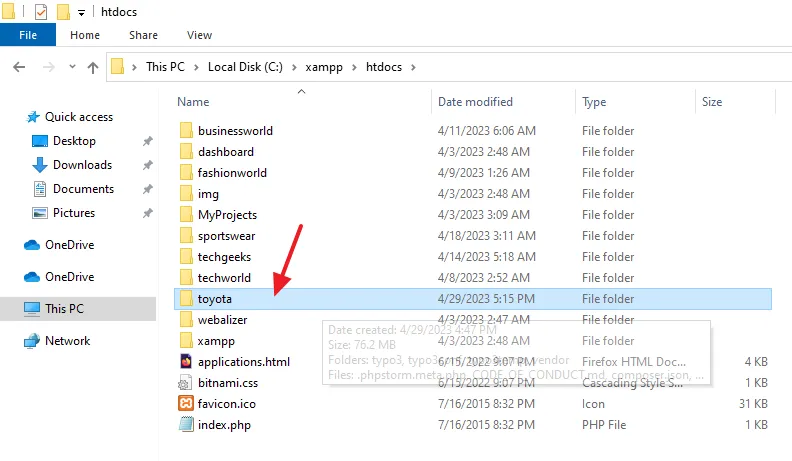
- Go to XAMPP => htdocs, and open your Typo3 folder.
- Right-click on a white space. Go to New and click on the Text Document.
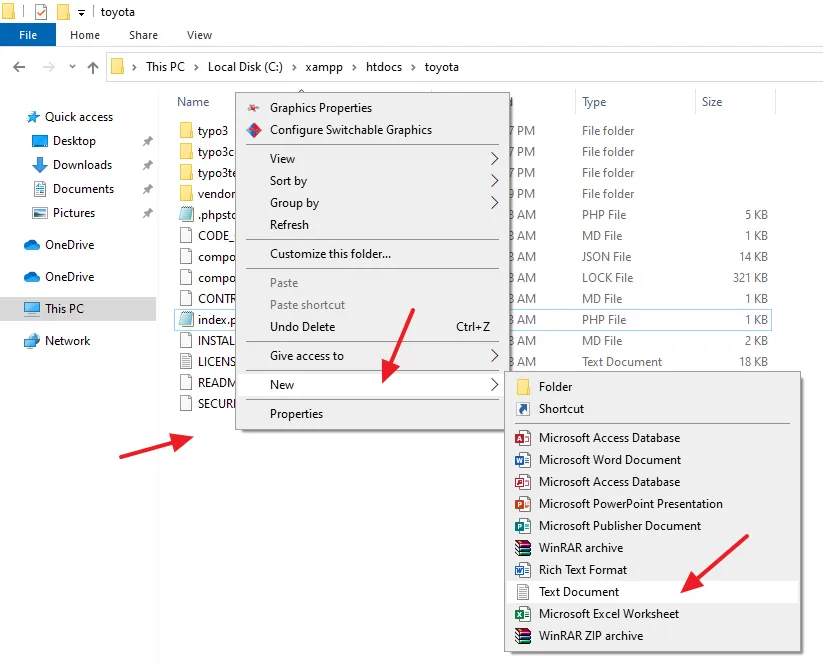
- Rename the text file to FIRST_INSTALL.
- Now go back to Typo3 Installation tab on browser and Reload the page.
- It may show you the error, “Problem Detected. Windows apache thread stack size…“. This error has been already addressed in the Section 2 (Set Up Environment for Typo3 on XAMPP => 02. Configure httpd.conf file), so ignore this error here.
- Click on the Continue with errors button. If the installation doesn’t go forward, press Enter on your URL Bar.
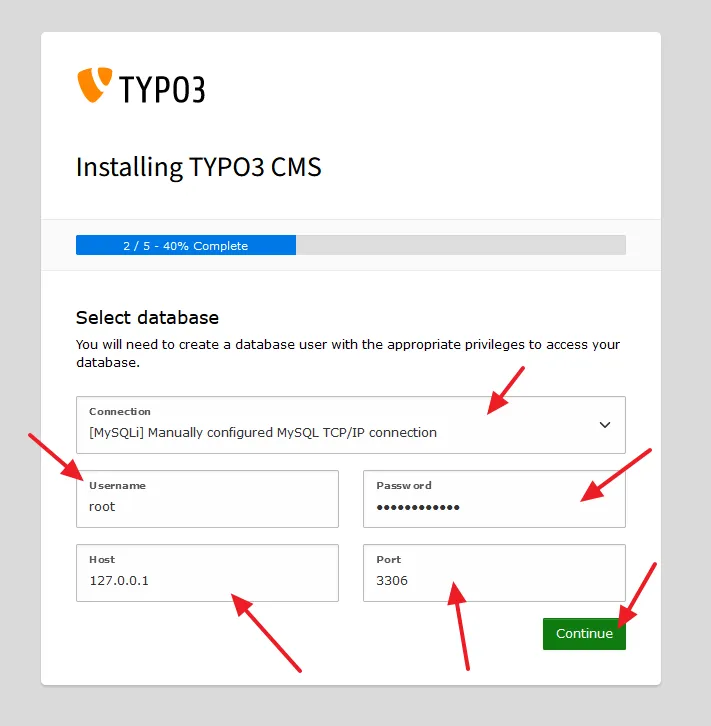
- In the Connection choose [MYSQLi] Manually configured MySQL TCP/IP connection.
- In the Username enter your phpMyAdmin username which is by default root (if you haven’t changed).
- In the Password enter the password of phpMyAdmin username. If you haven’t set root password for username, leave this field empty.
- In the Host enter 127.0.0.1. It means localhost.
- In the Port enter 3306.
- Click on the Continue button.
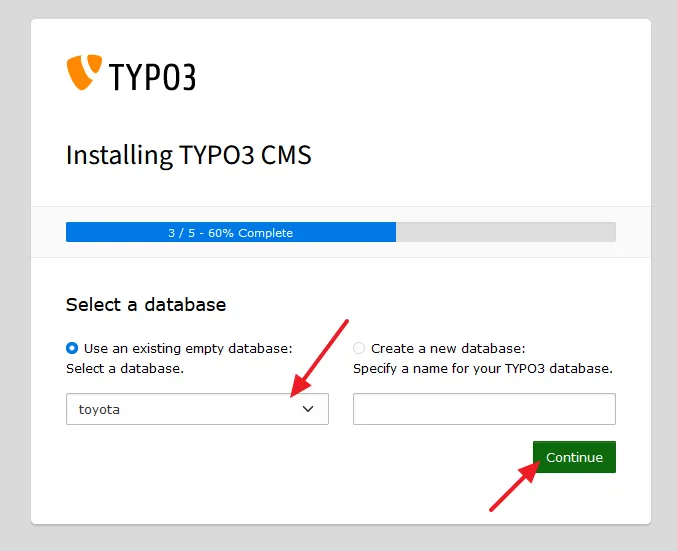
- Select Use an existing empty database: option and choose you database that you have created on phpMyadmin for Typo3.
- Click on the Continue button.
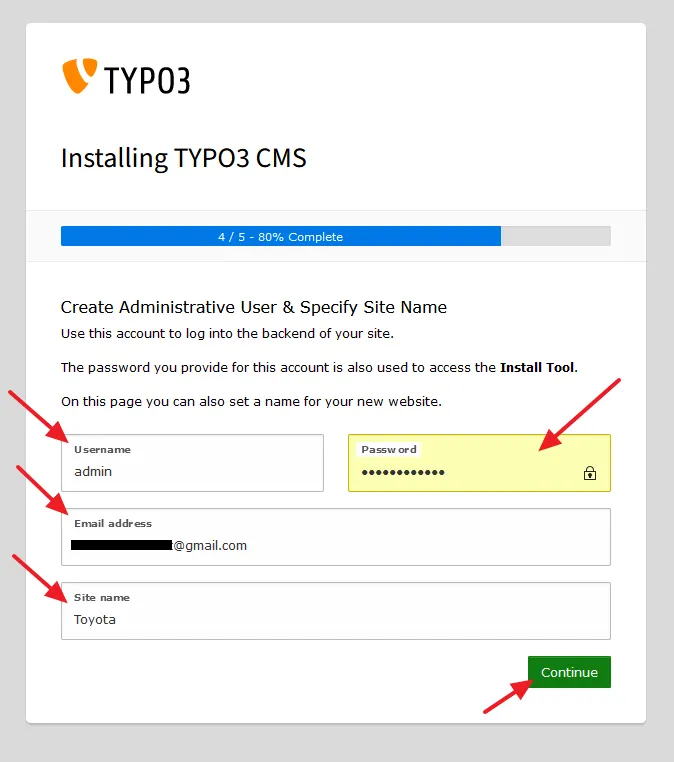
Create administrative user & specify site name.
- Enter a Username and Password.
- Enter your Email address.
- Enter your Site name.
- Click on the Continue button.
- Select Create empty starting page option. If you want to install a demo site select Yes, download the list of distributions.
- Click on the Open the TYPO3 Backend button.
If you choose the third option, Take me straight to the backend you get the below errors on your site (front-end):
500
Page Not Found
The page did not exist or was inaccessible. Reason: No TypoScript record found!

404
Page Not Found
The page did not exist or was inaccessible. Reason: The requested page does not exist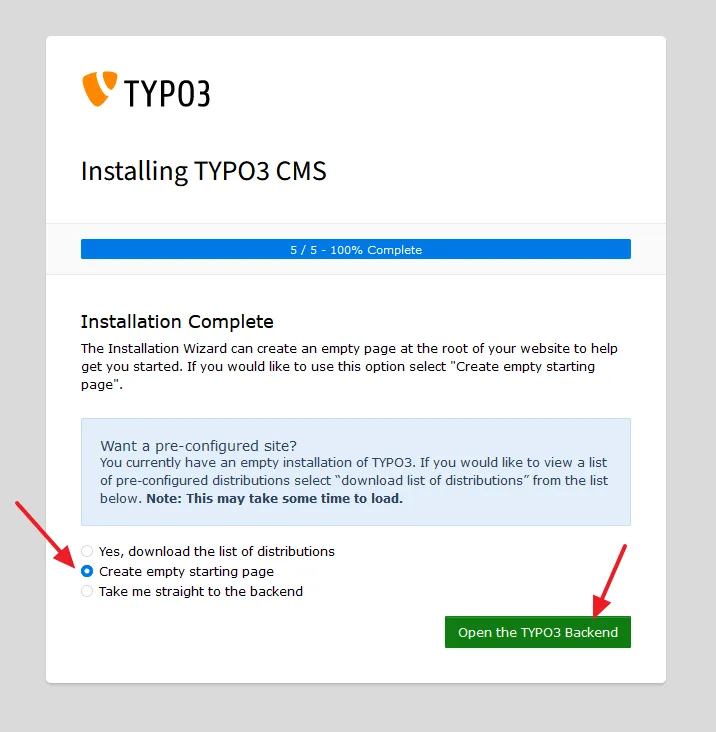
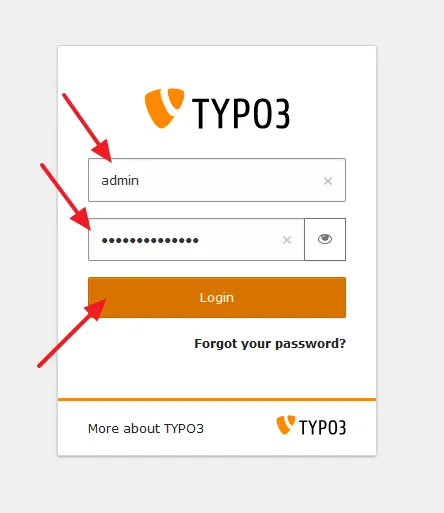
- You will be redirected to Typo3 admin login. Enter your admin Username and Password.
- Click on the Login button.
Next time you can open admin page via this URL: http://localhost/site_name/typo3/, for example, http://localhost/toyota/typo3/.
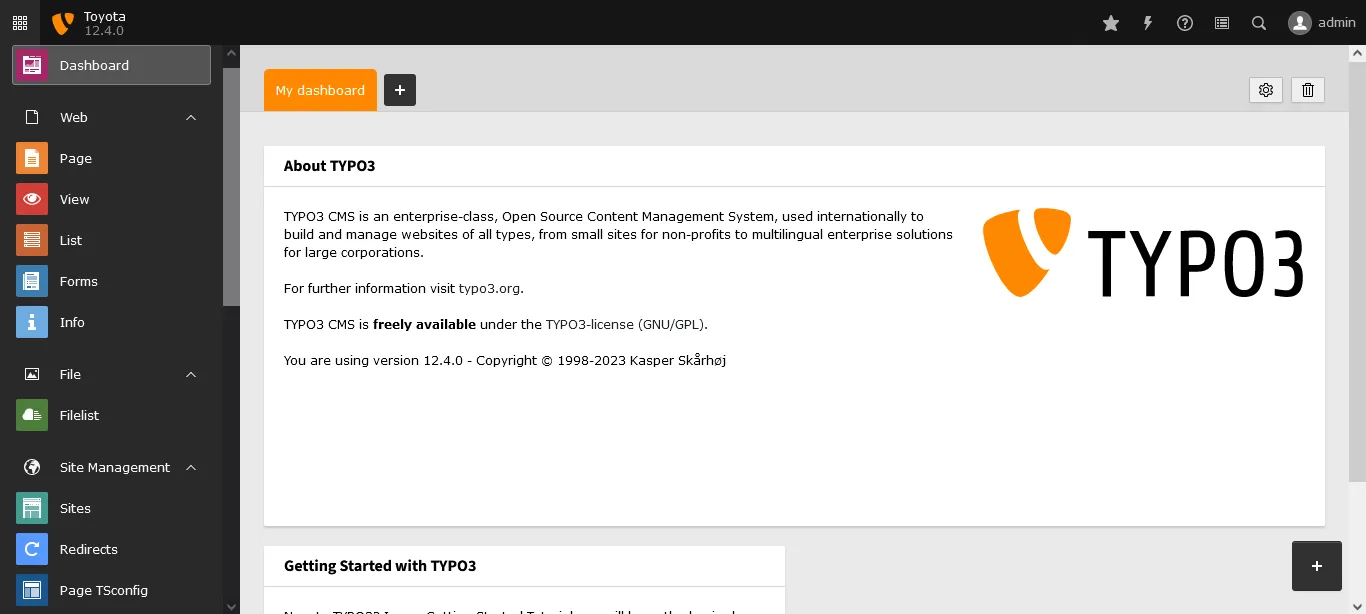
- This is how the admin section of Typo3 looks like. It is divided into five main sections i.e. Webpages and database content, File administration on the server, Configuration and management tools for sites, Administration and maintenance tools, and Observe system status and adapt system parameters.
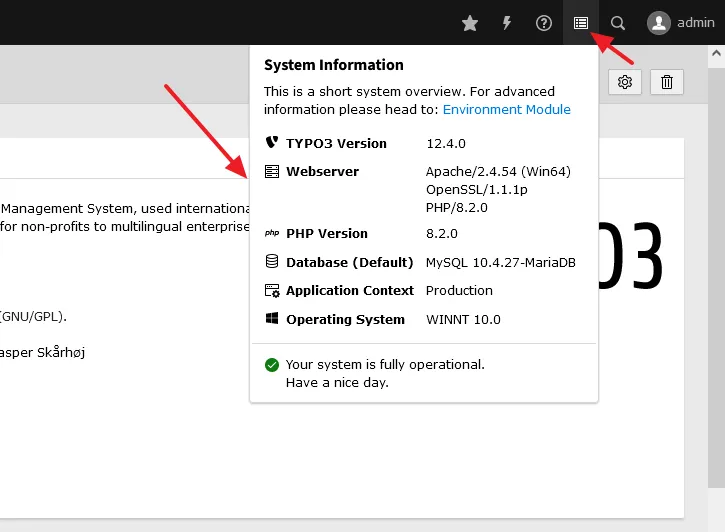
- Click on the System Information icon to view quick information and to check whether there are issues or errors.
- Under the Web section, Click on the View.
- Click on the View webpage to open the front-end of your site. You can directly open the front-end of your site via this URL: http://localhost/site_name, for example, http://localhost/toyota/.
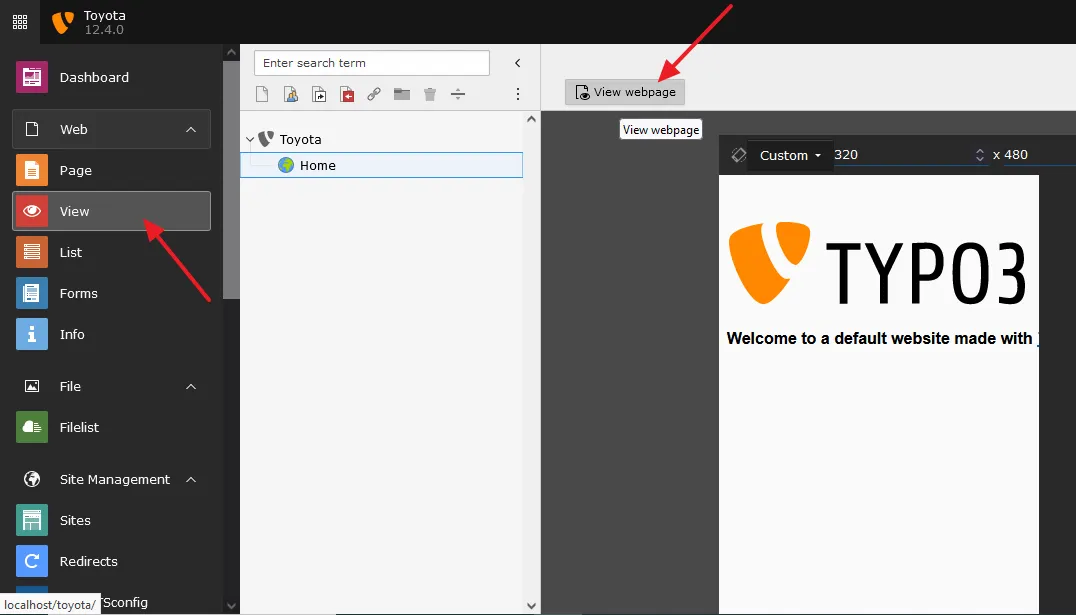
- This is how a Typo3 site looks like with a basic starter page.

So it was all about installing Typo3 CMS on XAMPP in Windows step-by-step. I hope that this tutorial will have helped you. If you like this post then don’t forget to share with other people. Share your feedback in the comments section below.

Also Read
- How to Install Joomla on XAMPP | Beginner’s Guide
- How to Install WordPress on XAMPP | Beginner’s Guide
- How to Install ExpressionEngine on XAMPP in Windows
- How to Install Drupal on XAMPP in Windows
- How to Install ProcessWire CMS on XAMPP in Windows
- How to Buy Domain & Hosting Step-by-Step
- How to Install OpenCart on XAMPP in Windows
- How to Install Dropback CMS on XAMPP in Windows
- How to Install CMS Made Simple on XAMPP in Windows
- How to Install Composr CMS on XAMPP in Windows



Leave a Reply