Do you want to learn how to install CMS Made Simple on XAMPP in Windows? You’re in the right place.
In this tutorial, I will guide you step-by-step on How to download and extract CMS Made Simple’s installation file to XAMPP htdocs, How to create a database for CMS Made Simple on phpMyAdmin, and How to install CMS Made Simple on XAMPP in Windows via cmsms-install.php file.
CMSMS (CMS Made Simple) is a PHP-based, user-friendly, highly expandable, free open-source Content Management System with freedom of design and powerful add-on modules.
If you haven’t installed XAMPP in Windows, follow this tutorial:
If you have not set root password on phpMyAdmin, follow this tutorial:
Following topics will be covered in this post:
- How to Download & Extract CMS Made Simple on XAMPP htdocs
- How to Create a Database for CMS Made Simple on phpMyAdmin
- How to Install CMS Made Simple on XAMPP in Windows
01. How to Download & Extract CMSMS on XAMMP htdocs
In this section, I will guide you on how to download and extract CMS Made Simple to your computer and how to extract and copy it to XAMPP htdocs directory. The htdocs is the root directory of XAMPP where you store/place your sites.
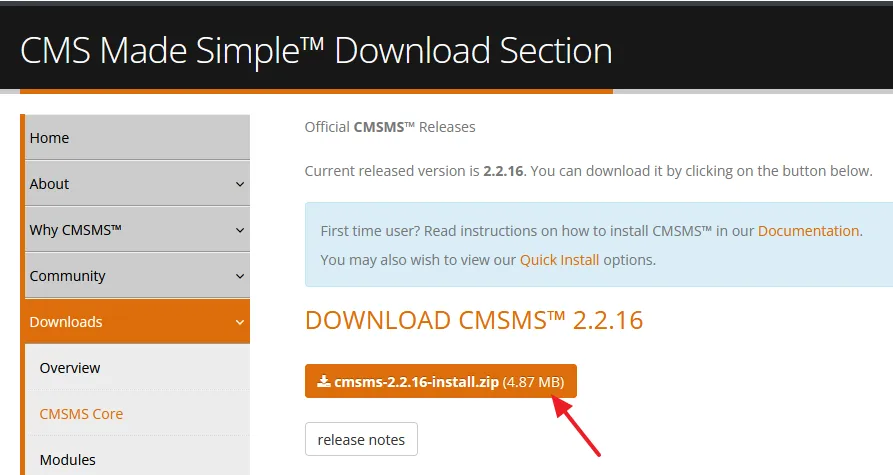
- Go to CMS Made Simple Download Section.
- Click on the cmsms-version-install.zip button. The current version here is cmsms-2.2.16.
- It will be downloaded to your computer.
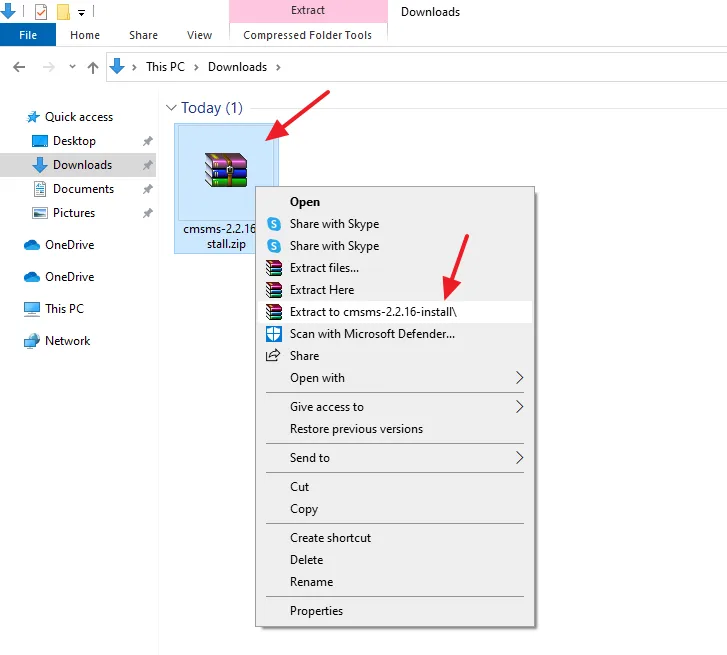
- Righ-click on the Zip file of CMSMS and click on the Extract to cmsms-version-install.
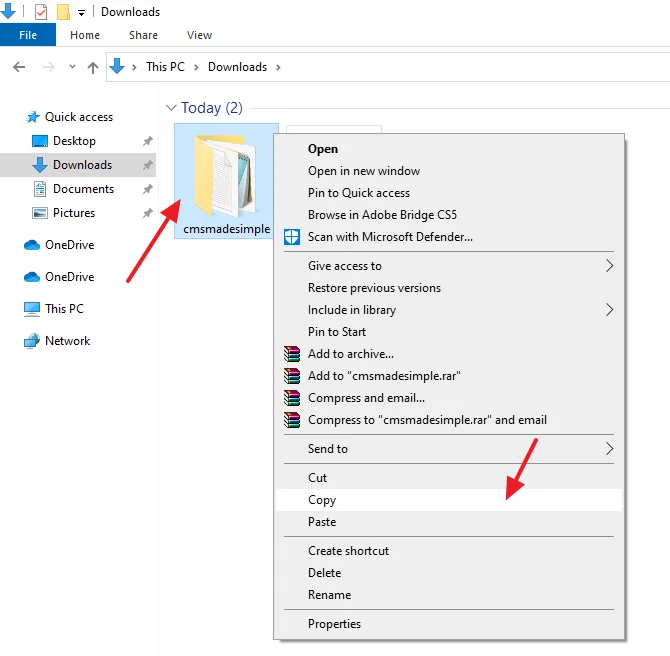
- Rename the extracted folder of CMSMS with your site/project name. The CMSMS folder contains cmsms-install.php file. The CMSMS will be installed on XAMPP by executing this file.
- Right-click on it and click on the Copy.
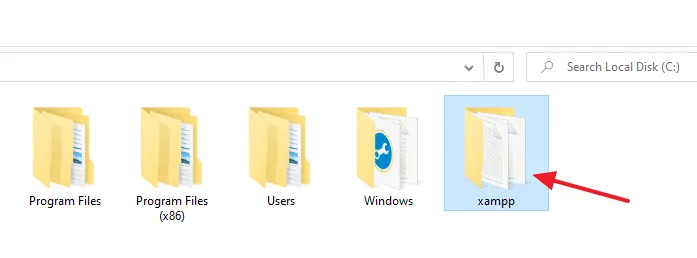
- Open the XAMPP folder.
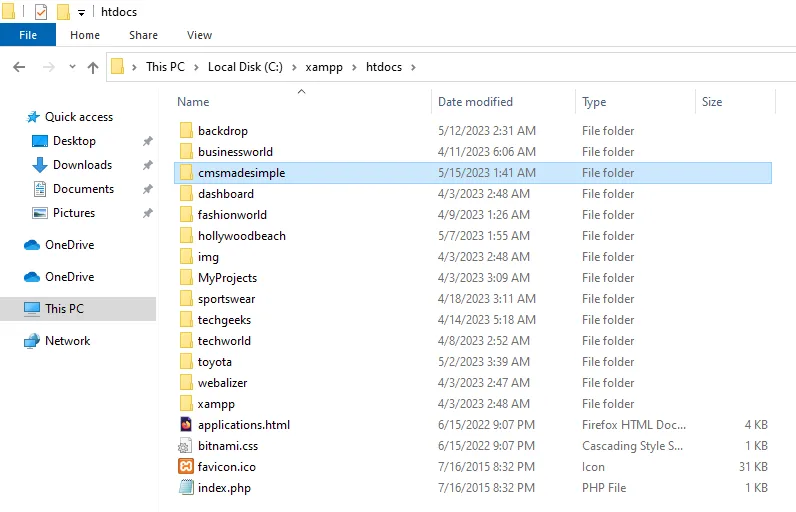
- Open the htdocs folder.
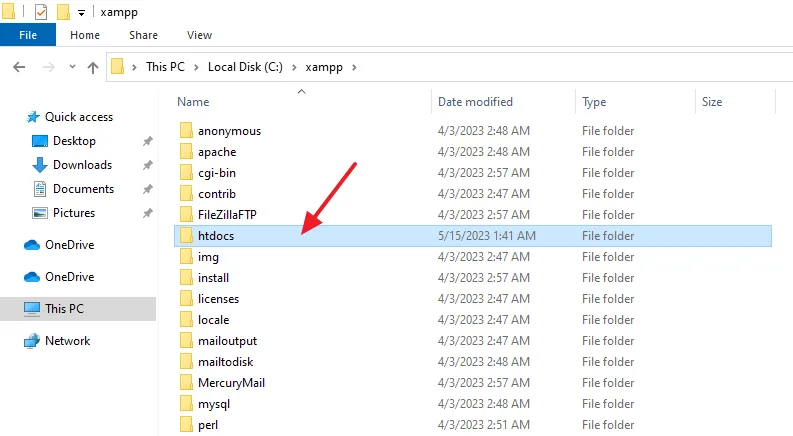
- Right-click on a white space and click on the Paste to copy the CMSMS folder & file to htdocs directory.
02. How to Create a Database for CMSMS on phpMyAdmin
In this section, I will guide you on how to create a database for CMS Made Simple on phpMyAdmin.
- Open the XAMPP localhost on your browser like this: http://localhost.
- Click on the phpMyAdmin tab. You can directly open the phpMyAdmin like this: http://localhost/phpmyadmin.
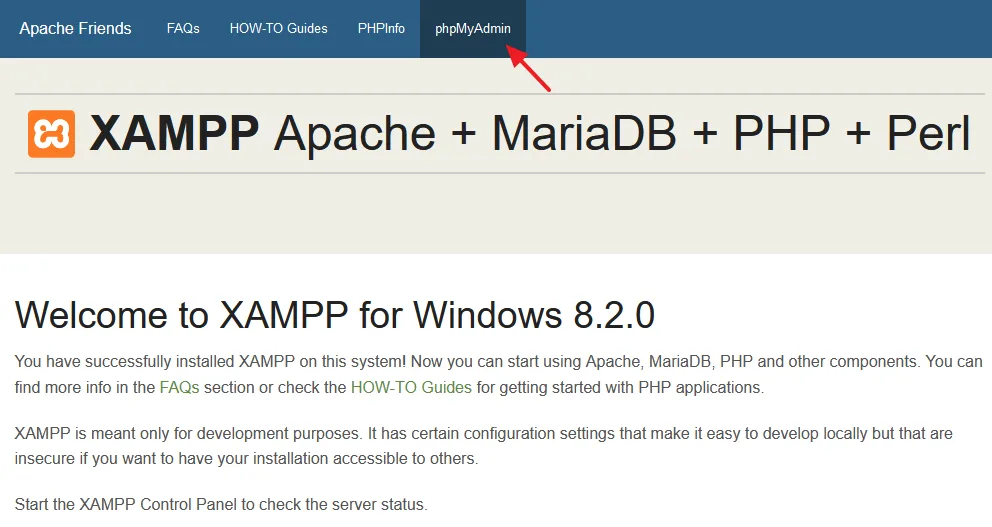
- Click on the New, located at the Sidebar.
- Go to Create database section and enter a Database Name.
- Click on the Create button.
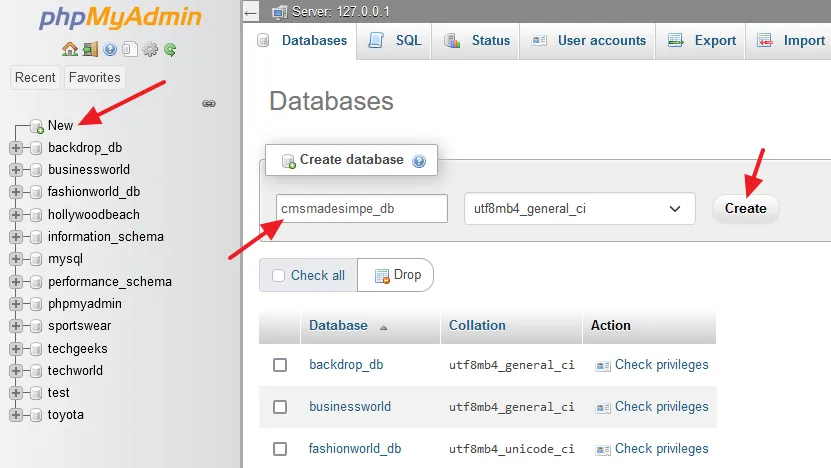
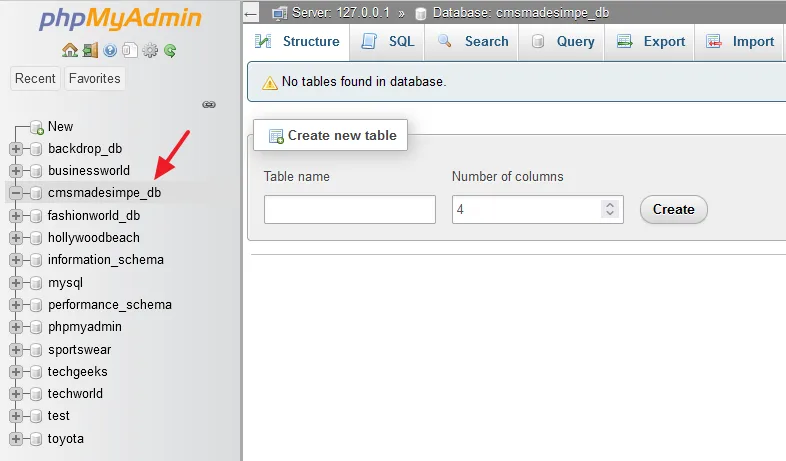
- You can see that a database with the name cmsmssimple_db is created on the phpMyadmin. The tables on the database will be automatically created during the installation.
03. How to Install CMS Made Simple on XAMPP in Windows
In this section, I will guide you on how to install CMS Made Simple on XAMPP in Windows using the cmsms-install.php file.
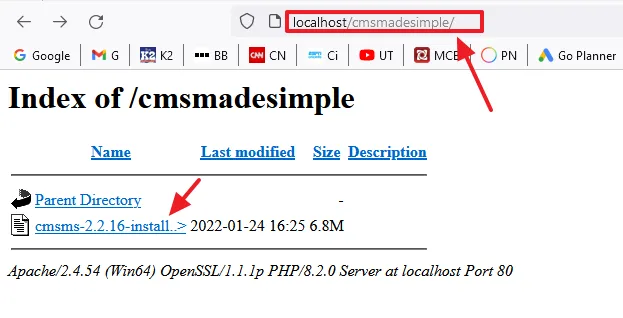
- Browse the CMS Made Simple folder on localhost that you had copied to htdocs directory, like this: http://localhost/your_site_name.
- Click on the cmsms-version-install.php file. It will open the CMS Made Simple Installation and Upgrade Assistant, as shown in the next step.
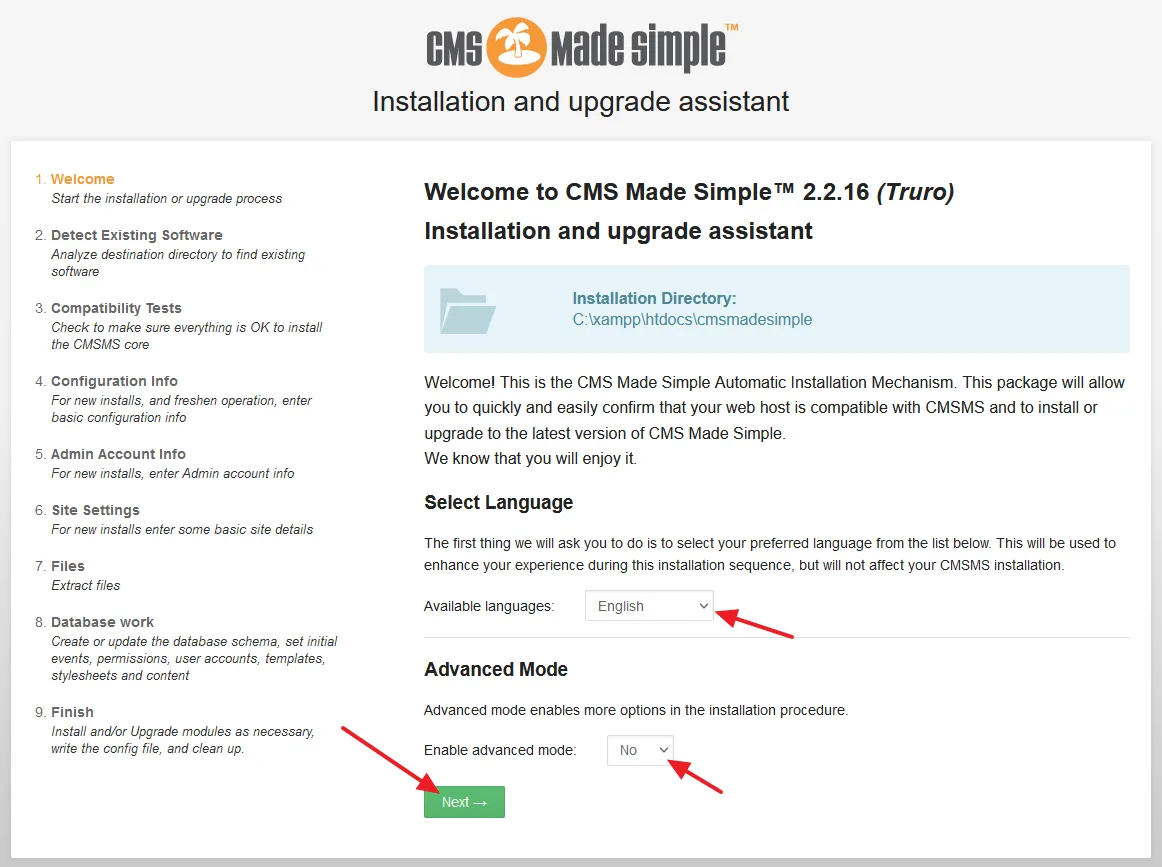
- Select your Language.
- You can enable Advanced Mode, if you wish.
- Click on the Next button.
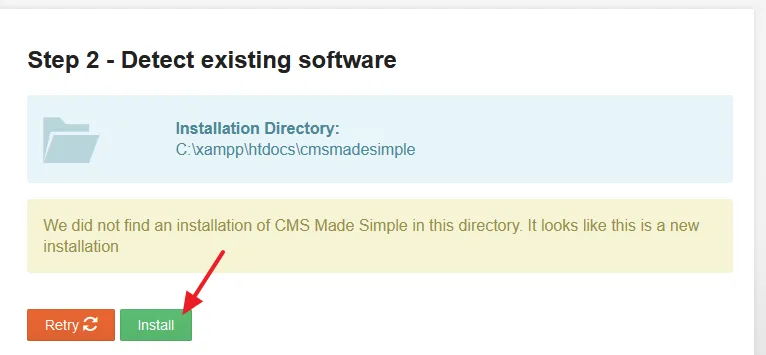
- First it will look for an existing installation of CMS Made Simple in the directory. If it finds, it may offer an Upgrade option. Since there is no existing installation, so click on the Install button.
- It will perform numerous tests of your current web environment (XAMPP localhost). If it recommends to fix issues or enable php extensions, do them. The php extensions can be enabled from php.ini file which you can directly open from XAMPP Control Panel => Apache Module => Config.
- Click on the Next button.
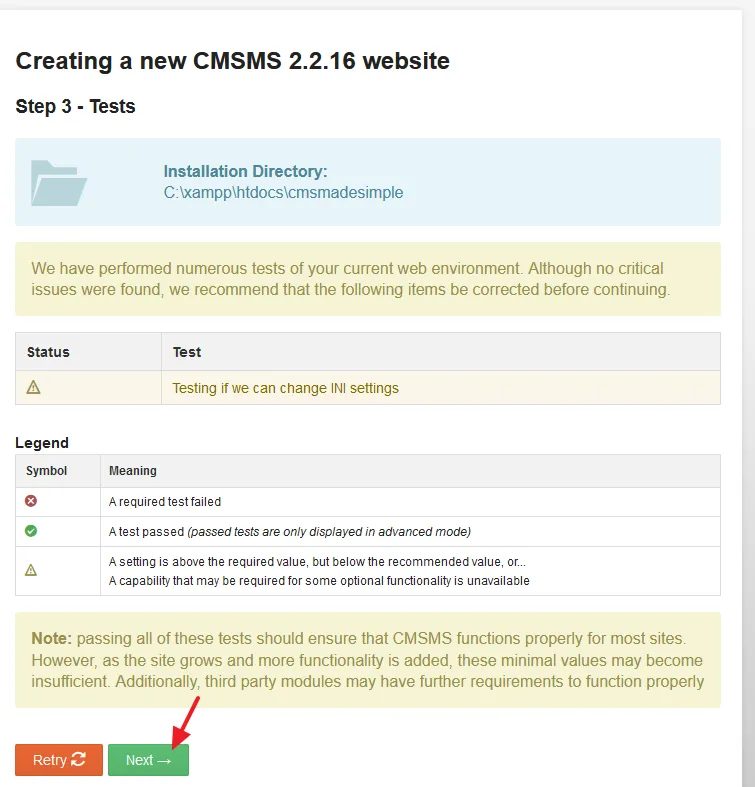
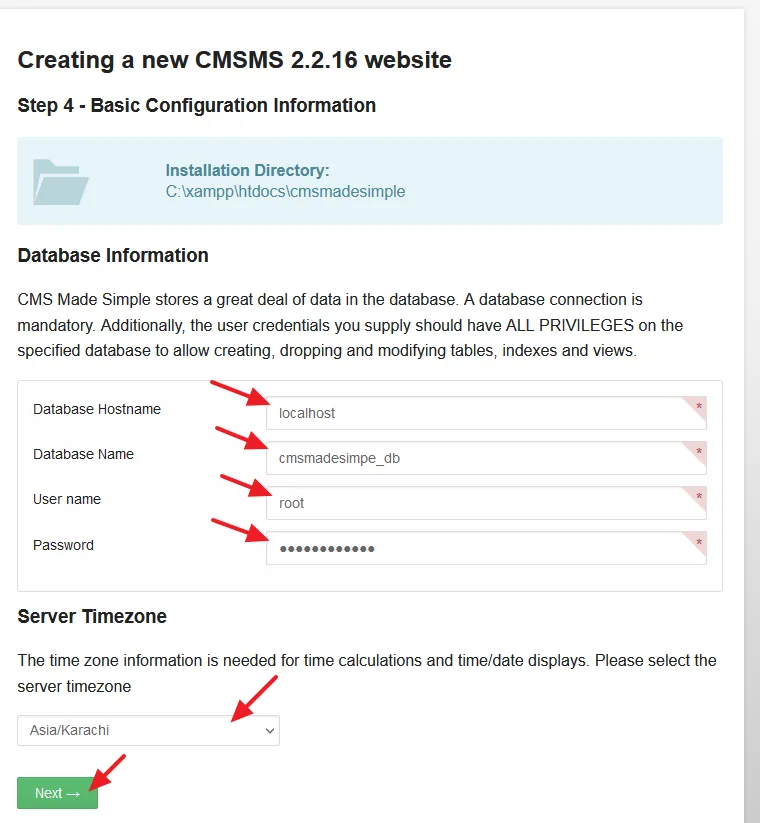
Provide your Database Information.
- In the Database Hostname enter localhost.
- In the Database Name enter the name of the database that you had created on the phpMyAdmin.
- In the User Name enter the username of phpMyAdmin. The default username is root.
- Enter the Password for the User Name. If you haven’t set password for root, leave this field empty.
- Choose your Server Timezone.
- Click on the Next button.
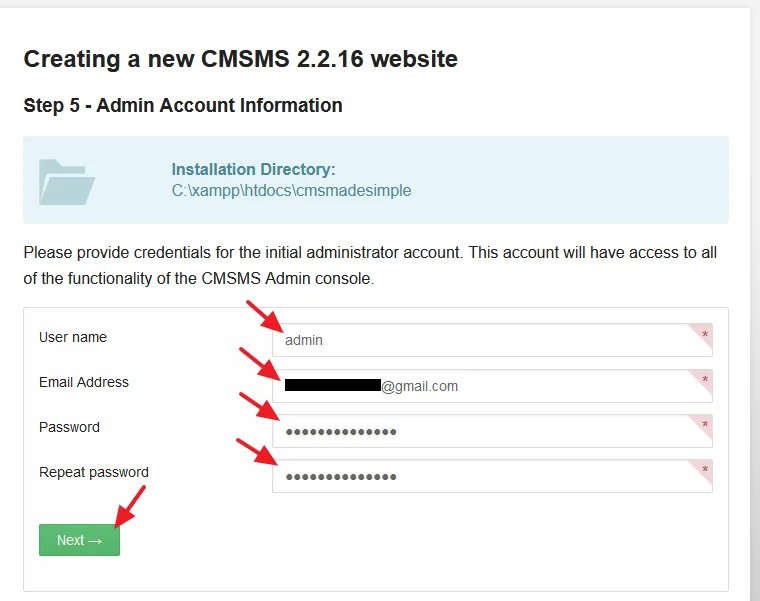
Provide information for the CMS Made Simple administrator account.
- Enter a Username.
- Enter your Email Address.
- Enter Password.
- Click on the Next button.
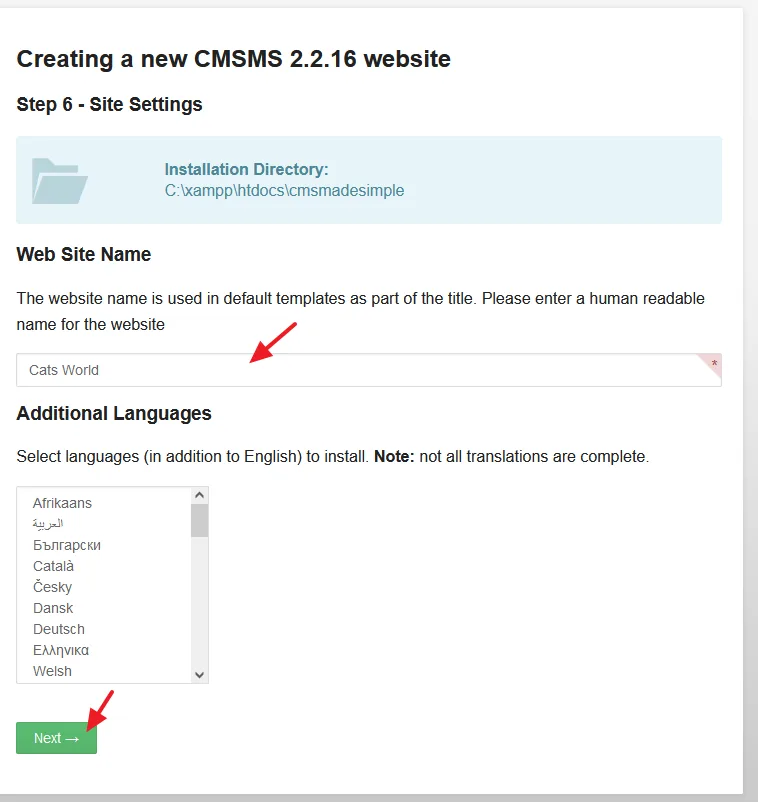
- Enter the Name of your website.
- Select a Language(s) in addition to English.
- Click on the Next button.
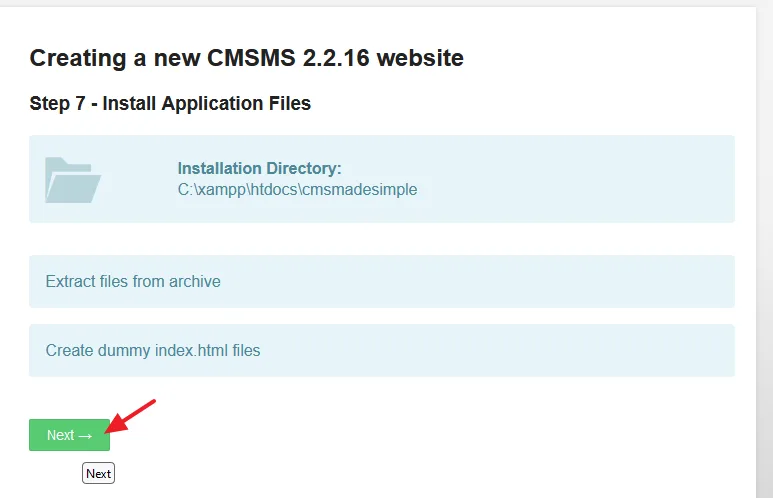
- It will extract application files from archive and install to your CMSMS directory.
- Click on the Next button.
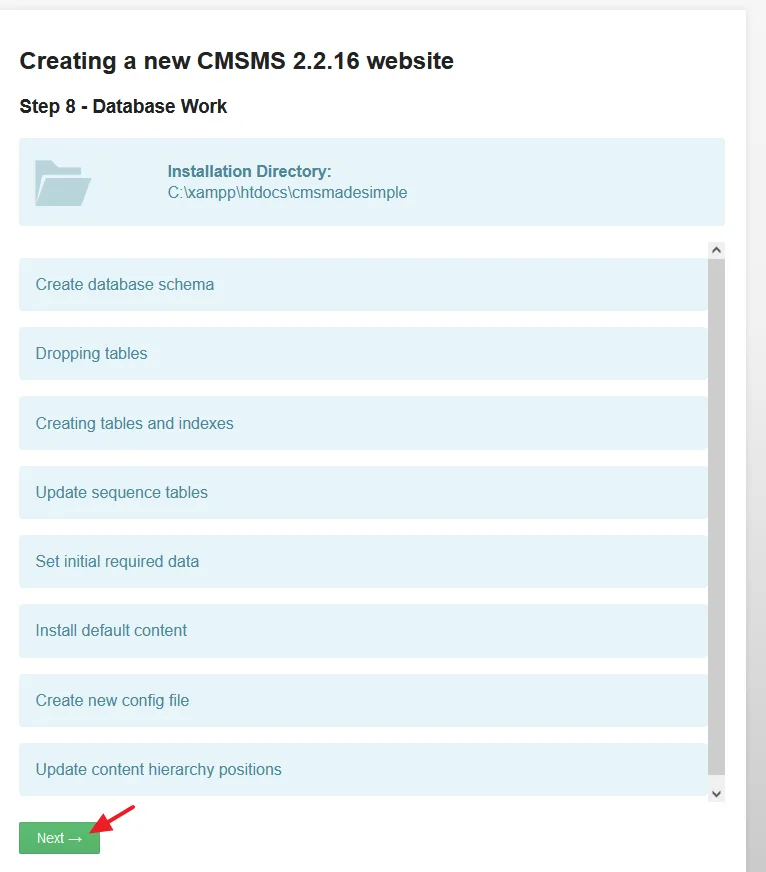
- It will create database schema, tables, etc, and install the default content.
- Click on the Next button.
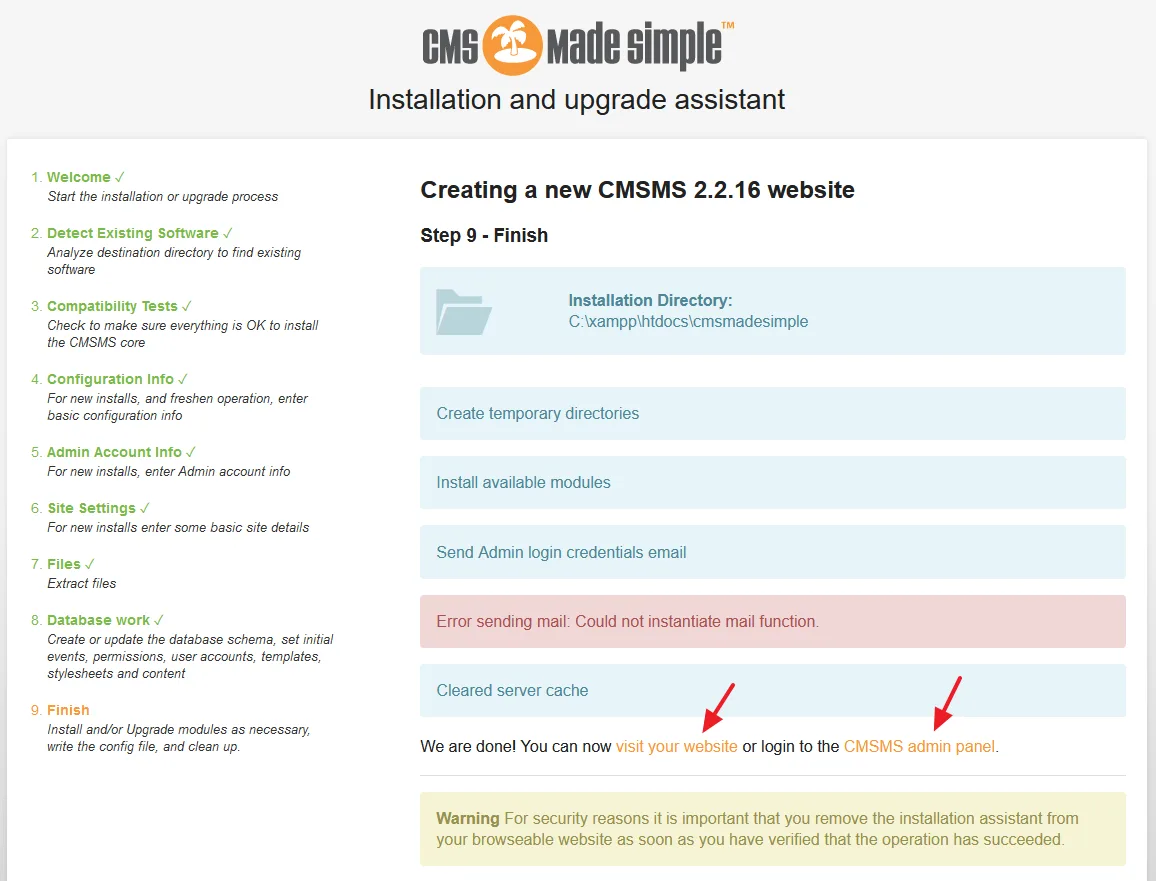
All the 8 steps are completed i.e. Welcome, Detect Existing Software, Compatibility Tests, Configuration Info, Admin Account Info, Site Settings, Files, and Database work.
Ignore this error, “Error sending mail: Could not instantiate mail function“, because the server is not configured to send mails. On Localhost, normally you don’t use/send emails.
- Scroll-down to, “We are done! You can now visit your website or login to the CMSMS admin panel”.
- Click on the visit your website link to open the homepage (front-end) of your website and CMSMS admin panel to open the admin section of your website.
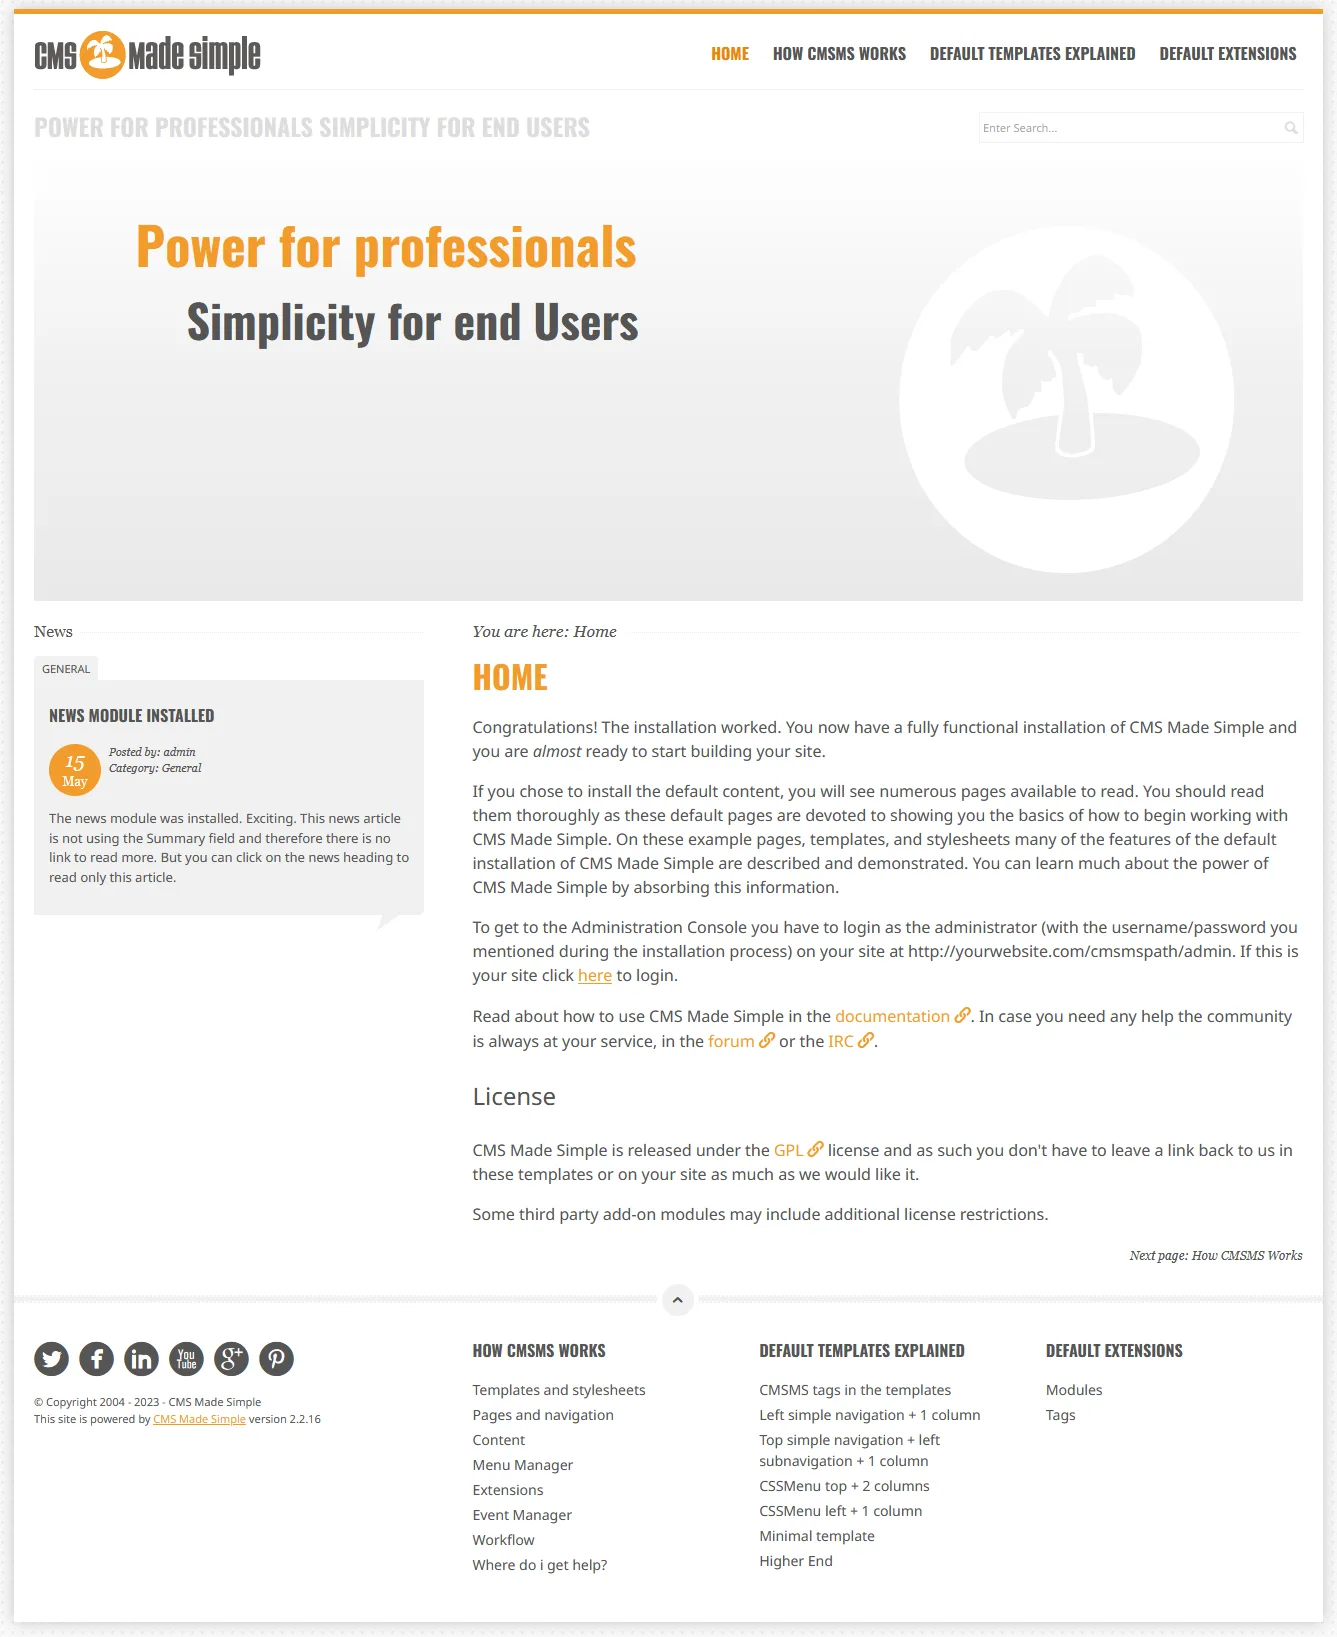
- This is the Homepage of CMS Made Simple website with a builtin theme and demo content. You can open website like this: http://localhost/site_name/, for example, http://localhost/cmsmadesimple/.
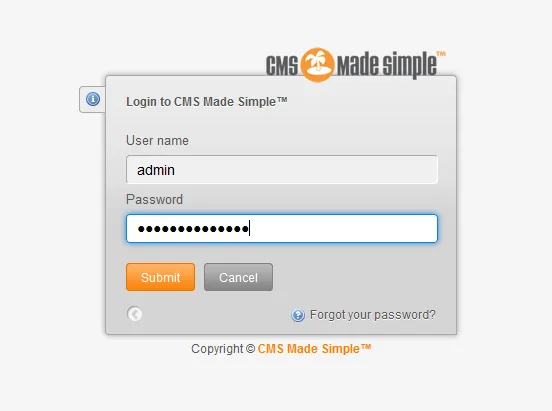
- This is the Admin Login to CMS Made Simple website. You can access this page on localhost through this URL: http://localhost/site_name/admin, for example, http://localhost/cmsmadesimple/admin.
- Enter Username and Password to log in.
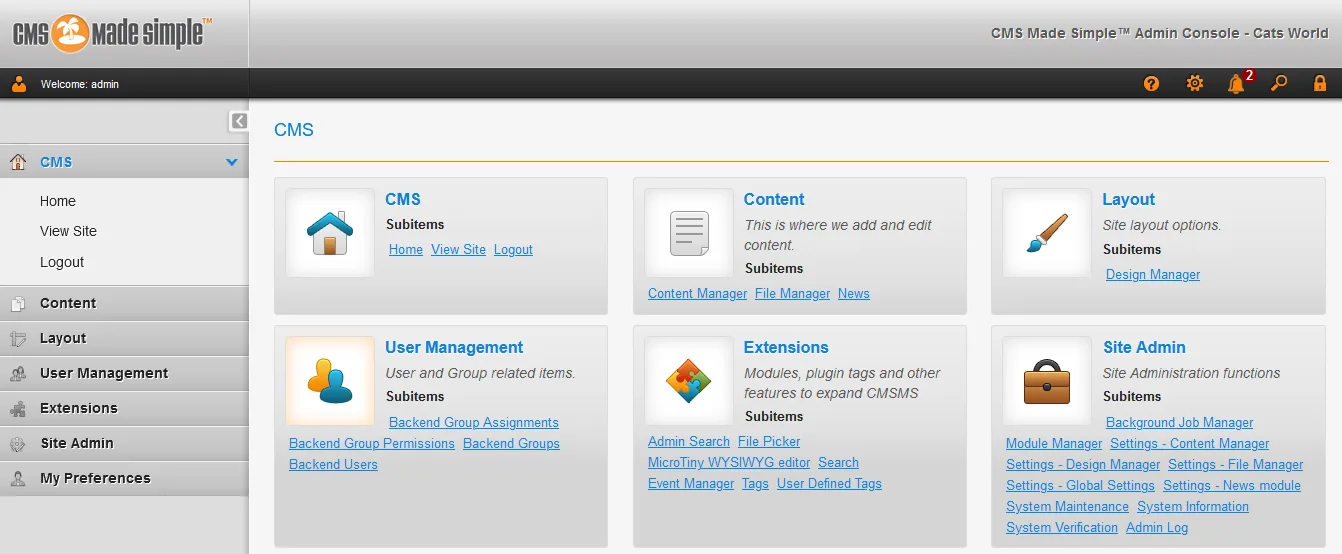
- This is how the admin section of CMS Made Simple looks like. You can manage Content, Layout, Users, Extensions, Preferences, and many more..
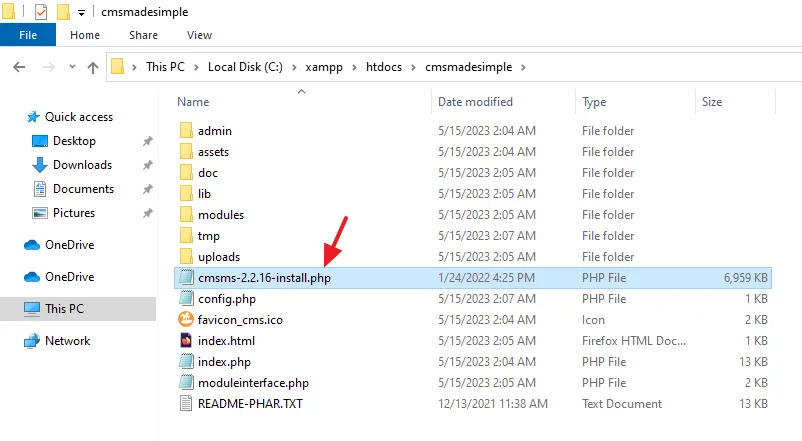
- For security reasons CMS Made Simple recommends you to remove the installation assistant file. Go to XAMPP htdocs and open your CMS Made Simple directory and delete the cmsms-version-install.php file because you don’t this file anymore.
If you like this post then don’t forget to share with other people. Share your feedback in the comments section below.
Also Read
- How to Install Joomla on XAMPP | Beginner’s Guide
- How to Install WordPress on XAMPP | Beginner’s Guide
- How to Install ExpressionEngine on XAMPP in Windows
- How to Buy Domain & Hosting Step-by-Step
- How to Install Typo3 CMS on XAMPP in Windows
- How to Install OpenCart on XAMPP in Windows
- How to Install ProcessWire CMS on XAMPP in Windows
- How to Install Dropback CMS on XAMPP in Windows
- How to Install Composr CMS on XAMPP in Windows
- How to Install Concrete CMS on XAMPP in Windows



Leave a Reply