Do you want to install OpenCart on XAMPP localhost in Windows? You’re in the right place.
In this tutorial, I will guide you step-by-step on how to download and extract OpenCart to your XAMPP htdocs directory, rename config-dist.php file, enable ZIP extension on XAMPP, create a database for OpenCart on phpmyadmin, and install OpenCart on XAMPP server.
OpenCart is a free open-source eCommerce platform (online store management system) for online sellers and merchants. It is written in PHP programming language, supports MySQL database and HTML components.
If you haven’t installed XAMPP in Windows, follow this tutorial:
If you have not set root password on phpMyAdmin, follow this tutorial:
Following topics will will be covered in this tutorial:
- How to Download & Extract OpenCart to XAMPP
- How to Rename Config-dist.php File
- How to Enable Required PHP Extensions on XAMPP
- How to Create a Database for OpenCart on phpMyAdmin
- How to Install OpenCart on XAMPP
- How to Remove Installation Directory
01. How to Download & Extract OpenCart to XAMPP
In this section, I will guide you on how to download & extract OpenCart to XAMPP htdocs directory. The htdocs is the root directory of XAMPP where you place and create sites and applications.
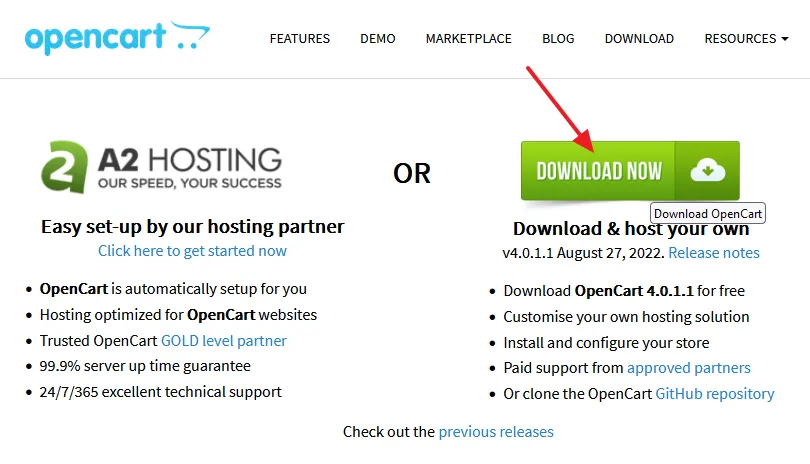
- Open the OpenCart Download Page.
- Click on the Download Now button.
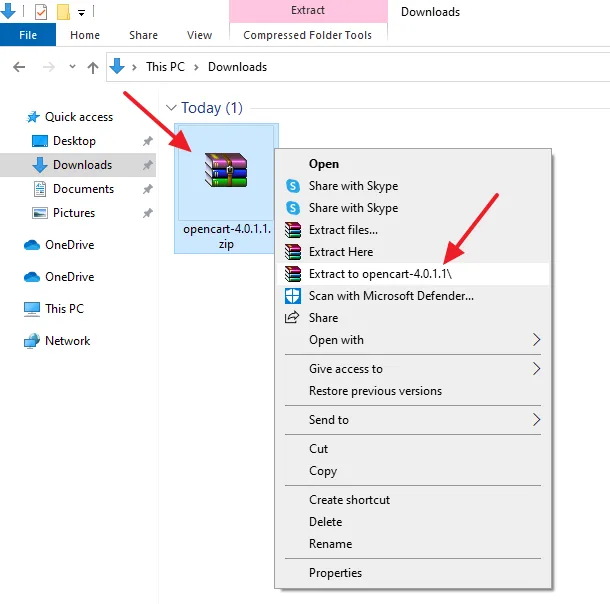
- Right-click on the ZIP file of OpenCart and click on the Extract to OpenCart. Here the current version of OpenCart is 4.0.1.1.
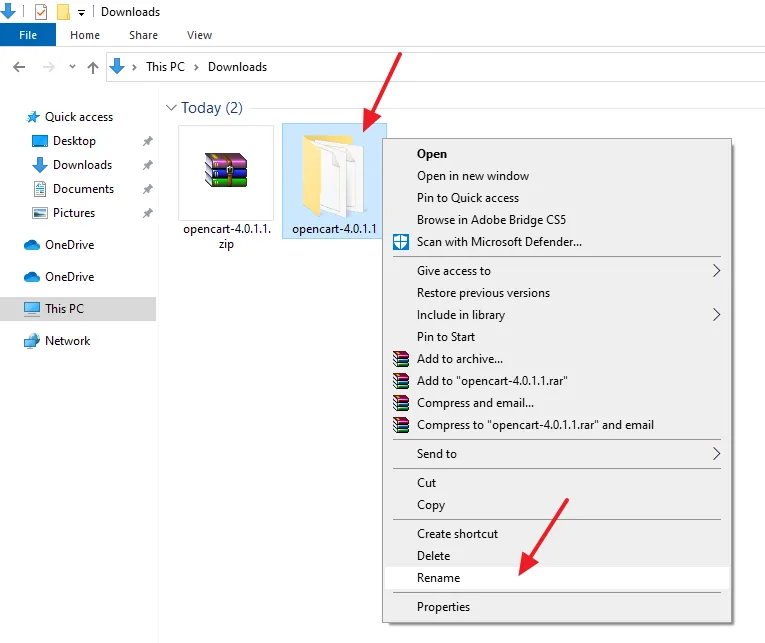
- Right-click on extracted folder and click on the Rename to rename your OpenCart folder with your site/project name. I have renamed the OpenCart folder to sportswear.
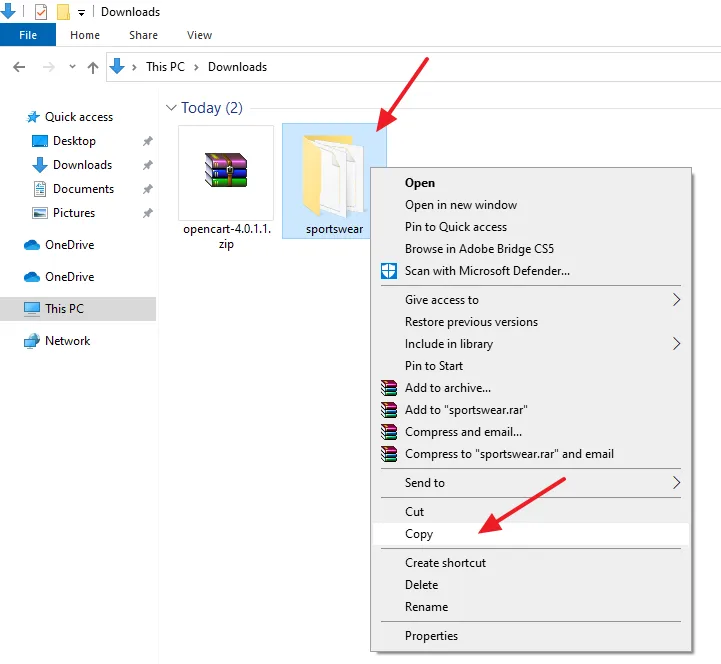
- Right-click on the OpenCart extracted folder and click on the Copy.
- Open the XAMPP folder.
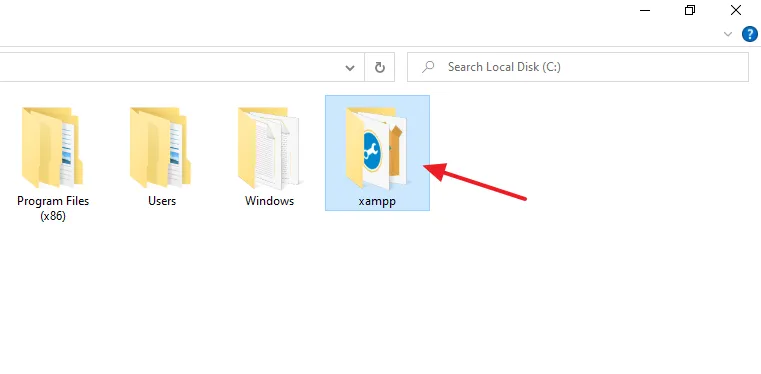
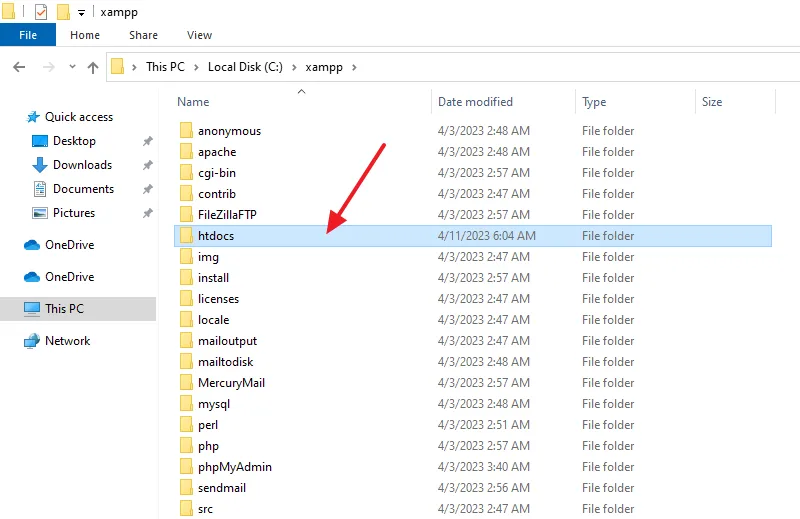
- Open the htdocs directory.
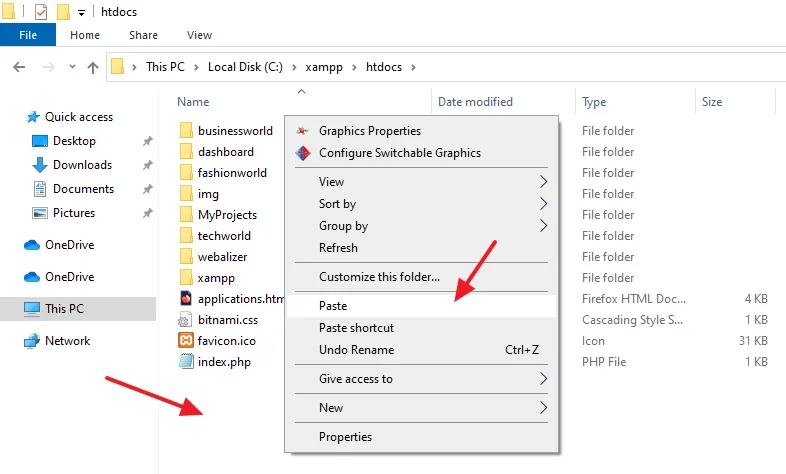
- Inside the htdocs directory, right-click on the white space and click on the Paste.
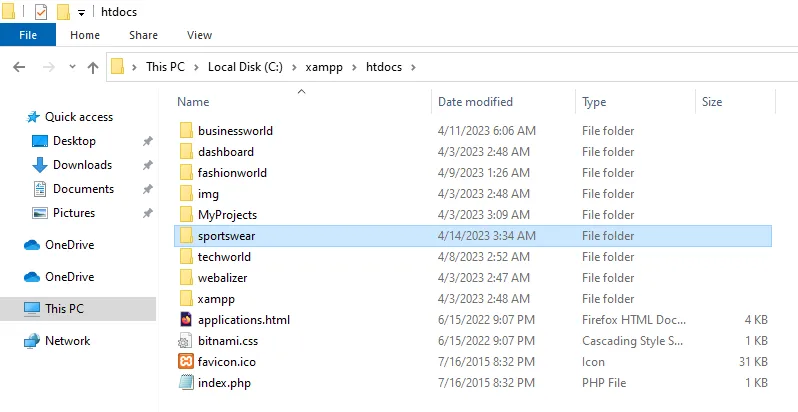
- You can see that the OpenCart is copied to htdocs.
- Open the upload folder which is located inside the OpenCart folder. All the installation files and folders of OpenCart are located inside this folder.
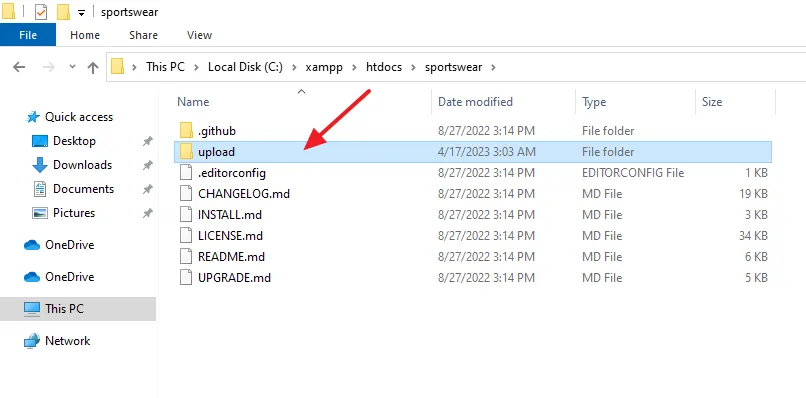
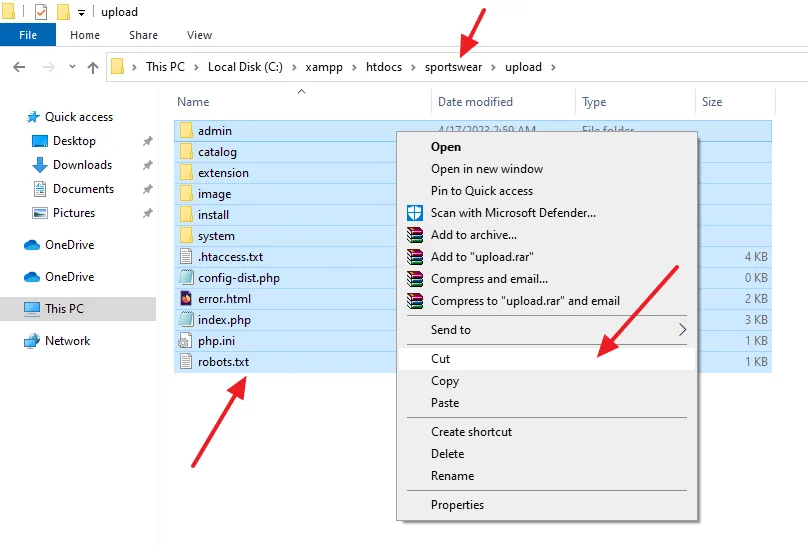
- Press Ctrl + A to copy all the files and folder of the upload folder.
- Right-click on the selected (highlighted) area and click on the Cut.
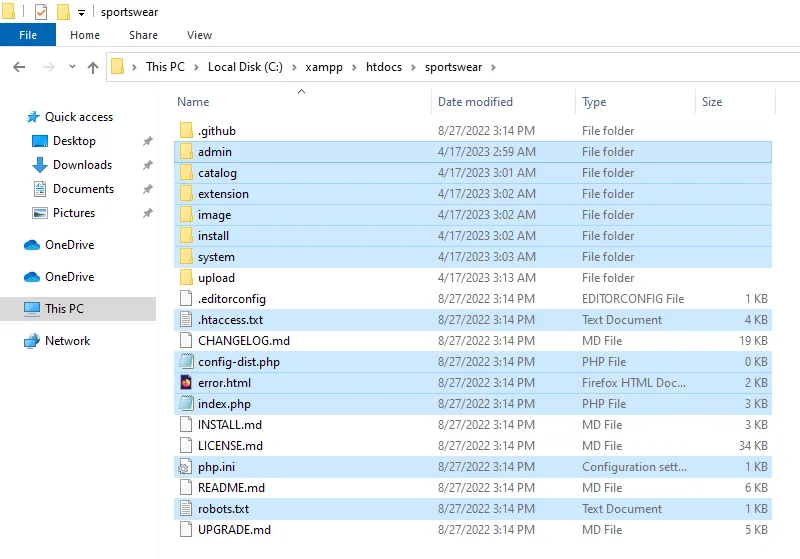
- Go back to OpenCart main folder.
- Inside the OpenCart main folder, right-click on the white space and click on the Paste. All the content of upload folder will be copied to OpenCart main folder.
02. How to Rename Config-dist.php File
In this section, I will guide you on how to rename OpenCart’s config-dist.php files to config.php.
If you don’t rename these files you get this error during the installation of OpenCart on XAMPP.
Please make sure you have set the correct permissions on the files list below.
C:/xampp/htdocs/sportswear/config.php (Missing)
C:/xampp/htdocs/sportswear/admin/config.php (Missing)
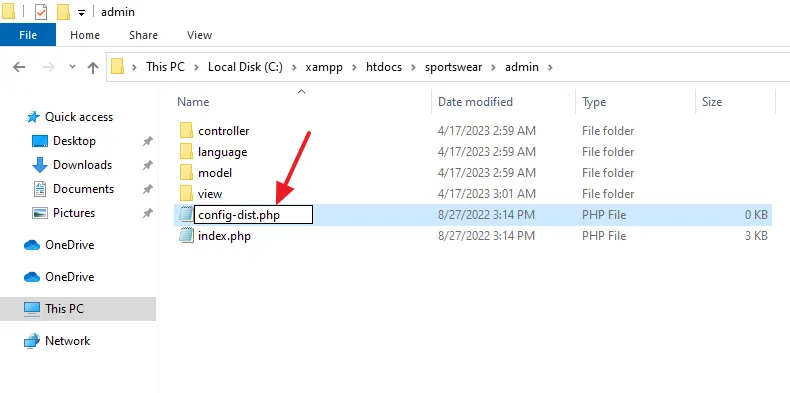
- Open the admin folder of OpenCart.
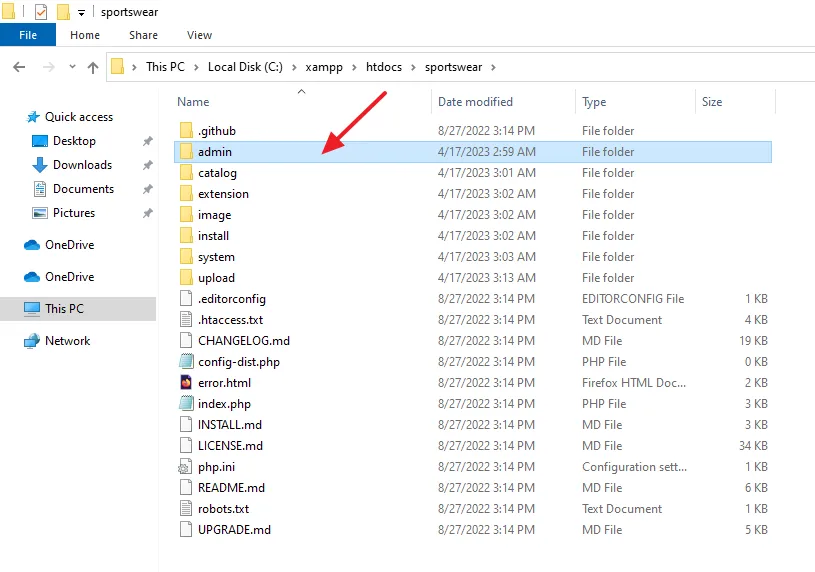
- Rename the config-dist.php to config.php.
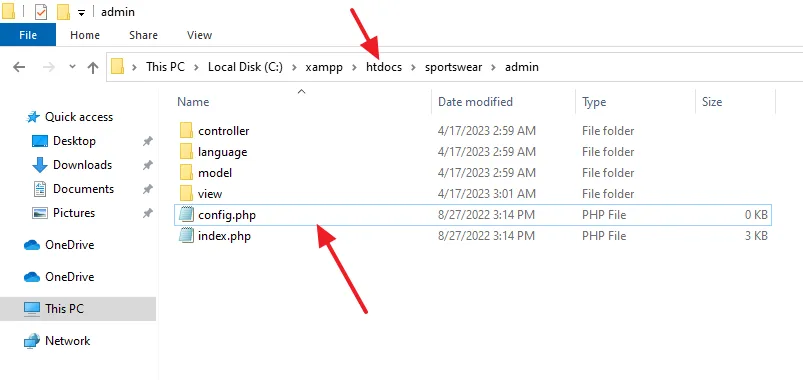
- You can see here that the config-dist.php is renamed to config.php.
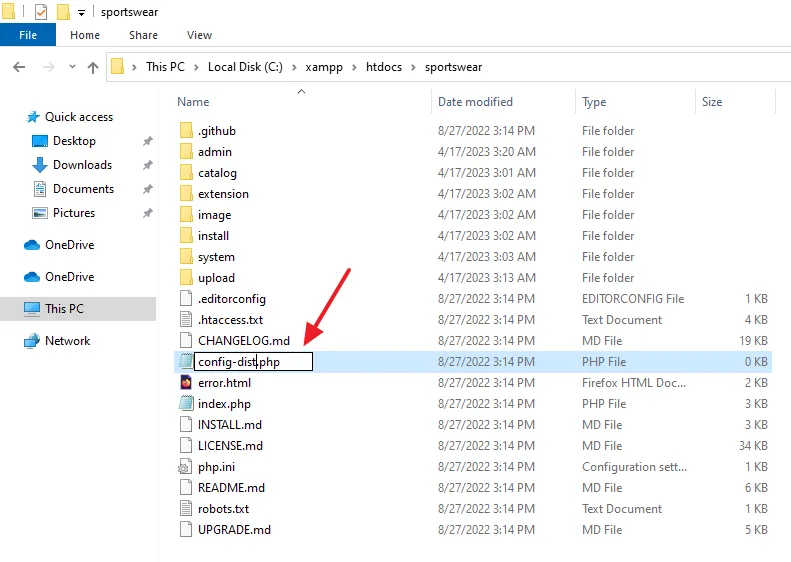
- Now go back to OpenCart main folder, there is another config-dist.php file.
- Rename the config-dist.php to config.php.
03. How to Enable Required PHP Extensions on XAMPP
In this section, I will guide you on how to enable PHP extension on XAMPP which are required for OpenCart.
NOTE: You can skip this step right now and comeback later if your OpenCart installation asks you to enable required extensions.
Here I am guiding you on how to enable zip extension on XAMPP, which is by default disabled on XAMPP. In the same file (PHP.ini) you can find and enable all other required PHP extensions like cURL, gd, OpenSSL, etc.
- Open the XAMPP Control Panel.
- Click on the Config button of Apache module.
- Click on the PHP (php.ini).
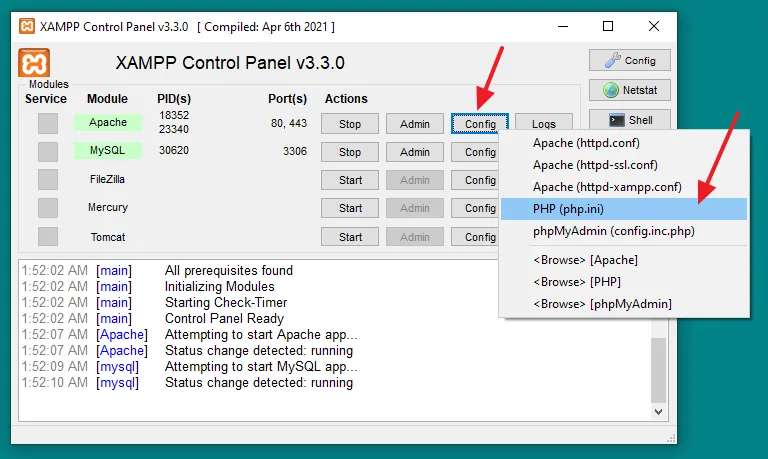
- The PHP.ini file will be opened on a Notepad file.
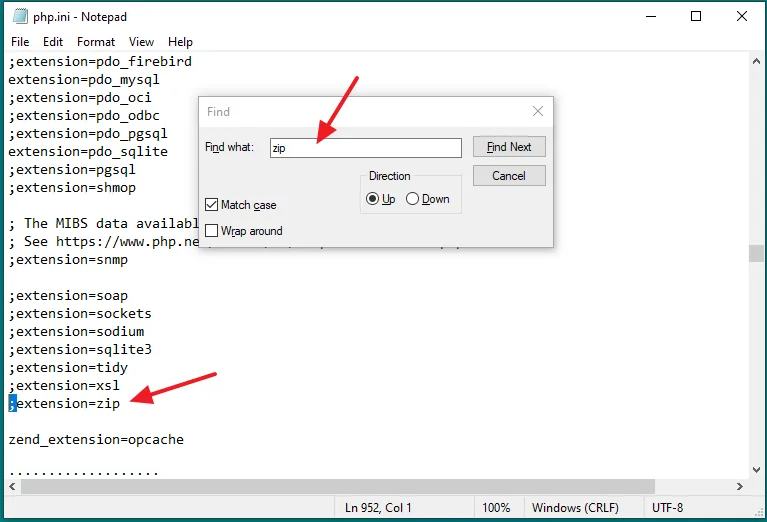
- Press Ctrl + F to find the extension. Here I have entered zip.
- Remove the semicolon (;) from the beginning of the extension to enable it. The semicolon (;) makes a line, text, extension, etc, comment when added at the beginning.
- Save the file.
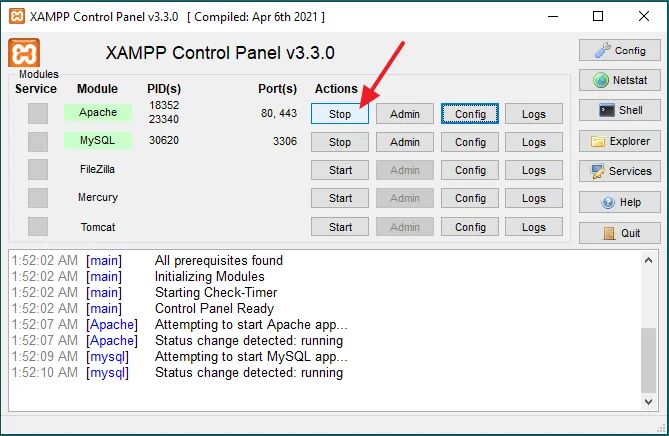
- Now go to XAMPP Control Panel and Stop the Apache module.
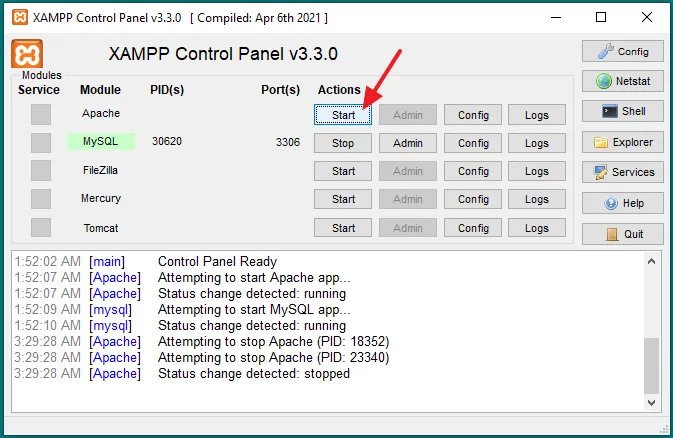
- Click on the Start button to restart the Apache module. When you make changes to configuration files you need to restart the XAMPP modules.
04. How to Create a Database for OpenCart on phpMyAdmin
In this section, I will guide you on how to create a database for OpenCart on phpMyAdmin where dynamic content will be stored.
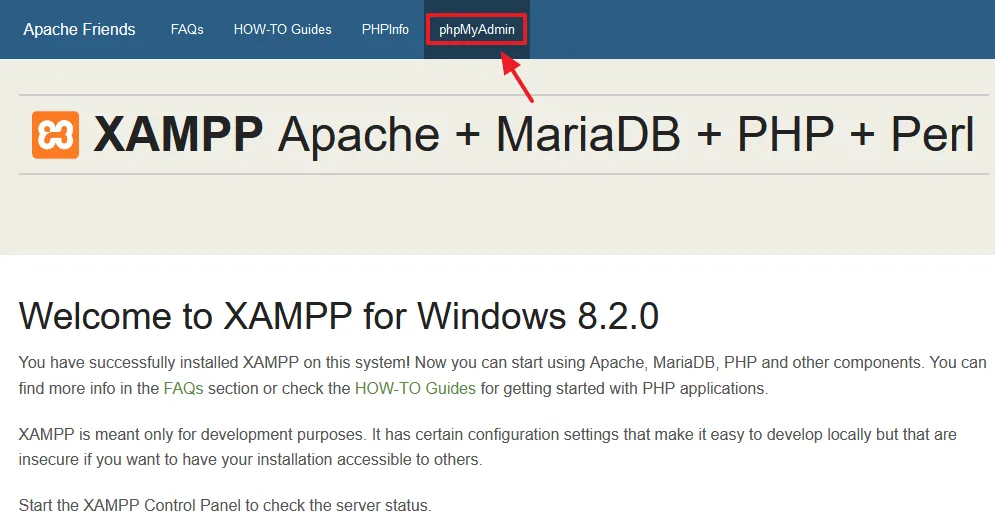
- Open XAMPP localhost (http://localhost) on your computer browser.
- Click on the phpMyAdmin tab to open the phpMyAdmin. You can directly open phpMyAdmin using this URL: http://localhost/phpmyadmin/.
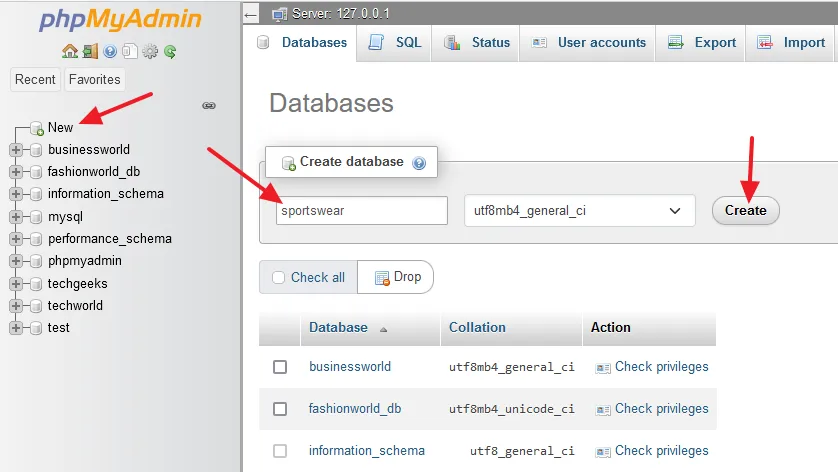
- Click on the New to create a new database on phpMyAdmin.
- Go to Create database section and enter your database name. I have entered sportswear.
- Click on the Create button.
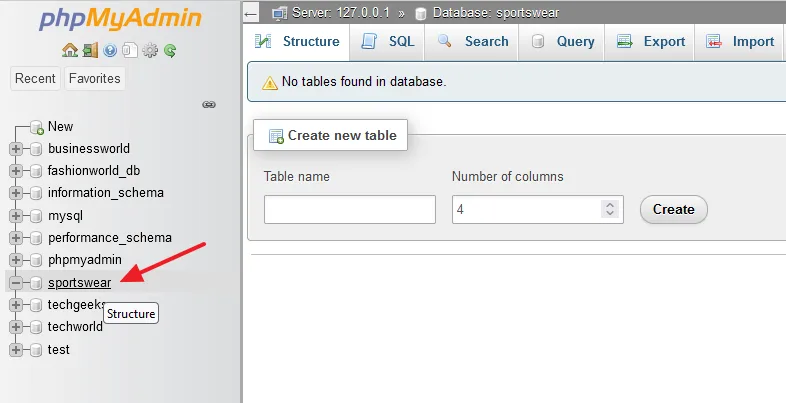
- You can see at the left side that a new database sportswear for OpenCart site is created. The tables in this database will be created automatically during the OpenCart installation.
05. How to Install OpenCart on XAMPP
In this section, I will guide you on how to install OpenCart on XAMPP server in Windows.
- Browse your OpenCart folder like this: http://localhost/site_name/, for example, http://localhost/sportswear/.
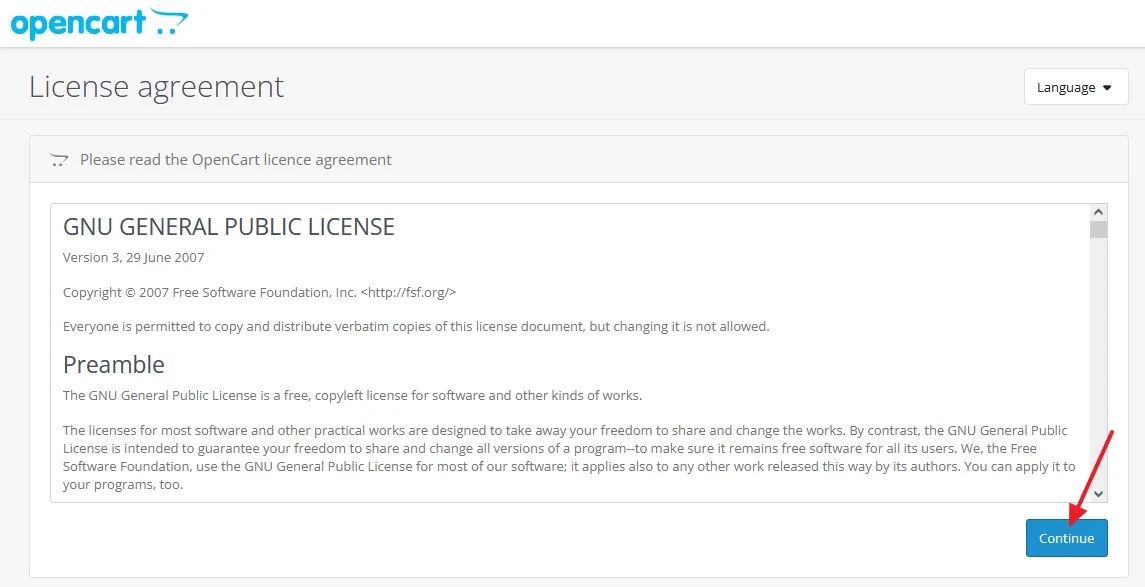
- It will show you OpenCart License Agreement.
- Click on the Continue button.
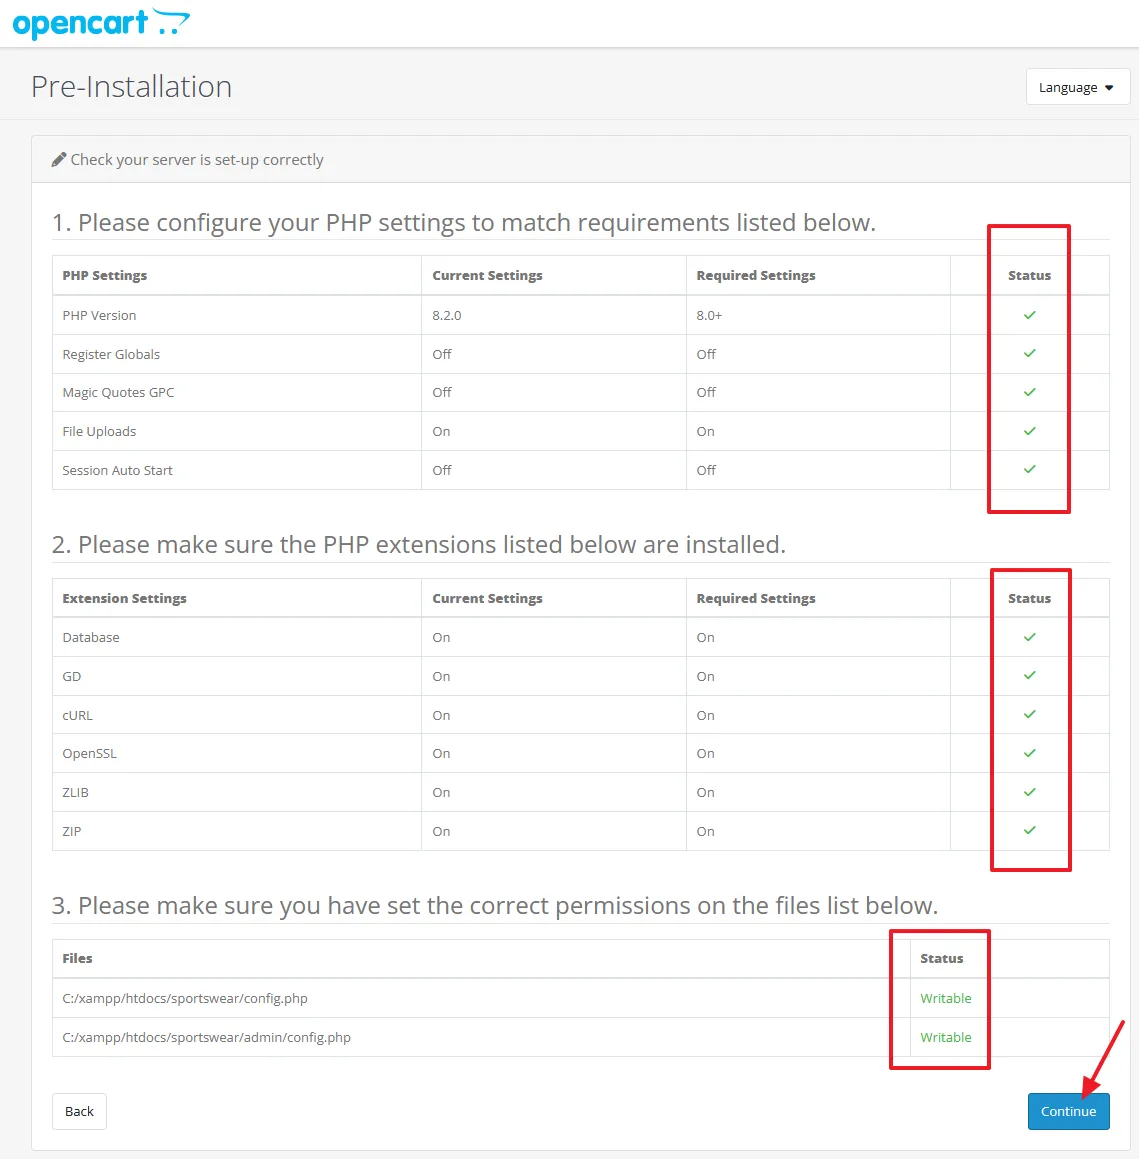
- It will show you Pre-Installation checks. A Status with Green tick means requirements are fulfilled. The Status of config.php files should be Writable.
- Click on the Continue button.
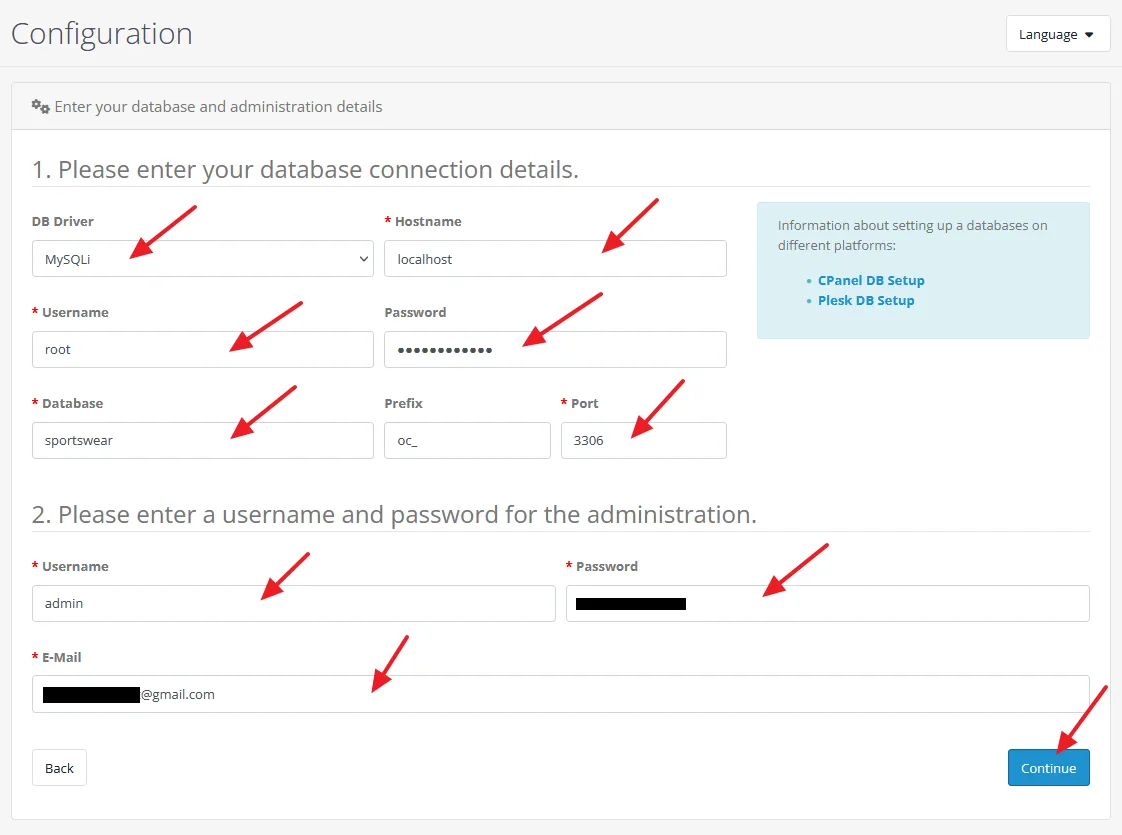
Database Connection Details
- In the DB Driver select MySQLi.
- In the Hostname enter localhost.
- In the Username enter the username of phpMyAdmin. By default it is root, if you haven’t changed.
- In the Password enter the password of your phpMyAdmin username.
- In the Database enter the name of your database that you have created for OpenCart on phpMyAdmin.
- In the Port enter 3306.
Administration Details
- Enter a Username, Password, and Email Address for your OpenCart admin account user. You will use these credentials to login to your OpenCart administration section.
- Click on the Continue button.
- Your OpenCart installation on XAMPP in Windows is completed.
It is also reminding you to remove the installation directory from the OpenCart because you don’t need it anymore. Follow the last section to learn about how to remove the installation directory.
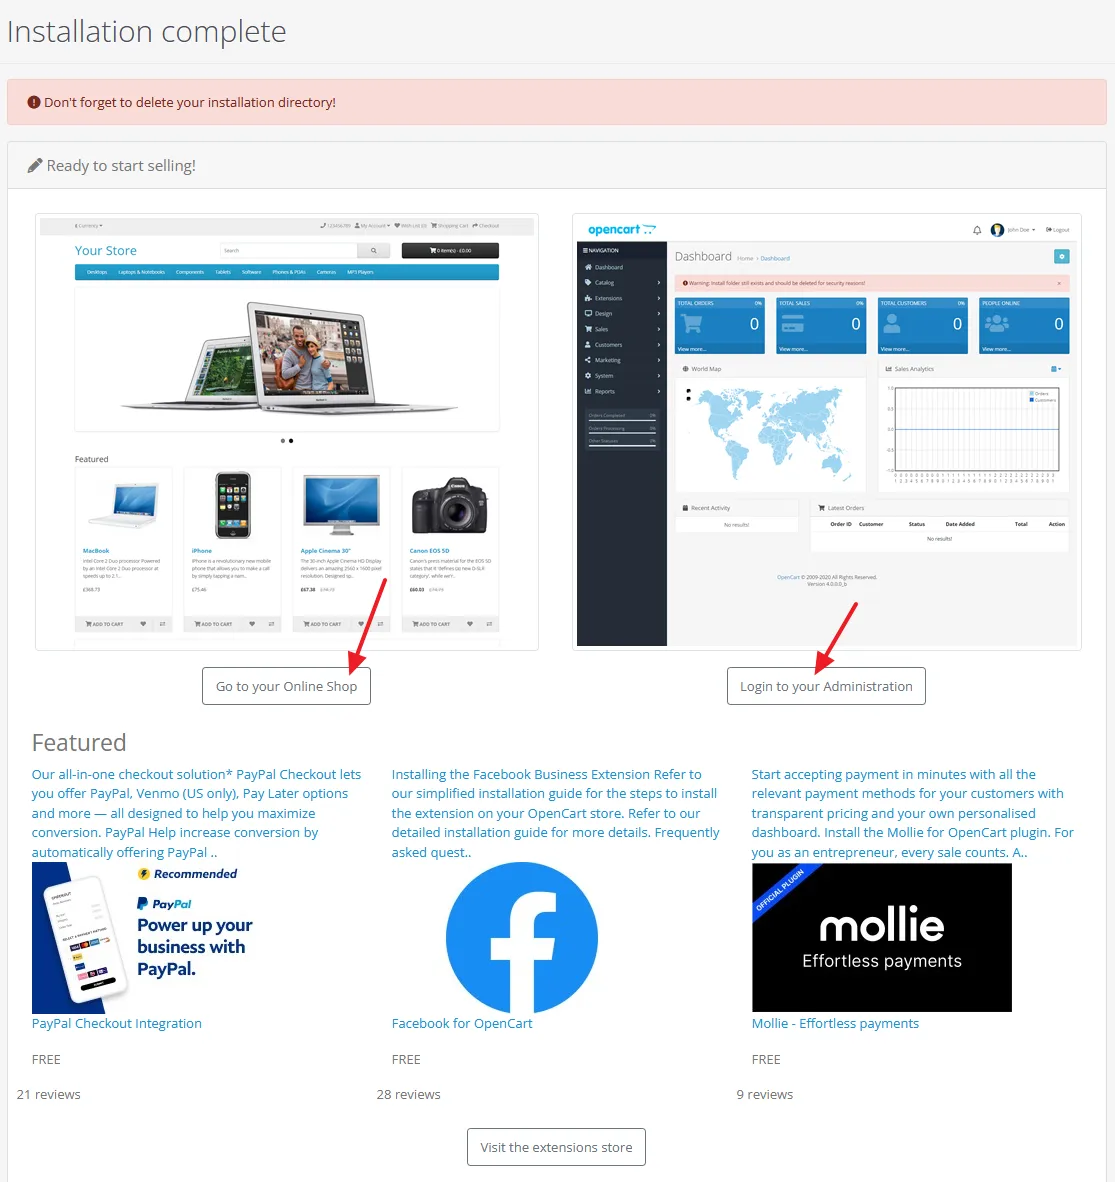
- This is the front-end of your OpenCart site. You can access through: http://localhost/site_name/, for example, http://localhost/sportswear/.

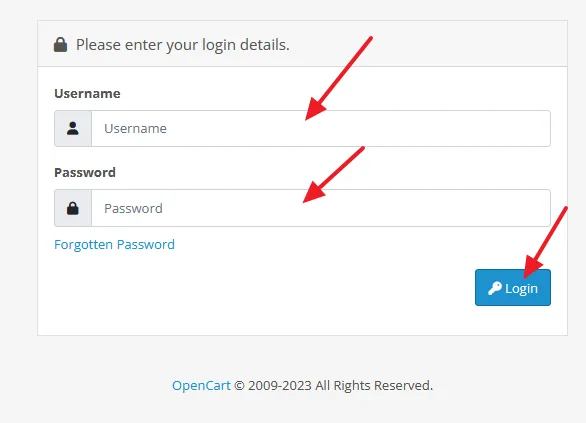
- You can access the OpenCart administration through: http://localhost/site_name/admin/, for example, http://localhost/sportswear/admin/.
- Enter your Username, Password and click on the Login button.
06. How to Remove Installation Folder
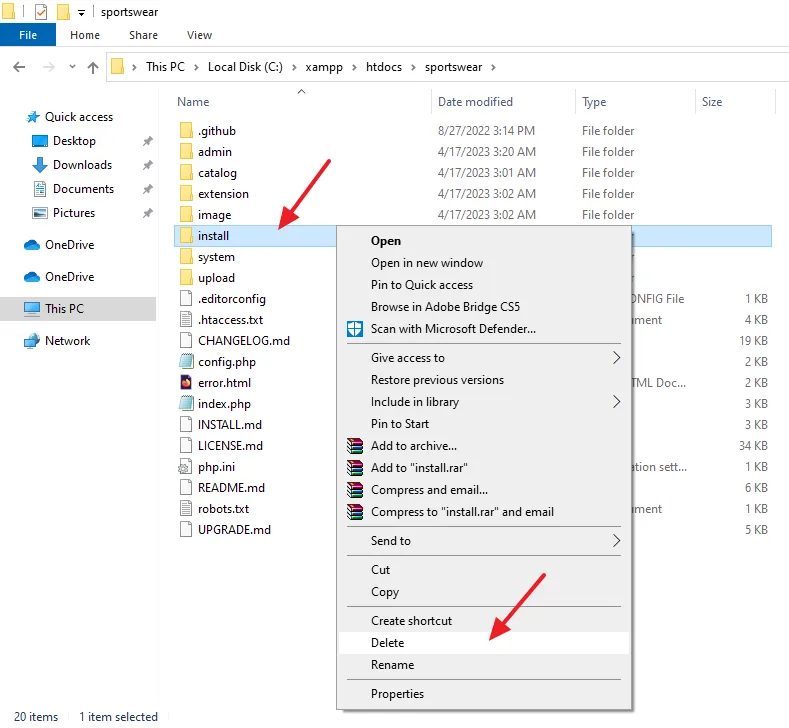
In this section, I will guide you on how to remove the installation directory located inside the OpenCart folder. After OpenCart is installed, you don’t need this directory anymore.
- Open your OpenCart folder.
- Right-click on the install folder and click on the Delete.
If you like this post then don’t forget to share with other people. Share your feedback in the comments section below.

Also Read
- How to Buy Domain & Hosting Step-by-Step
- How to Install Typo3 CMS on XAMPP in Windows
- How to Download & Install WampServer on Windows
- How to Set Up PHP on IIS in Windows | Install PHP with IIS
- How to Install Joomla on XAMPP | Beginner’s Guide
- How to Install WordPress on XAMPP | Beginner’s Guide
- How to Install ExpressionEngine on XAMPP in Windows
- How to Install Drupal on XAMPP in Windows
- How to Install ProcessWire CMS on XAMPP in Windows
- How to Install Dropback CMS on XAMPP in Windows




Leave a Reply