Have you monetized your WordPress website with Google AdSense and want to create Ads.txt for it? You’re in the right place.
In this tutorial, I will guide you step-by-step on how to create Ads.txt by installing Ads.txt Manager plugin, and how to get AdSense Code and add to your Ads.txt.
Ads.txt is a new way to help identify and prevent fraud in the digital advertising world. It is an initiative launched by the IAB to help identify authorized digital sellers. It creates ability for publishers to let everyone know who is authorized to sell your inventory. The Ads.txt helps prevent fake inventory from being presented to advertisers.
Following topics will be covered in this post:
- How to Install Ads.txt Manager Plugin
- How to Get Code from Your AdSense Account
- How to Paste the AdSense Code in the Ads.txt
- How to Test Ads.txt on WordPress Site
01. How to Install Ads.txt Manager Plugin
Though you can create Ads.txt directly on the root (public_html) directory of your site by visiting your hosting account, but it needs some manual work and can be difficult for non-tech person. That’s why I will guide you on how you can create Ads.txt file by installing Ads.txt Manager plugin.
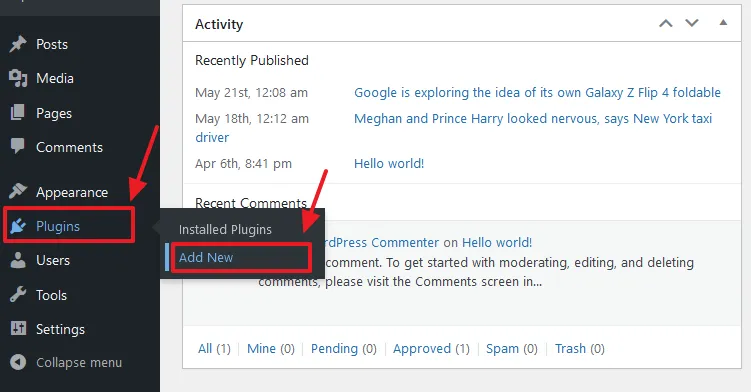
- Go to Plugins from your WordPress Admin Sidebar.
- Click on the Add New.
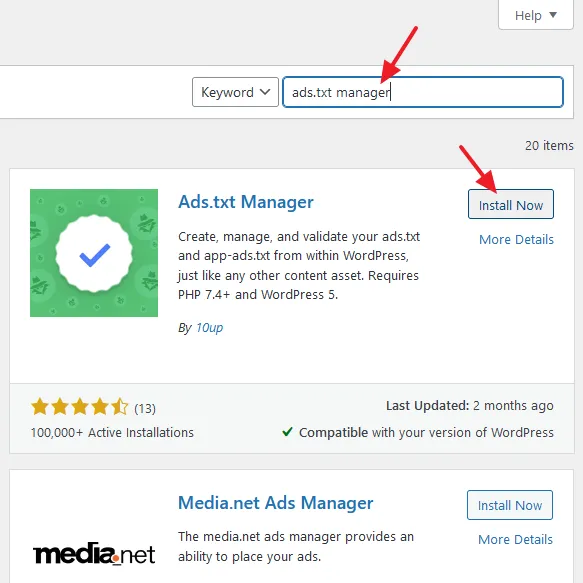
- Enter ads.txt manager in the Plugin Search Bar. It will be listed in the plugins search results.
- Go to Ads.txt Manager, you can identify it by logo.
- Click on the Install Now button.
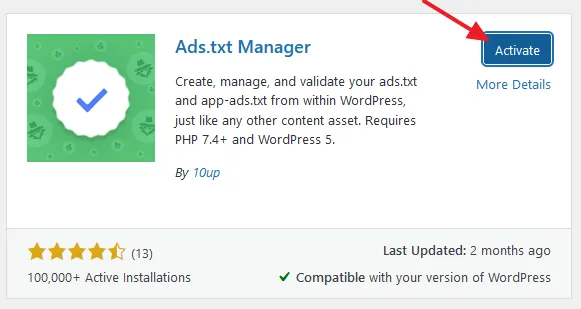
- Click on the Activate button.
02. How to Get Code from Your AdSense Account
In this section, I will guide you on how to get code from your AdSense account for Ads.txt.
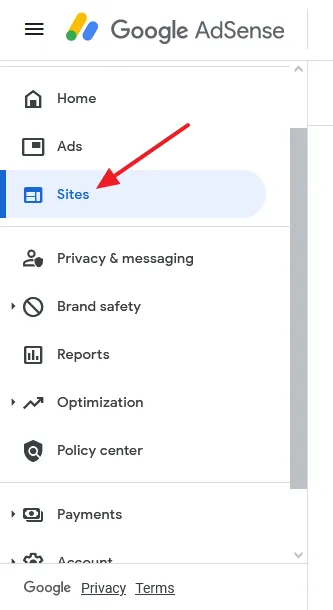
- Open your Google AdSense account.
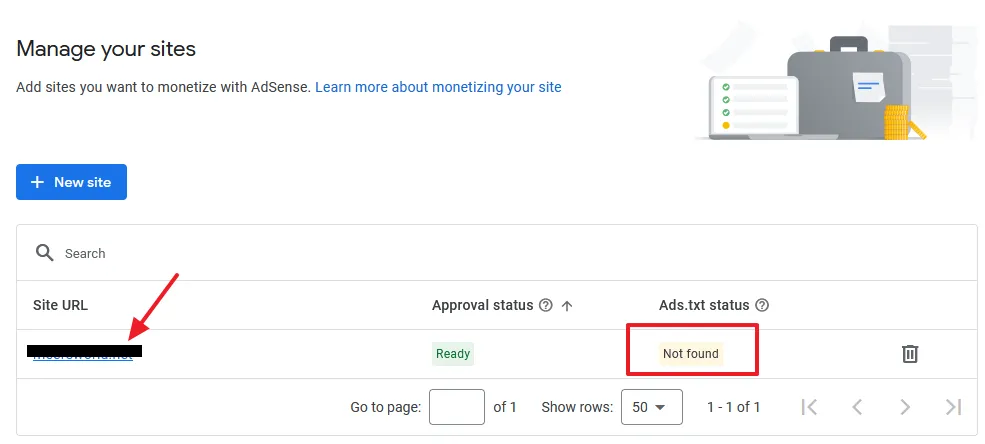
- Click on the Sites tab from the Sidebar.
- Click on your domain link located under the Site URL label. You can also see the Ads.txt status, it is Not found.
- Click on the Copy icon to copy the Ads.txt code for your Google AdSense account.
This is how the Ads.txt for Google AdSense looks like. It has been explained in the next step.
google.com, pub-0000000000000000, DIRECT, f08c47fec0942fa0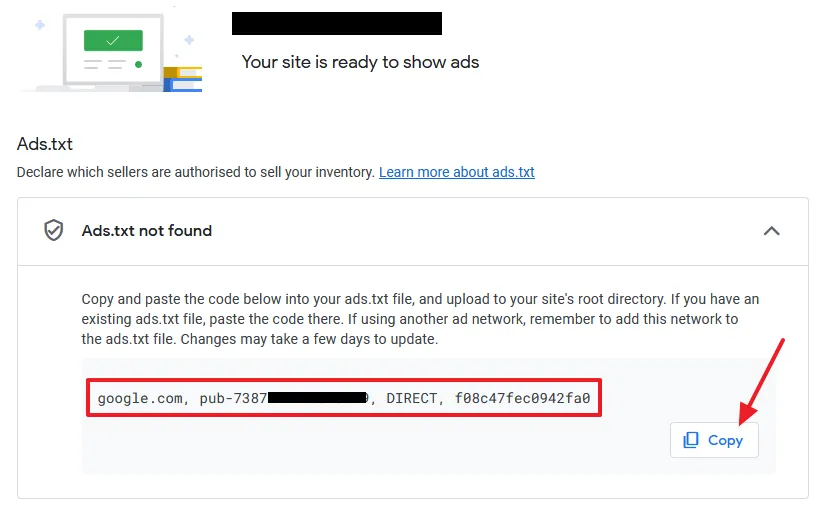
Explanation
Ads.txt for AdSense has 4 parts i.e. Domain, AdSense Publisher ID, Type of Relationship, and TAG ID. Except the AdSense Publisher ID, the other three parts are same for all the sites monetized with Google AdSense.
- The google.com is the domain that will sell ad inventory on your site.
- The pub-0XXXXXXXXXXXXXXXX is your Google AdSense account Publisher ID. It is unique for every publisher (AdSense Account Owner). In your AdSense account, you can also view your Publisher ID on Account => Settings => Account Information.
- The DIRECT is the type of relationship with your partner/advertiser. With Google AdSense you have DIRECT relationship.
- The f08c47fec0942fa0 is the TAG ID. TAG stands for Trustworthy Accountability Group that acts as a certification authority.
03. How to Paste the AdSense Code in the Ads.txt
You have got the AdSense Code of Ads.txt, now in this section, I will guide you on how to paste the AdSense Code in the Ads.txt.
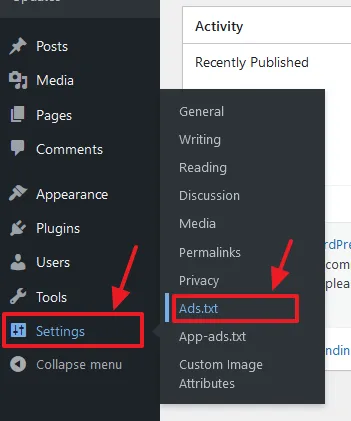
- Go to Settings from the WordPress Sidebar.
- Click on the Ads.txt.
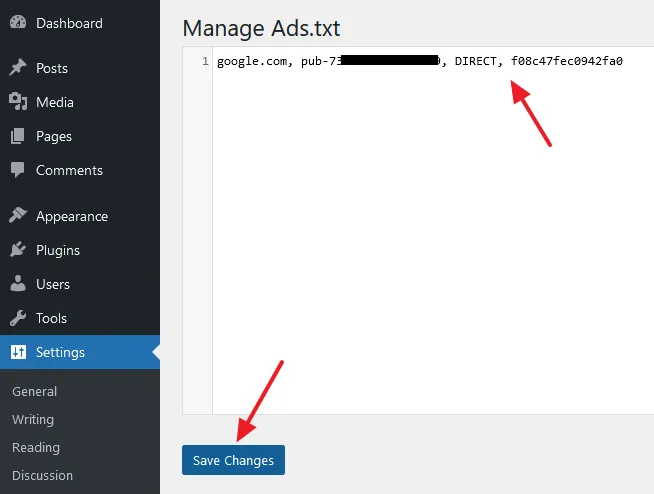
- Paste the Ads.txt code for Google AdSense that you had copied, in the textarea.
- Click on the Save Changes button.
04. How to Test Ads.txt on WordPress Site
Ads.txt is successfully created and set up for Google AdSense in your WordPress site, now it is time to test it to know whether it is accessible/visible for Google AdSense crawlers.
- Browse the Ads.txt like this: your_domain/ads.txt, for example, example.com/ads.txt. The ads.txt code should be visible on your browser. If it is visible, means that crawlers can read its content.

If your WordPress site redirects to https://www, your ads.txt should be opened with https://www, for example, “https://www.example.com/ads.txt“. If your WordPress site redirects to https:// (without www), your ads.txt should be opened with https://, for example, “https://example.com/ads.txt“.
Let say, your WordPress site redirects to “https://www.example.com“. If I type “https://example.com/ads.txt“ it should be redirected to “https://www.example.com/ads.txt“, and vice versa.
If it doesn’t happen you might get the error in your Google AdSense account, “Earnings at Risk – You need to fix some ads.txt file issues to avoid severe impact to your revenue“. The Status of Ads.txt in the Google AdSense will be Not Found.
If your ads.txt URL doesn’t redirect in a right way, go through this tutorial:
If you like this post then don’t forget to share with the other people. Share your feedback in the comments section below.

Also Read
- How to Remove Lazy Loading on Featured Image in WordPress
- How to Claim WordPress Website on Pinterest | 3 Methods
- How to Show Last Updated Date on WordPress Posts
- How to Link Google Analytics 4 to AdSense & Show Data
- Foreign Taxpayer Identification Number (TIN) On Form W-8BEN
- How to Fix AdSense Ads Break Page Layout on Block Theme
- How to Setup Free Newsletter Plugin on WordPress


Leave a Reply