
Do you want to remove the Lazy Loading on featured image of your WordPress blog posts? You’re in the right place.
In this tutorial, I will cover following topics (1) How to remove/disable the Loading=”lazy” attribute on featured/hero image of blog posts in WordPress using the free plugins Custom Image Attributes and LiteSpeed Cache Plugin (2) What is the drawback of removing the Lazy Loading on Featured Image (3) Don’t Remove Lazy Loading, Instead exclude Viewport Images.
Following topics will be covered in this post:
- What is Lazy Loading?
- Why it is Important to Disable Lazy Loading on Featured Image
- How to Install Custom Image Attribute Plugin
- How to Remove Loading=”Lazy” on Featured (LCP) Image
- How to Add Fetch=”Priority” on Featured Image
- What is the Drawback of Removing Lazy Loading on Featured Image
- Don’t Remove Lazy Loading, Instead exclude Viewport Images
01. What is Lazy Loading
A Lazy Loading is an advanced feature that tells browsers to defer the loading of images until page visitor scrolls near them. It improves the performance (loading speed) of a page and saves the resources such as bandwidth.
You can see in this video that images are being loaded only as I scroll/reach near them.
When Lazy loading is enabled you can see the image attribute Loading=”lazy” on the Image tag <img> also known as Image Embed Element, in the Page Source, as shown below.

02. Why it is Important to Disable Lazy Loading on Featured (LCP) Image
When Lazy Loading improves the loading speed of a page then why it is important to disable the Lazy Loading on Featured/LCP image or above-the-fold content?
The answer is, it can have a very bad effect on your page’s LCP (Largest Contentful Paint) timing because when an image in the viewport is lazily loaded the browser may defer it, that can increase its loading time. To provide a good page-experience to users, the content on the viewport should be immediately loaded.
LCP is one of the key metrics of Core Web Vitals that measures how long it takes for the largest element (image, text, heading, etc) to become visible in the viewport. The viewport is the visitor’s visible area of a web page on a device, as shown below.

You can also test your pages on Google PageSpeed Insights to know whether your LCP images are being lazily loaded or not. If they are lazily loaded, it shows, “Above-the-fold images that are lazily loaded render later in the page lifecycle, which can delay the largest contentful paint.“.

03. How to Install Custom Image Attribute Plugin
The Custom Image Attributes is a lightweight simple WordPress plugin that removes/disables Loading=”lazy” on featured image of blog posts and also provides you an additional feature that allows you to add other custom Image attributes such as fetchpriority=”high”.
In this section, I will guide you on how to install Custom Image Attribute plugin on your WordPress site.
- Go to Plugins and click on the Add New.

- Enter Custom Image Attributes in the plugins search bar.

- Go to Custom Image Attributes plugin by Live SEO, as you can identify it by logo.
- Click on the Install Now button.

- Click on the Activate button.

04. How to Remove Loading=”Lazy” on Featured Image
In this section, I will guide you on how to remove Lazy Loading on Featured Images using the plugins (1) Custom Image Attributes (2) LiteSpeed Cache Plugin.
01. Using Custom Image Attributes Plugin
You must have installed the Custom Image Attributes plugin, now, in this section, I will guide you on how to remove the Loading=”lazy” on featured/hero image.
Here I am showing you how to remove Loading =”lazy” on a new featured image. You can follow this guide to do it for old/existing featured images. You can open your old featured images directly from the Media Library as well as from posts.
- Open a blog post in the WordPress Editor.
- Click on the Post tab.
- Go to Featured image section and click on the Set featured image.

- Upload and select your featured image.
- Go to ATTACHMENT DETAILS section located at your right-side and scroll-down to bottom, as shown in the video.
- Check Mark on the Remove Lazy Loading Yes.
- Click on the Set Featured Image button.
Do this for every Featured Image that you upload. Open your old/existing Featured Images and repeat the same process. When you check mark Remove Lazy Loading Yes, changes are automatically saved, you don’t have to update your post.
- Inspect the source code of the featured image. You can see that the Loading=”lazy” is removed from the <img> tag of featured image.
- You can also see the fetchpriority=”high” attribute that I have added through Custom Image Attribute plugin, as shown in the next section. This attribute tells the browser that this image has high priority and should be loaded quickly with other resources. It improves the LCP score/timing of featured image.
- You can also test your page on Google PageSpeed Insights to know whether featured image is lazily loading or not, and how much LCP score is improved.

02. Using LiteSpeed Cache Plugin
LiteSpeed Cache is one of the leading free WordPress cache plugins which is used to optimize the performance of your site. Here I am showing you how to remove the Lazy Loading on your featured image by adding its class.
- Go to LiteSpeed Cache from the sidebar.
- Click on the Page Optimization.

- Open the Media Excludes tab.
- Scroll down to Lazy Load Image Class Name Excludes section and add the class of your Featured Image. I have added the class wp-post-image, which is the class of my site’s Featured Image. LiteSpeed cache will remove the data-lazyloaded=”1″ from my Featured image and it will not be lazily loaded. Learn more about HTML Classes.
- Update the changes and Clear the Cache of LiteSpeed. Open a post and check whether Loading=”lazy” is removed or not.
In the next step, I have shown how to find the class of your Featured image.

- Right-click on your Featured Image and click on the Inspect. It will open the HTML code of Featured image on the Developers tool.
- The image code starts with <img tag, will also be highlighted by blue color. The class of my Featured Image lies inside class=”attachment- size- wp-post-image“. The class names vary from theme to theme.

05. How to Add Fetch=”Priority” on Featured Image
In this section, I will guide you on how to add fetchpriority=”high” attribute on featured image.
- Go to Settings from your WordPress admin Sidebar.
- Click on the Custom Image Attributes.

- In the Custom Image Attributes field enter fetchpriority=”high”. To add multiple attributes, leave a space, e.g. fetchpriority=”high” data-save=”lightbox”, etc.
- Click on the Save Changes button.

06. What is the Drawback of Removing Lazy Loading?
Though I have guided you to remove the Lazy Loading on Featured Image using the plugins, but there is a drawback of it.
When you remove Lazy Loading on Featured Image using the above solutions, Lazy Loading is also removed from all the thumbnails of your posts. As a result, when a page is loaded they all are quickly loaded with the Featured Image and other Critical Resources of your site, that increases the loading speed of a page particularly on mobile devices.
It is not recommended to load offscreen images with your Featured Image and Critical Resources. All the offscreen images are meant to be deferred using Lazy Loading.
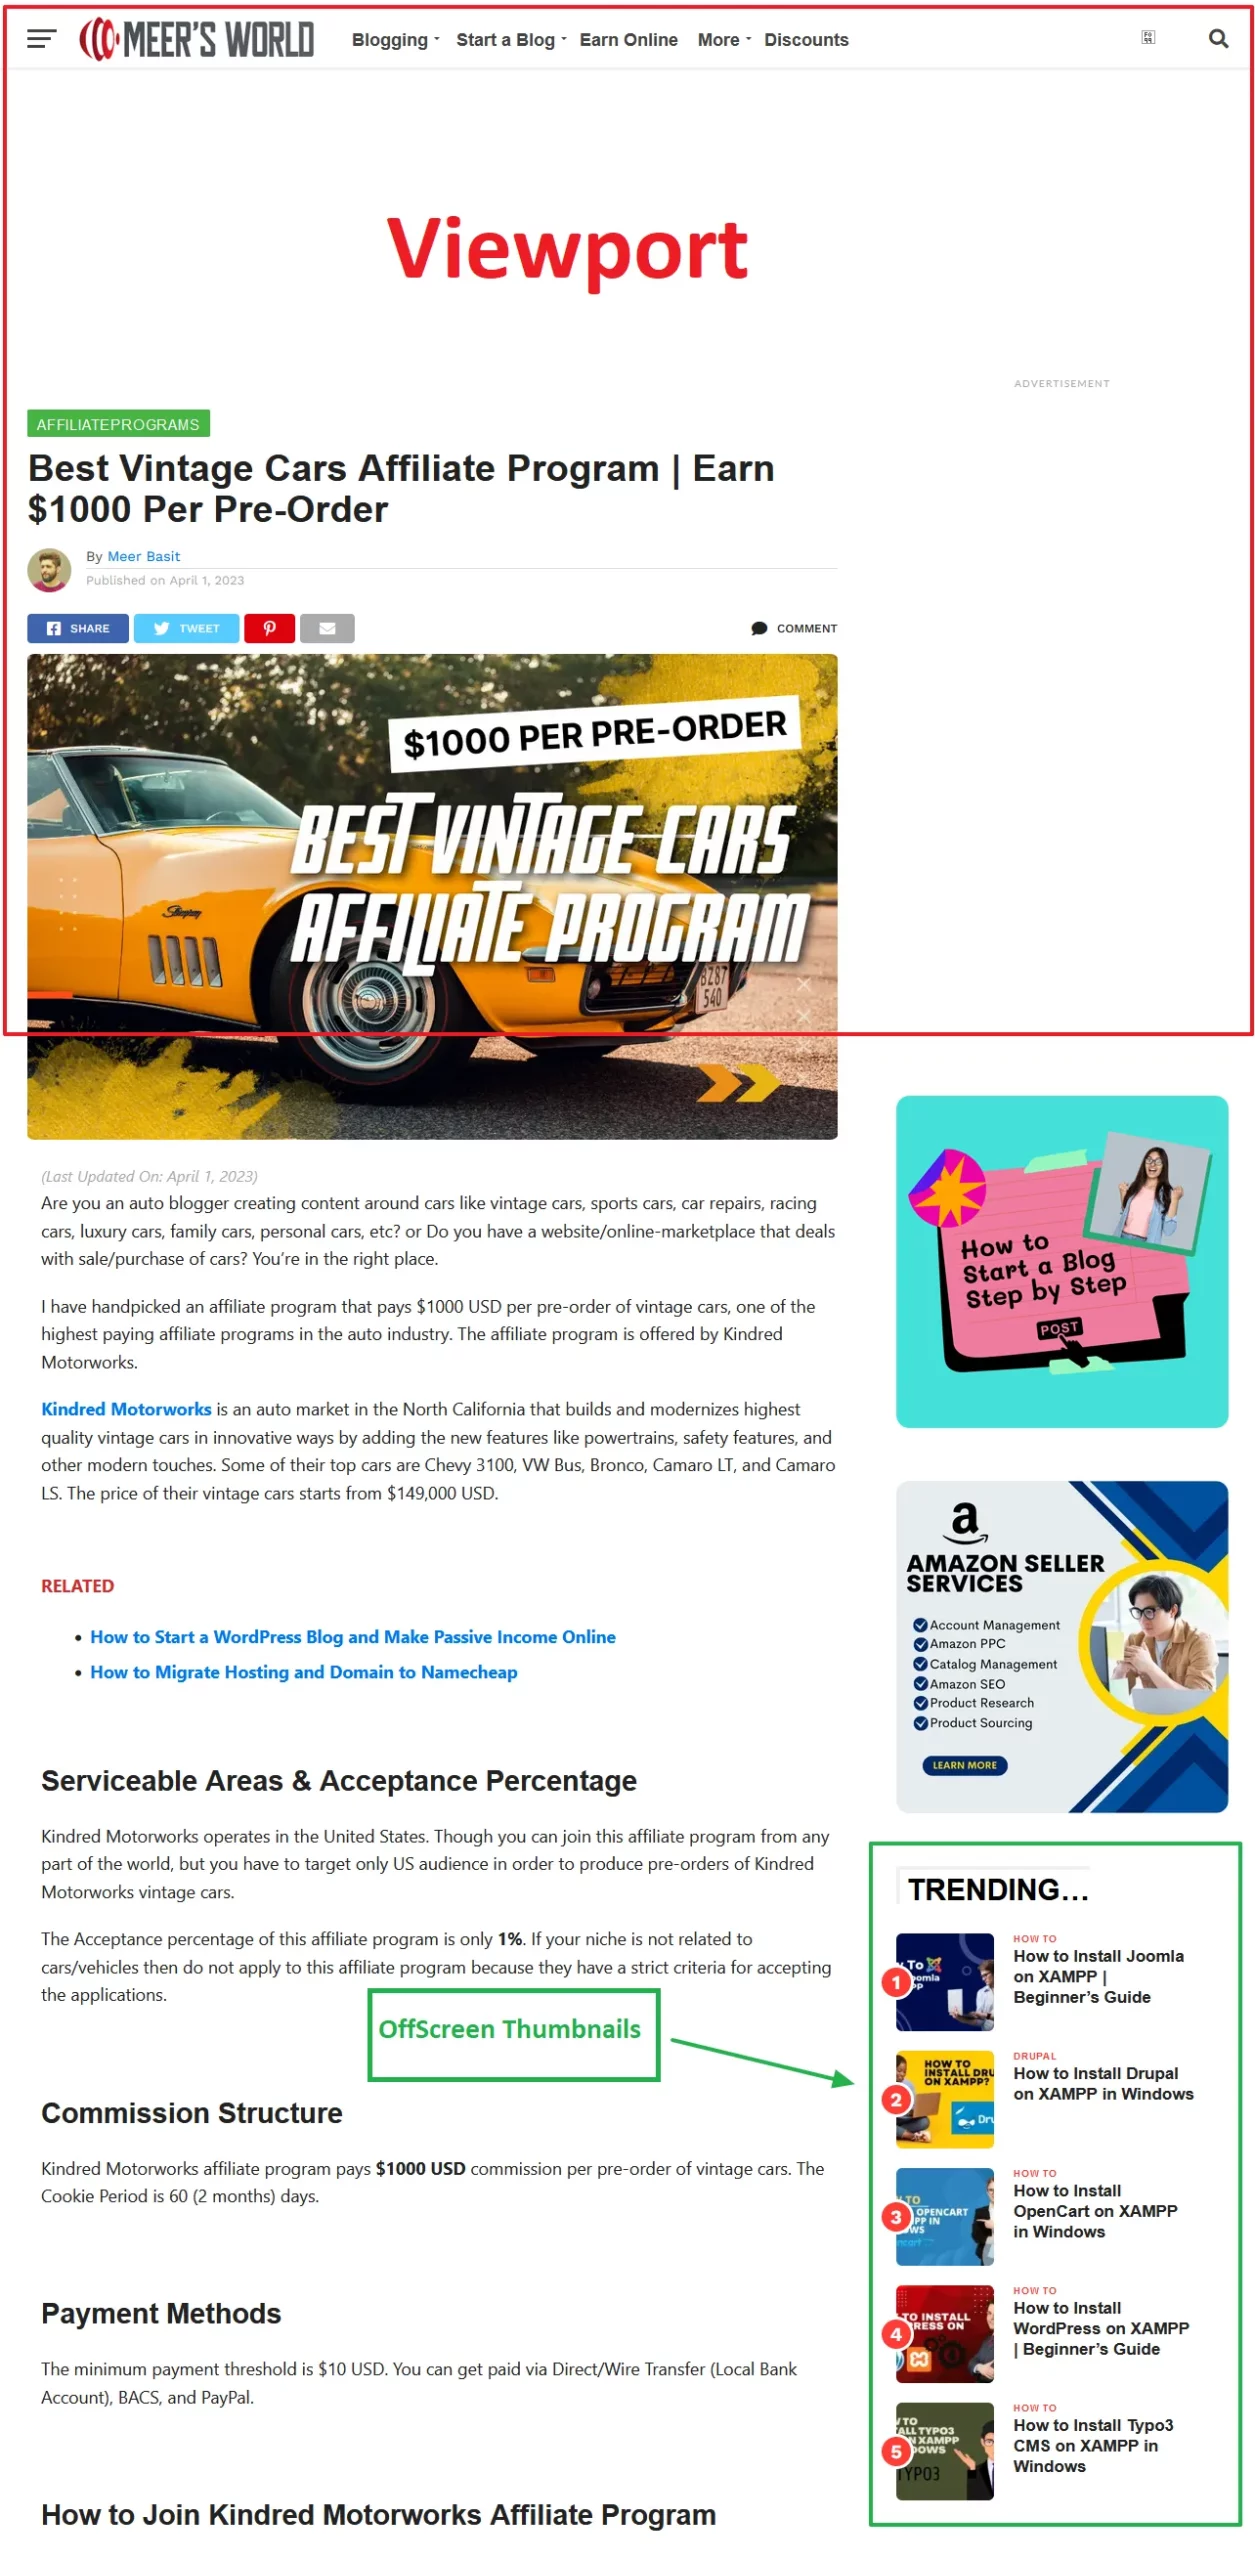
Here the region highlighted with the red border is viewport (Viewport is the user’s visible area of a web page). The region highlighted with the green border contains offscreen thumbnails.
07. Don’t Remove Lazy Loading, Instead exclude Viewport Images
In the above section, I shared a drawback of removing Lazy Loading using the plugins. In this section, I will guide you on how to exclude Featured Image from Lazy Loading without removing the Lazy Loading tag, so that the offscreen thumbnails are lazily loaded.
- Go to LiteSpeed Cache and click on the Page Optimization.

- First go to Media Settings tab and Turn-on the Lazy Load Images.

- Go to VPI tab and Turn-on the Viewport Images.
- Update the changes and clear the cache of LiteSpeed.

- Now go to Google PageSpeed Insights and test a post to know whether Featured Image is loading lazily or not, and offscreen post thumbnails are loading lazily.
- Here you can see under the PASSED AUDITS that Google PageSpeed Insights is showing, Largest Contentful Paint image was not lazily loaded, though data-lazyloaded=”1″ is present.

- You can also see under the PASSED AUDITS that offscreen images are lazily loaded, means they are deferred.

Hope this article helps you to solve the issue of Lazy Loading a Featured image on WordPress. If you like this post then don’t forget to share with other people. Share your feedback in the comments section below.

Also Read
- How To Pass Core Web Vitals Test for Monetized WordPress Blog
- Find & Fix Runtime Score of Core Web Vitals Metrics (LCP, CLS)
- How to Show Last Updated Date on WordPress Posts
- How to Install & Set Up Yoast SEO Configuration
- How to Stop Spam Bot Comments in WordPress
- How to Enable Persistent Object Cache on WordPress
- Rest API did not Behave Correctly | Fix WordPress Block Editor


Leave a Reply