Do you want to redirect your naked domain to “www”? You’re in the right place. In this tutorial, I will guide you step-by-step on how to redirect a naked domain to “www” if your domain hosting doesn’t provide DNS hosting.
Domain without “www” is called naked domain like “example.com“, “https://example.com“, “http://example.com“. In order to setup a naked redirect you need to redirect your naked domain to “www” domain by adding the 4 “A Records” in your domain’s DNS Settings that point to Google IPs.
The “A Record” maps a domain name to an IP address. CNAME Record is a type of resource record in the DNS that maps one domain name to another.
Some of the domain hostings or registrars do not provide DNS hosting/settings of your domain. They only allow you to add “Nameservers”. It means that you can’t add “A Records” and “CNAME Records” to your domain.
To solve this issue you can use FreeDNS hosting. There are hosting companies like CloudFlare, Namecheap, etc, that provide FreeDNS hosting. I have tried both the CloudFlare & Namecheap FreeDNS hosting, but Namecheap is the best. CloudFlare causes issues with SSL.
Namecheap is one of the leading web hosting companies. It also offers FreeDNS hosting service for people whose registrars/hostings don’t provide DNS hosting with domain registration. Namecheap’s FreeDNS supports A/AAAA/CNAME/NS/MX/TXT/SRV DNS record types.
Following topics will be covered in this post:
- Why It Is Important To Redirect Your Naked Domain To “www”?
- How To Extract “A Records” & “CNAME Records” Information
- How To Add 4 “A Records” & 2 “CNAME Records” on Namecheap’s FreeDNS Hosting
- How To Replace Your Domain’s Nameservers With Namecheap’s Nameservers
- How To Check Nameservers Updated Or Not
- How To Fix, “This Site Can’t Be Reached” Error
01. Why It Is Important To Redirect Your Naked Domain To “www”?
There are 2 reasons why it is important to redirect your naked domain to “www”:
- Most of the people type your domain name without “www” like “example.com”. If your naked domain is not redirected to “www” browser will show error to website visitors like “website not found”, as a result visitors might not comeback to your website again. It also hurts the SEO of your website.
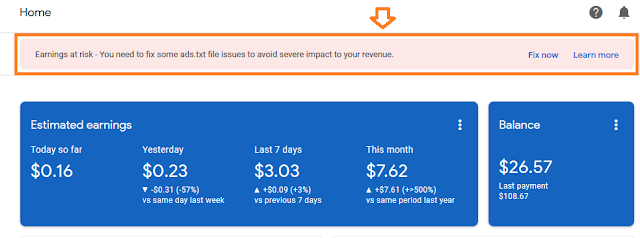
- If your website is monetized with Google Adsense you will see a warning from Google Adsense that “Earnings at risk – One or more of your sites does not have an ads.txt file. Fix this now to avoid severe impact to your revenue.” Most of the people search on internet to resolve this warning, but they don’t find any satisfying solution. Read more about: How To Resolve Earnings At Risk Google AdSense Warning.
02. How To Extract “A Records” & CNAME Records” Information
Before you learn how to add “A Records” & “CNAME Records” it is important to extract the information from the file, like what is Host, what is Value, and what is TTL. So that it would be easy for you to add these records in Namecheap’s FreeDNS hosting in the next step.
Here, I am taking the Blogger’s “DNS Setting file” as an example. When you enable redirect from naked domain to “www” domain on Blogger, it will ask you to download DNS Settings file. Its name will be like “www.meersworld.net.zone”. In your case, there will be your domain name instead of “meersworld.net”. You can open with Notepad.
- In order to learn how to get this file and how to redirect your (.blogspot) URL to custom domain read our tutorial: How To Redirect Blogspot To Custom Domain.
- Blogger’s DNS Setting file will be similar to this:
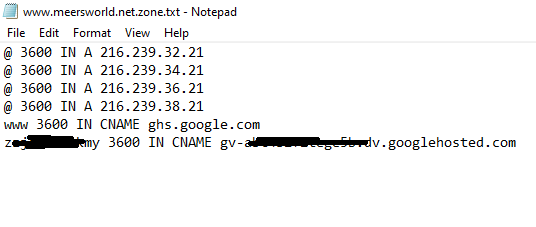
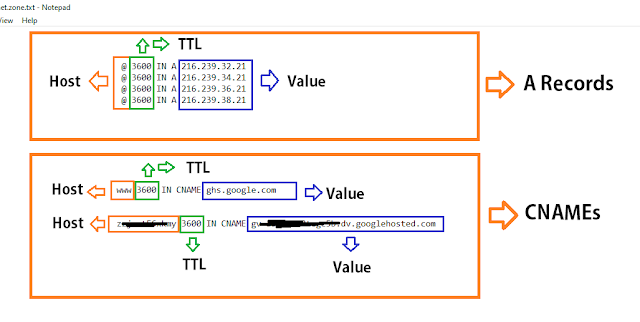
- Below, I have extracted information for your ease. It is the same file as above, but I have separated the lines into 2 boxes.
- In the top box there are 4 different “A Records” and in bottom box there are 2 CNAMEs.
- A Records and 1st CNAME are same for every domain, only the 2nd CNAME is unique for everyone.
For A Records
- “@” means root site. It is HOST. In our case it is “meersworld.net”
- “3600” is the TTL for each record. TTL stands for Time-To-Live. 3600 means 60 minutes.
- There are 4 Google IP addresses which are called VALUE.
CNAME Records
- 1st CNAME: “www” is HOST. “3600” is TTL. “ghs.google.com” is VALUE.
- 2nd CNAME: first variable “z——-” is your HOST. “3600” is TTL. “———–dv.googlehosted.com” is VALUE.
03. How To Add 4 “A Records” & 2 CNAMEs on Namecheap’s FreeDNS Hosting
In this section, I will guide you on how to add 4 “A Records” and 2 “CNAME” records on Namecheap’s FreeDNS hosting.
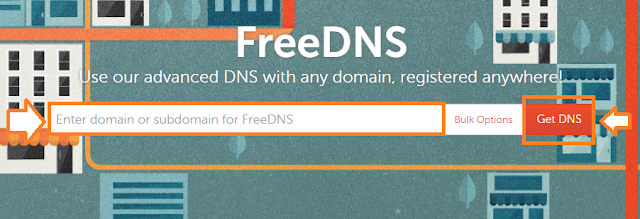
- Open Namecheap Official Website.
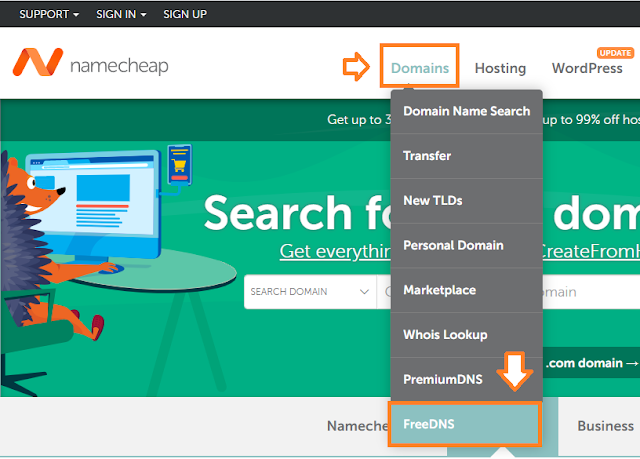
- Go to Domains from the menu.
- Click the FreeDNS.
- Enter your domain name without “www” like “example.com”.
- Click the Get DNS button.
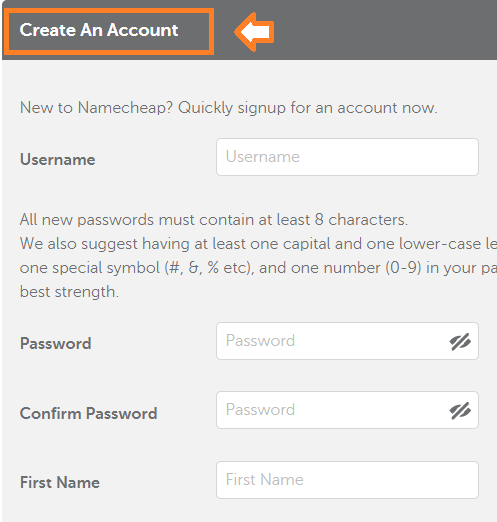
- It will ask you to either Signup or Sign In. If you are already not registered with the Namecheap, create your account.
- Enter a unique Username and provide the other required information.
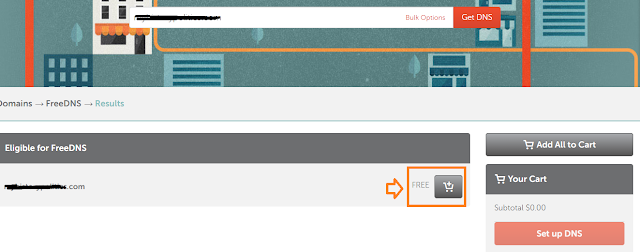
- Once you signup, Namecheap will tell you whether your domain is eligible or not. You can see that it has shown “Eligible for FreeDNS“.
- Click the “Free Basket” icon.
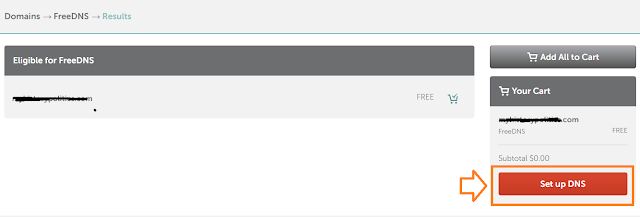
- Click the “Set up DNS” button.
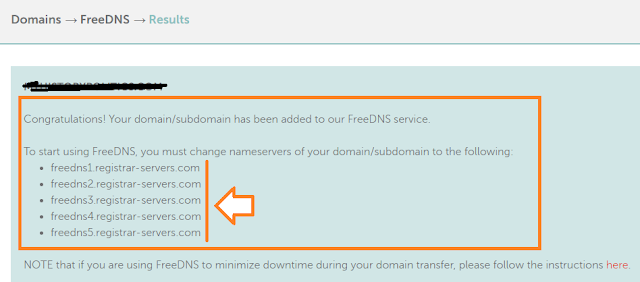
- Copy these 5 nameservers into a notepad file. These will be used in the Next step.
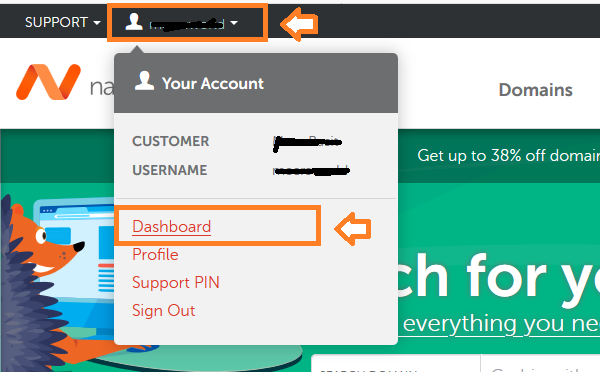
- Click the “Downward arrow” located beside your “Username” at top.
- Click the Dashboard link.
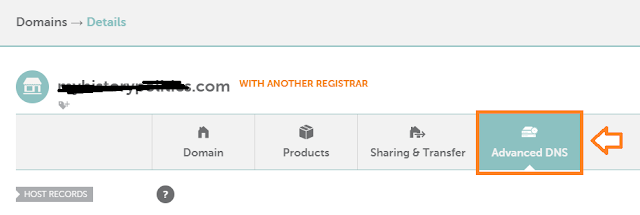
- Click the “Advanced DNS” tab.
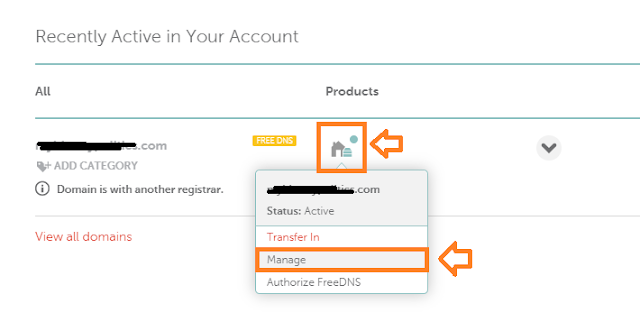
- Click or right-click on Home icon.
- Click the Manage option.
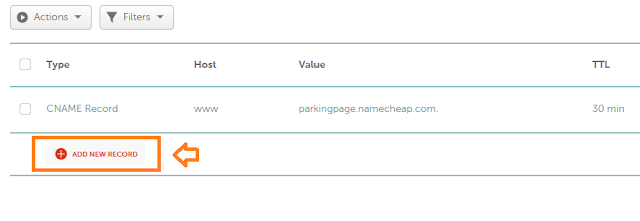
- Click the “ADD NEW RECORD“.
- There can be some existing records. You can delete them or leave them.
- First I will add 4 “A Records”. Click the “A Record” from the dropdown list.
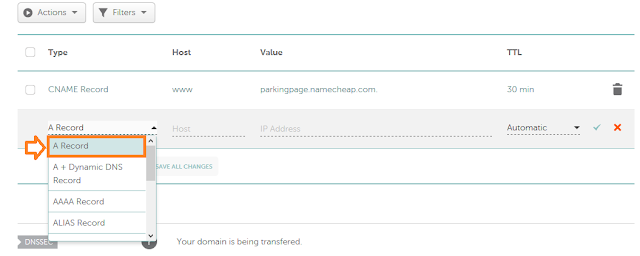
- These are the 4 “A Records” that you have to enter one-by-one: 216.239.32.21 | 216.239.34.21 | 216.239.36.21 | 216.239.38.21
- In Host, enter “@”.
- In Value enter the IP address.
- In TTL choose “60 min” means 3600 seconds.
- Click the “Green Tick” to save changes.
- Add other “A Records” in a similar way.

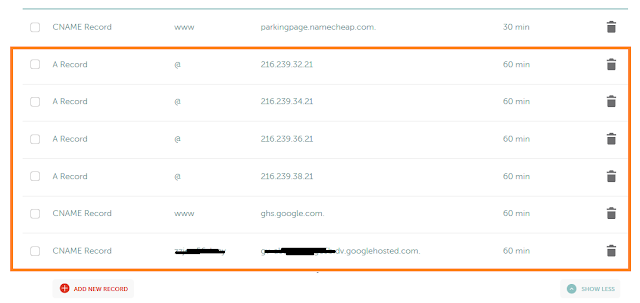
- You can see that I have added the 4 “A Records”.

- Now add the 2 CNAMEs.
- Click “ADD NEW RECORD” from the dropdown list.
- Click the “CNAME Record“.
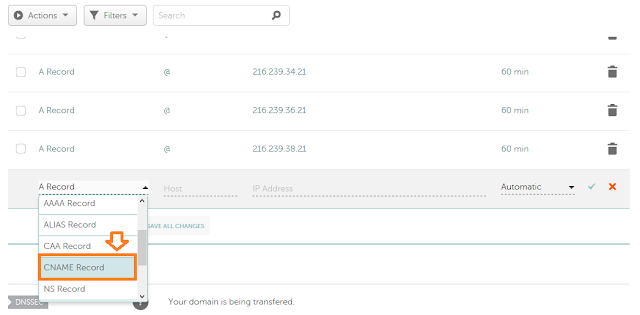
- In Host, enter ‘”www”.
- In Value, enter “ghs.google.com”.
- In TTL, choose “60 min”.

- Add the second CNAME similarly as you have added the 1st one.
- Now here you can see that there are 4 “A Records” & 2 CNAME Records. The 4 “A Records” will setup a naked redirect for your domain to “www”, Whereas the 2 “CNAME Records” will redirect a “.blogspot” domain to a custom domain
- You have successfully added “A Records” & CNAMEs and now in the next step you need to replace your domains nameservers with the Namecheap’s nameservers.
04. How To Replace Your Domain’s Nameservers With Namecheap’s Nameservers
In this section, I will guide you on how to replace your domain’s nameservers with the Namecheap’s nameservers.
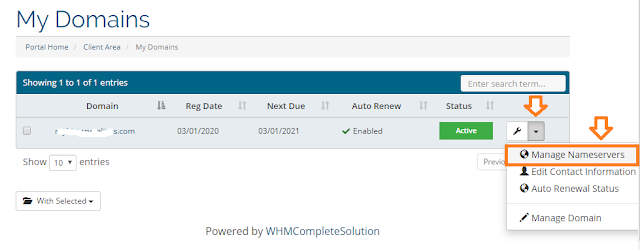
- Login to your domain’s hosting website. Your hosting Dashboard could be different from this.
- On your domain settings, click the “Manage Nameservers“.
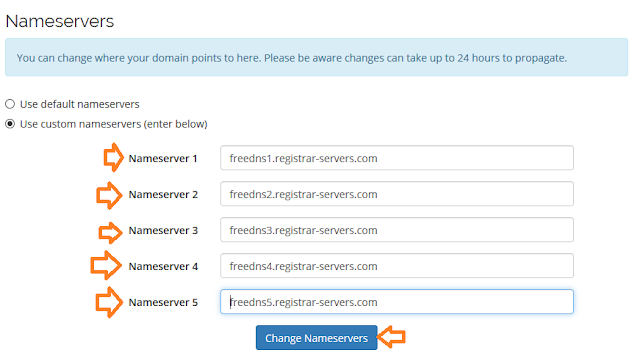
- Choose “Use custom nameservers (enter below)“.
In one of the above steps, I have asked you to copy Namecheap’s nameservers in a Notepad File. Now paste those 5 nameservers here. If you didn’t copy, I have listed below. These nameservers are same for everyone. If there are already nameservers listed, replace them with these 5 nameservers.
1. freedns1.registrar-servers.com
2. freedns2.registrar-servers.com
3. freedns3.registrar-servers.com
4. freedns4.registrar-servers.com
5. freedns5.registrar-servers.com- Click the “Change Nameservers“.
After you click the “Change Nameservers” it could show you only top 2 nameservers. Don’t worry about that, all the 5 nameservers will be saved.
- Now after some time test your naked domain, whether it redirects to “www” or not. Remember that sometimes nameservers take lot of hours to get updated, but most of the time they are updated within few minutes. You can verify whether your nameservers updated or not by “DNS checker” website. In the next section, I will guide you on how to check your nameservers propagation.
- Test your domain in three different ways, like: “example.com”, “http://example.com”, “https://example.com”.
- All these naked domains must redirect to “https://www.example.com”. If they redirect to “www” means you have setup the Naked Redirect successfully.
05. How To Check Nameservers Updated Or Not?
In this section, I will guide you on how to check whether your nameservers are updated or not.
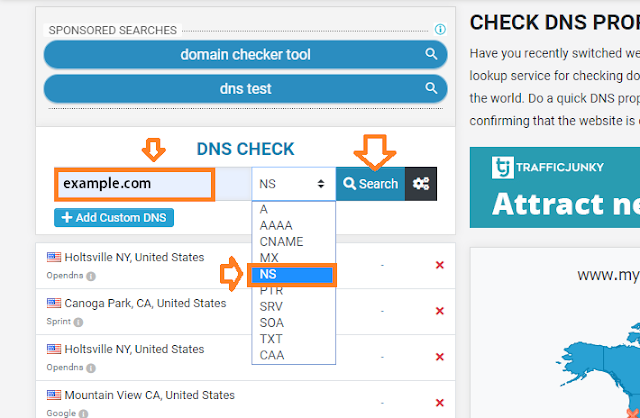
- DNS Checker is a tool that tells you whether your website is propagated worldwide or not.
- Go to DNS Checker.
- Enter your domain name WITHOUT “www” like “example.com”
- Choose NS. NS means Nameservers.
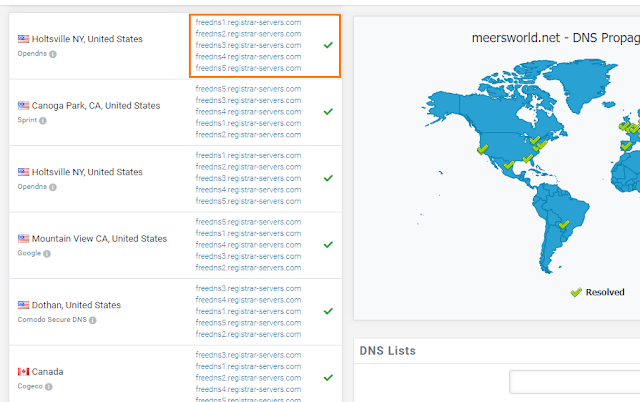
- You can see that all of the 5 Nameservers have been updated worldwide.
06. How To Fix, “This Site Can’t Be Reached” Error
Often when you setup a naked redirect or change nameservers of your website you might get an error on your Chrome browser like “This site can’t be reached. Www.example.com’s server IP address could not be found. DNS_PROBE_FINISHED_NXDOMAIN”.
On Mozilla Firefox you might get “Hmm. We’re having trouble finding that site”. We can’t connect to the server at www.example.com”.
So don’t get panic, your website is not down, this error is only on your computer’s browsers. You need to add “Google Public DNS IP addresses” to your IPv4 Properties. Remember that it is not necessary that you will get this error. In case if you get this error, follow the tutorial below.

If you like this post then don’t forget to share with people. Share your feedback in the comments section below.
Also Read
- Hire Best Blogger Template/Website Developers | Customize, Develop & Fix Blogger Template
- How To Display Google Ads On Blogger – Step By Step | Monetize A Blogger Blog | Earn Online
- How To Fix Valuable Inventory: No Content Google Adsense Error | Google Adsense Approval
- Complete Blogger/Blogspot Tutorials – Step By Step | Widgets, SEO, Monetization, Conditional Tags


Leave a Reply