Do you want to monetize your Blogger blog with Google Adsense and show Google ads on it? You are in the right place. In this tutorial, I will guide you step-by-step on How to sign up for Google AdSense on Blogger and show ads on your blog.
Google AdSense is one of the most popular PPC(Pay Per Click) based free program for monetizing blogs and YouTube channels. Over 2 million publishers and content creators have chosen Google AdSense to make money online.
One of the advantages of using the Blogger as a blogging platform is that it is owned by Google, you can easily integrate Google Adsense with the Blogger.
Following topics will be covered in this tutorial:
- Can you Apply for Google AdSense Program with a “.blogspot.com” subdomain?
- How the Sign-up to Google AdSense Process Works
- How to Sign Up for Google Adsense on Blogger
- How to Manage Google AdSense Auto Ads
- How To Add Google Adsense Gadgets on Blogger
- How To Configure Custom Ads.Txt in Blogger
RELATED
01. Can you Apply for Google AdSense Program with a “.blogspot.com” subdomain?
Answer is Yes. You can apply to AdSense program with your “.blogspot.com” subdomain. Few years back AdSense had made mandatory for publishers to use a standard domain when applying to Google AdSense program. For that you had to redirect your “.blogspot.com” subdomain to a standard domain, but now there is no such restriction.
Let’s understand the difference between subdomain and standard domain with an example. The “example.blogspot.com”, “johnsmith.blogspot.com” are subdomains of “Blogger.com”, means they belong to Blogger.com. The “example.com”, “meersworld.net”, “wordpress.com” are standard domains. A standard domain is your own property because you purchase it from a domain provider such as Namecheap, GoDaddy, etc.
If you’re interested in redirecting your Blogger blog to a custom domain, read this tutorial:
02. How the Sign Up to AdSense Process Works
The process of signing up to Google AdSense from Blogger involves 4 steps:
- Create the AdSense Account
- Submit your information (Account type, Name & Address, etc) and verify the phone number.
- Connect your blog to Google AdSense by submitting a Request Review.
- Google AdSense takes few days up to 2 weeks in order to review your request. Once the review is done you will be notified whether your blog is approved for monetization or not.
If you want to know how to prepare your blog before you apply to Google AdSense, and how to get AdSense approval, go through this article.
03. How to Sign Up for Google Adsense on Blogger?
In this section, I will guide you step-by-step on how to create your Google AdSense account and sign-up.
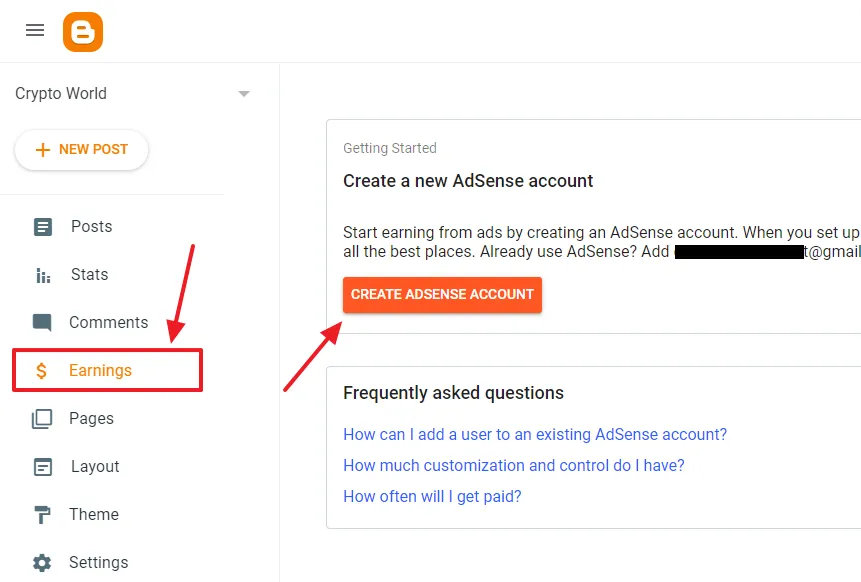
- Login to your Blogger account.
- Click the Earnings from the sidebar.
- Click the “CREATE ADSENSE ACCOUNT” button.
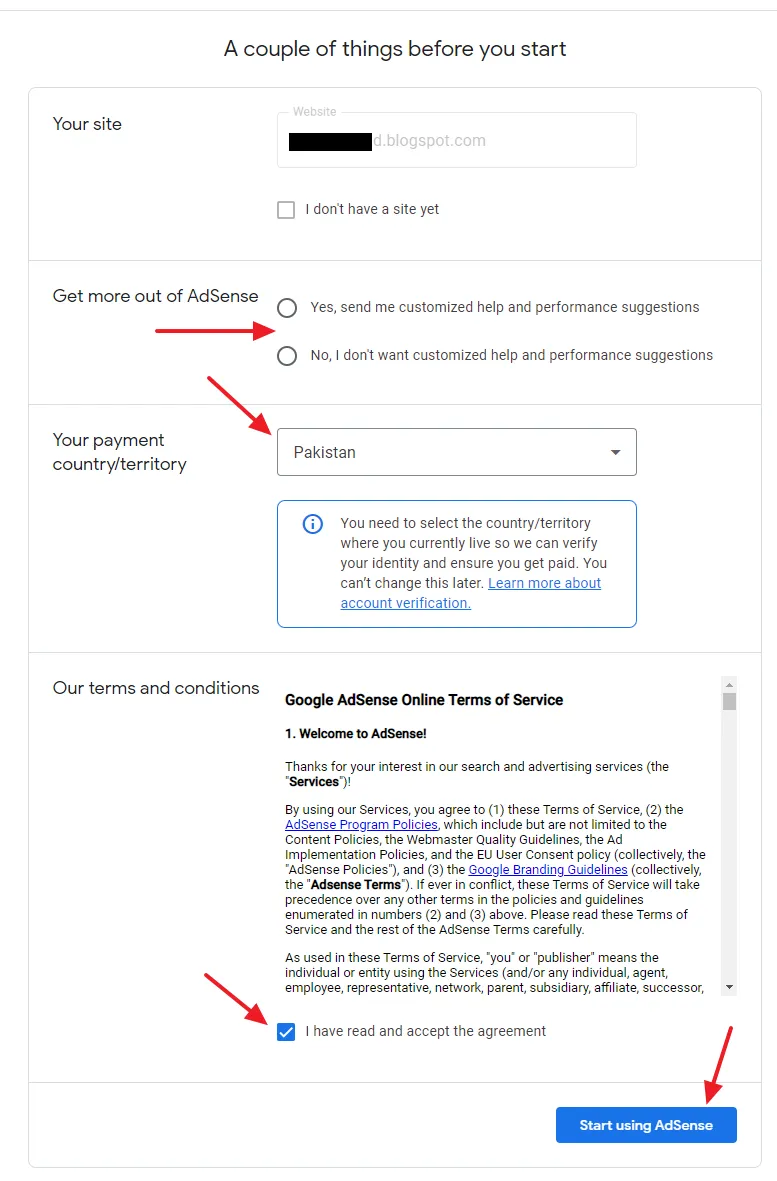
- On Your site there will already be the domain of your Blogger blog like “example.blogspot.com” because you have directly applied from your Blogger account.
- On Get more out of AdSense, choose an option whether you want performance suggestions from Google AdSense or not.
- On Your payment country/territory choose your Country where you’re located like India, United States, Bangladesh, Saudi Arabia, Pakistan, Australia, United Kingdom, Indonesia, etc.
- As you will choose the country the Our Terms and Conditions will appear below. Tick the “I have read and accept the agreement“.
- Click the Start using AdSense button.
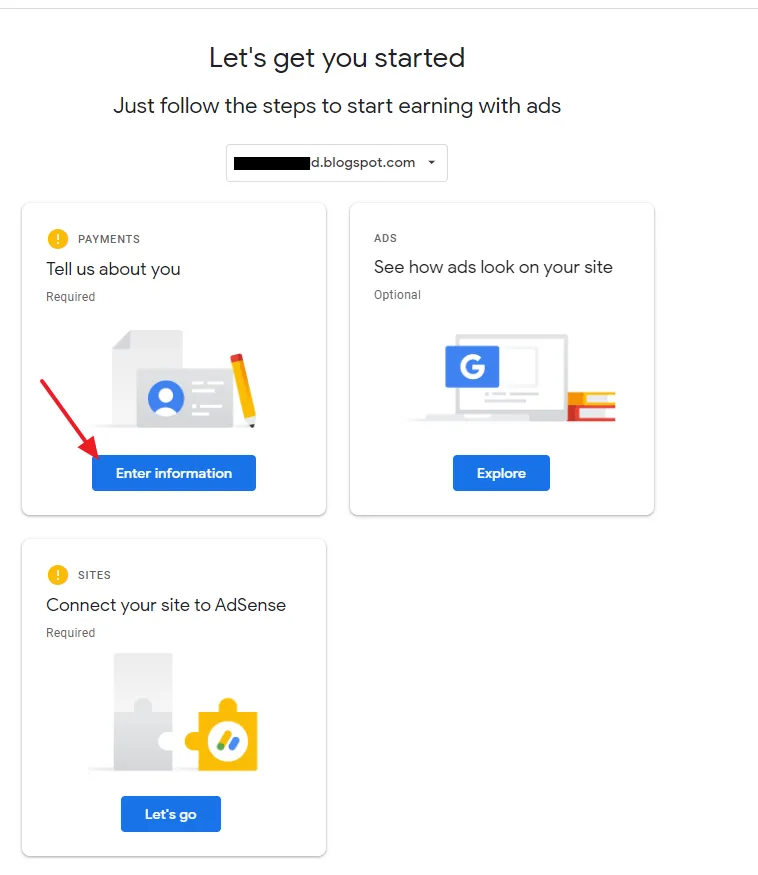
You have successfully created your AdSense account, now you have to do two mandatory things in order to complete the Sign-up process (1) Provide the Customer Information (Payments) (2) Request Review (Connect your site to Google AdSense).
01. PAYMENTS (Customer Information)
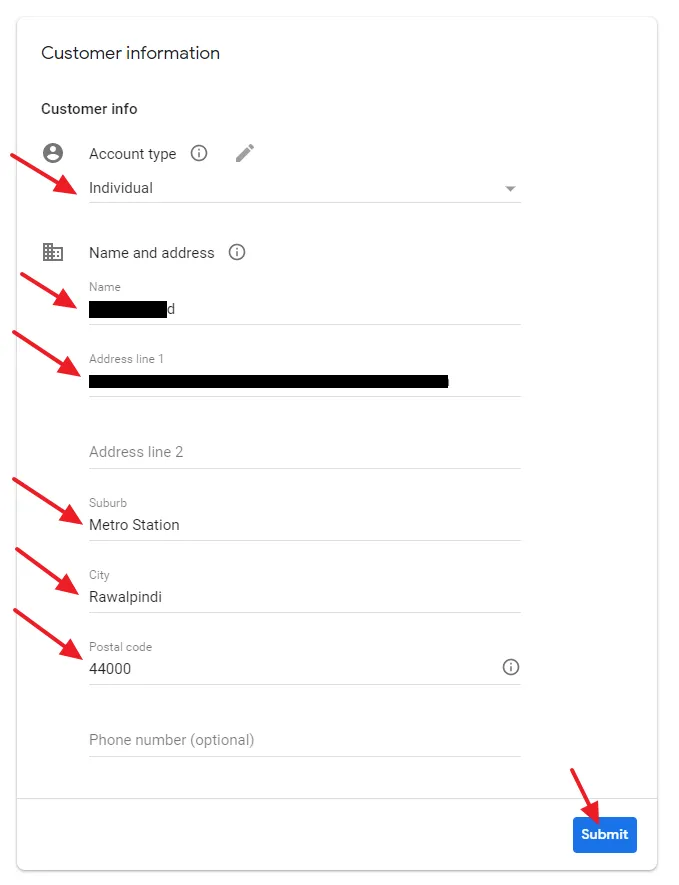
Follow the steps to fill the Customer Information:
- Go to PAYMENTS block and click the Enter information button.
- On Account type choose between Individual or Business.
- On Name and address provide the exact name and address. Do not provide a wrong or random address.
- On Suburb enter a suburb name. A suburb is a residential area located on outskirts of a city.
- Enter your City and its Postal Code.
- The Phone number is optional.
- Click the Submit button.
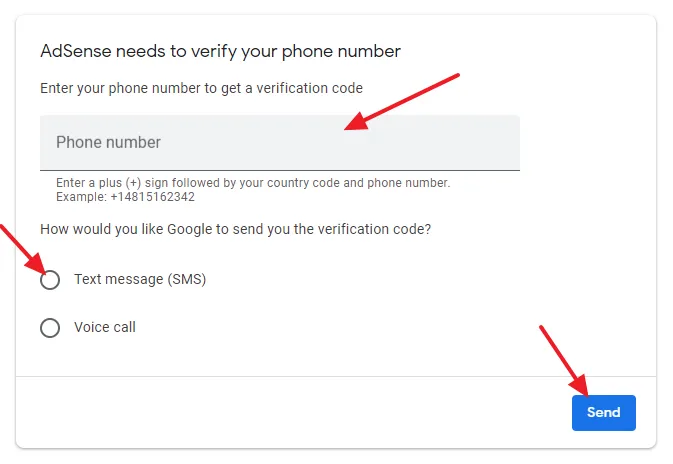
AdSense needs to verify your phone number.
- Enter your Phone number (mobile) in this format: “+” “country code” “phone number”, like +92 is the country code of Pakistan.
- Choose a method between the Text message (SMS) and Voice call.
- Click Send.
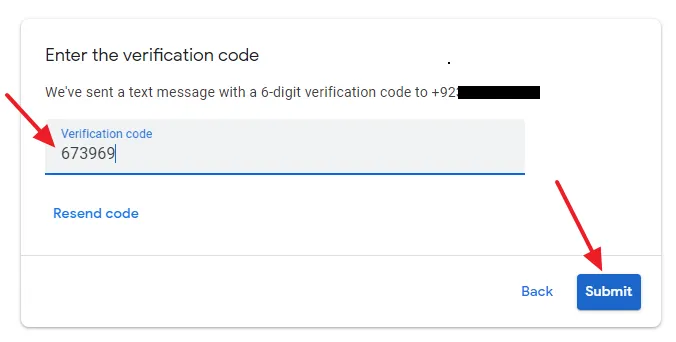
- Enter the Verification code that you have received on your mobile.
- Click the Submit button.
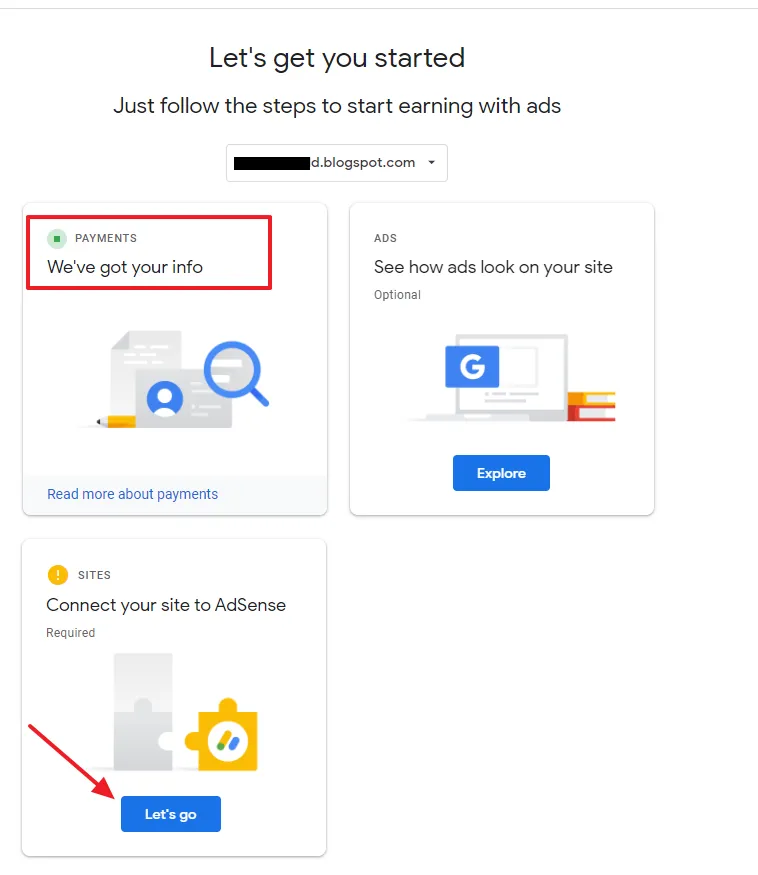
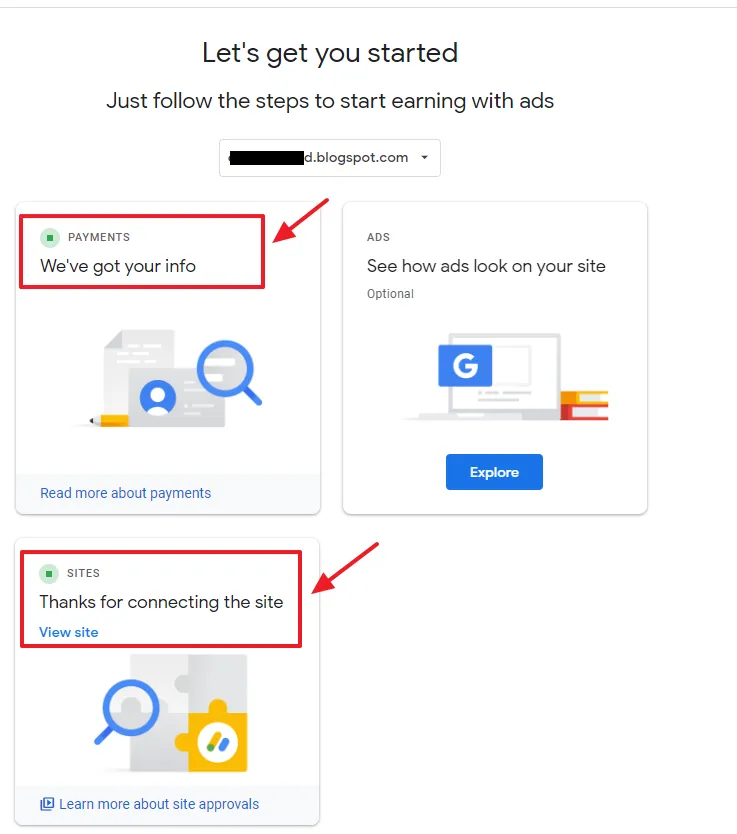
- The PAYMENTS part is done. You can see “We’ve got your info” message.
Now go to SITES block (Connect your site to AdSense) below the PAYMENTS. Click the Let’s go button and follow the next section to submit the Request review.
02. SITES (Connect your site to AdSense)
Click the Request review button to send your application to Google AdSense.
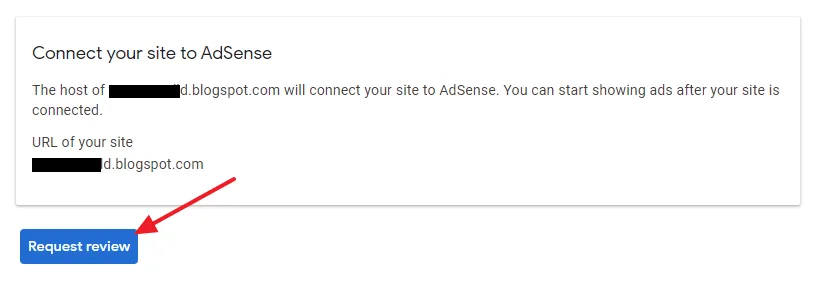
You can see the message on SITES block, “Thanks for connecting the site“. Click the View site link to check the status on Google AdSense.
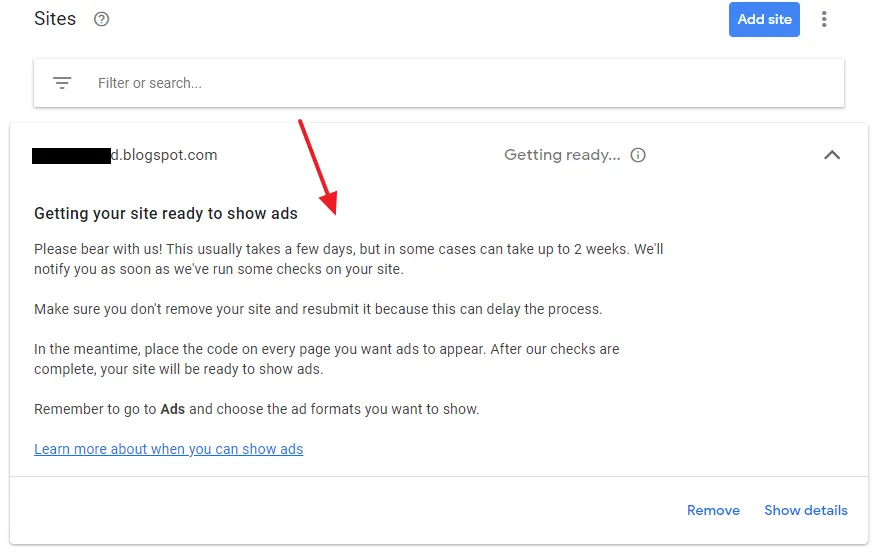
- On Sites you will see the status “Getting ready…“. Click the Downward arrow to read the details.

Here you can read the details. It tells you that, “This usually takes a few days, but in some cases can take up to 2 weeks. We’ll notify you as soon as we’ve run some check on your site“….. You can also check the status directly on your Blogger dashboard, as shown in the next step.
- Click the Earnings tab from the sidebar.
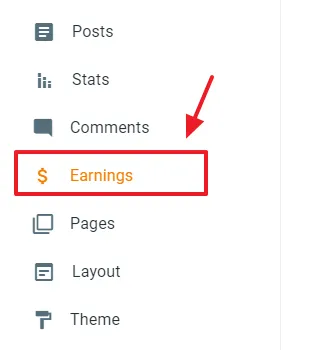
You can see that it is informing, “AdSense is reviewing your site…….“, “You AdSense account is connected, but AdSense is reviewing your blog to make sure it’s ready to show ads. Review can be as quick as a day, but for some publishers it can take several weeks.“.
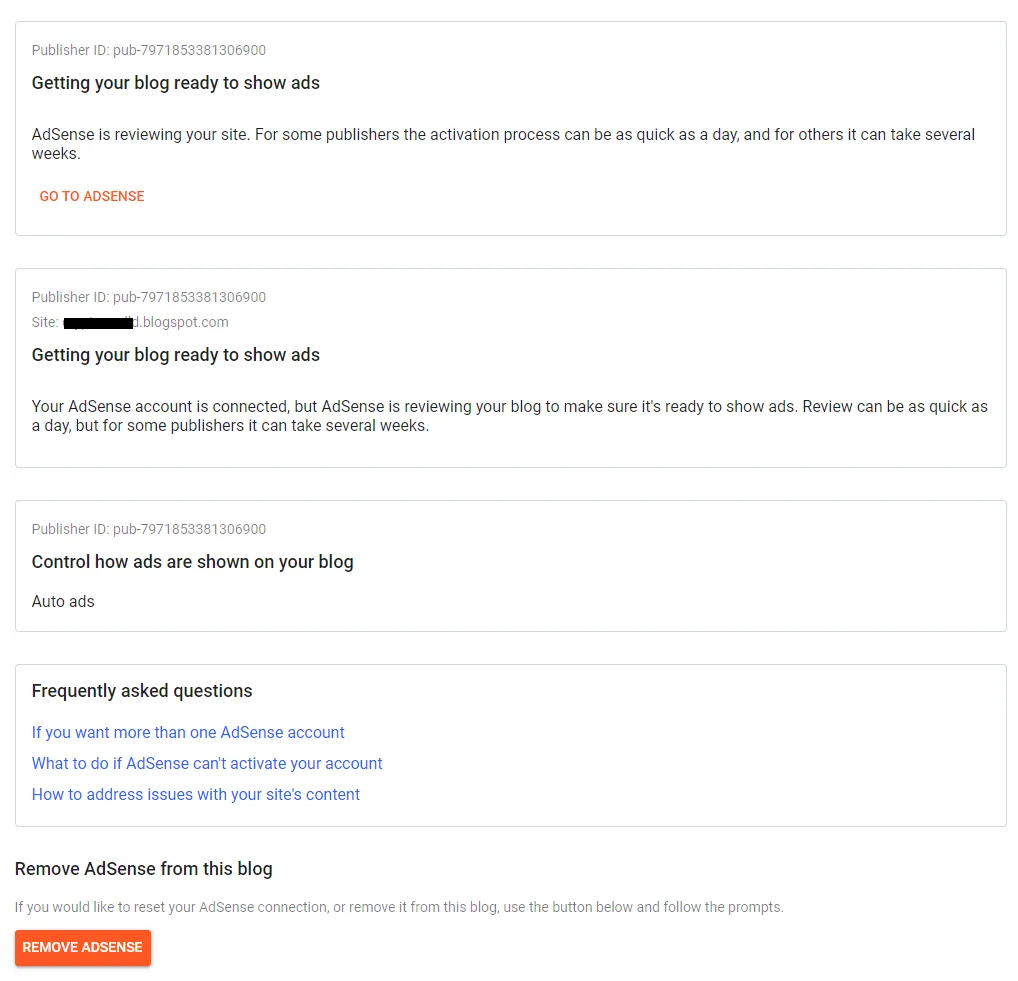
After your Blogger blog is approved for monetization and earnings reach $100 threshold, Google Adsense will ask you to set up your Payment details like Money transfer method, Bank Account No, Bank name, etc.
04. How to Manage Google AdSense Auto Ads
In this section, I will guide you on how to manage or set up Google AdSense auto ads for your Blogger blog.
- On your Google AdSense account click the Ads from the sidebar.
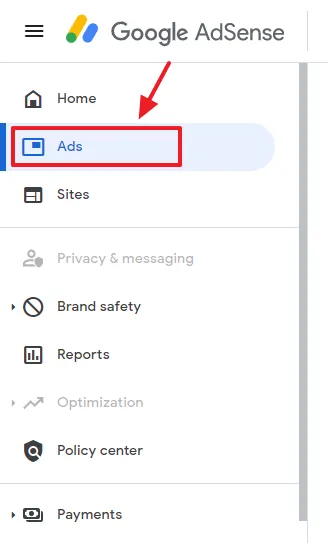
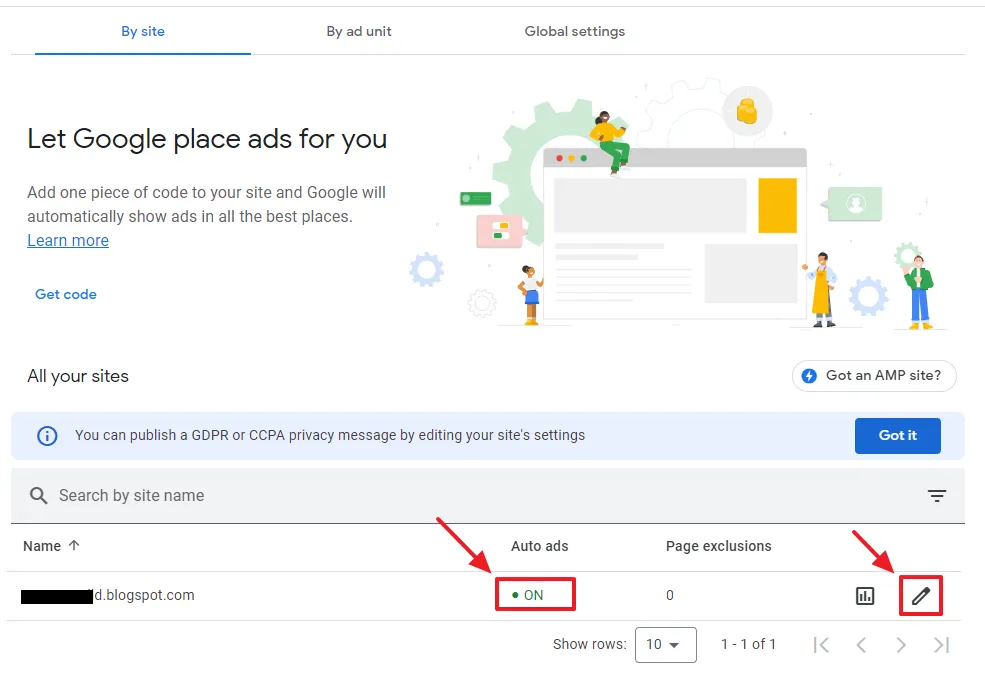
- Go to By site tab.
- By default Auto ads are turned on for your Blogger blog. Click the Edit icon to manage auto ads settings.
- The Auto ads settings allow you to enable/disable auto ads.
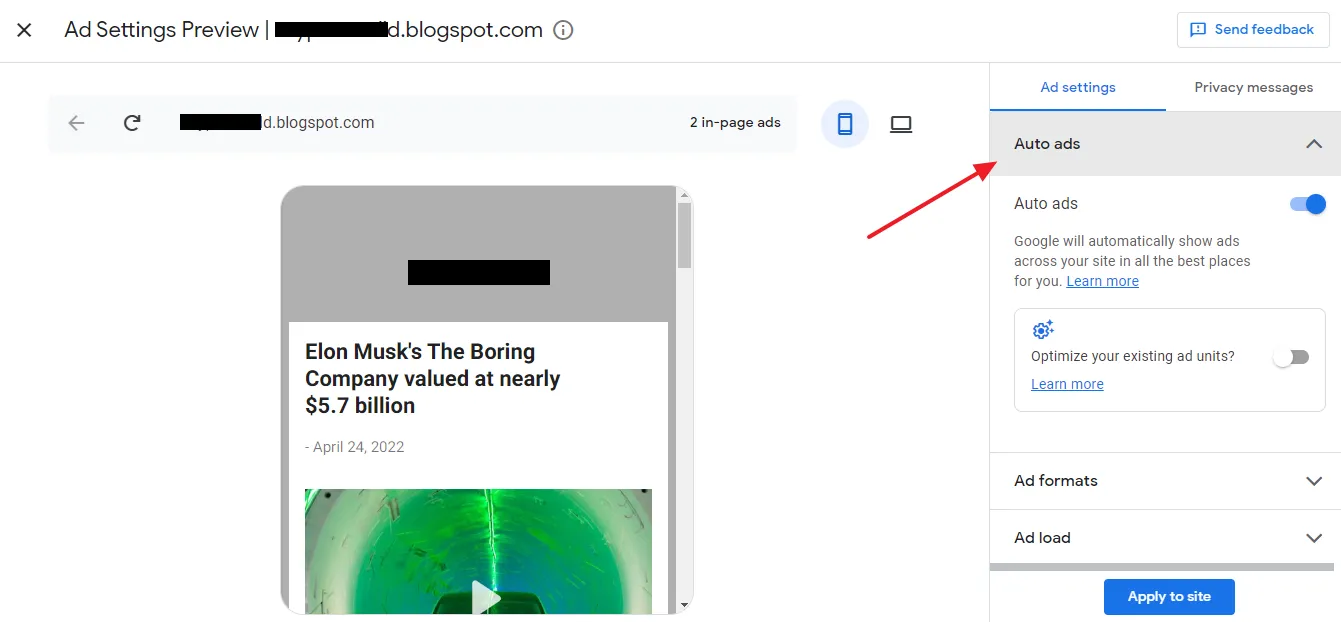
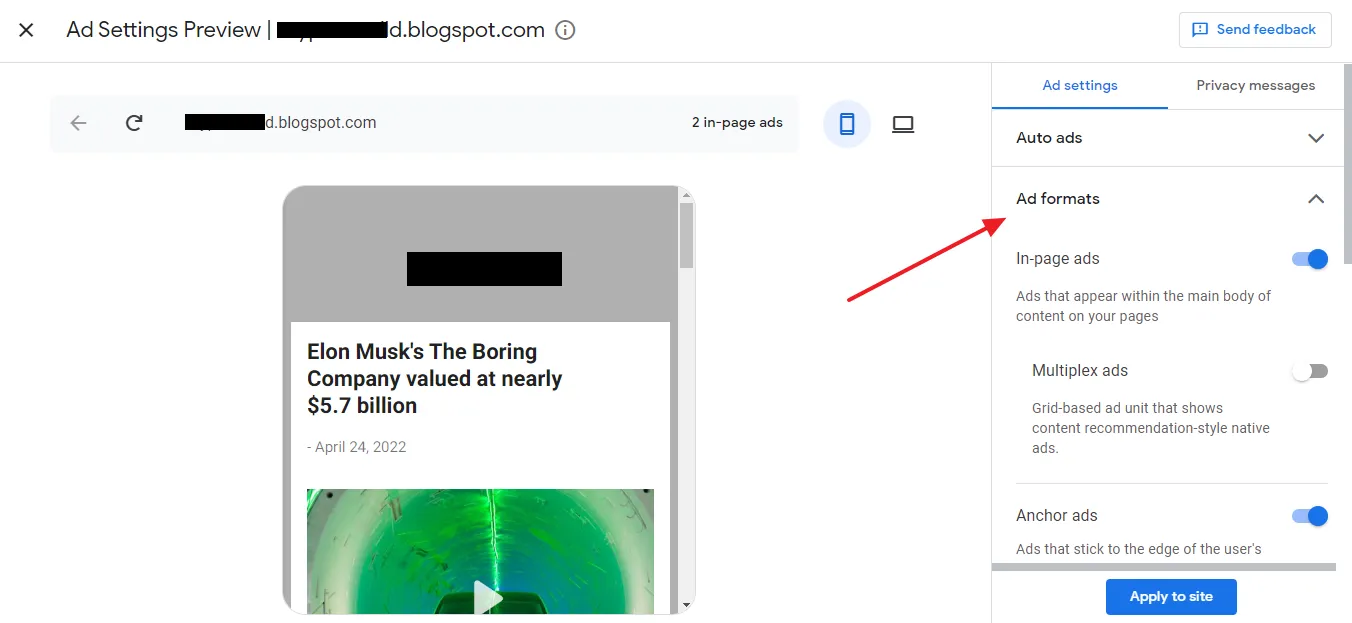
- The Ad formats settings allow you to enable/disable different types of auto Ad formats like In-page ads, Anchor ads, Side rails, and Vignette ads. The left side shows the preview of ads.
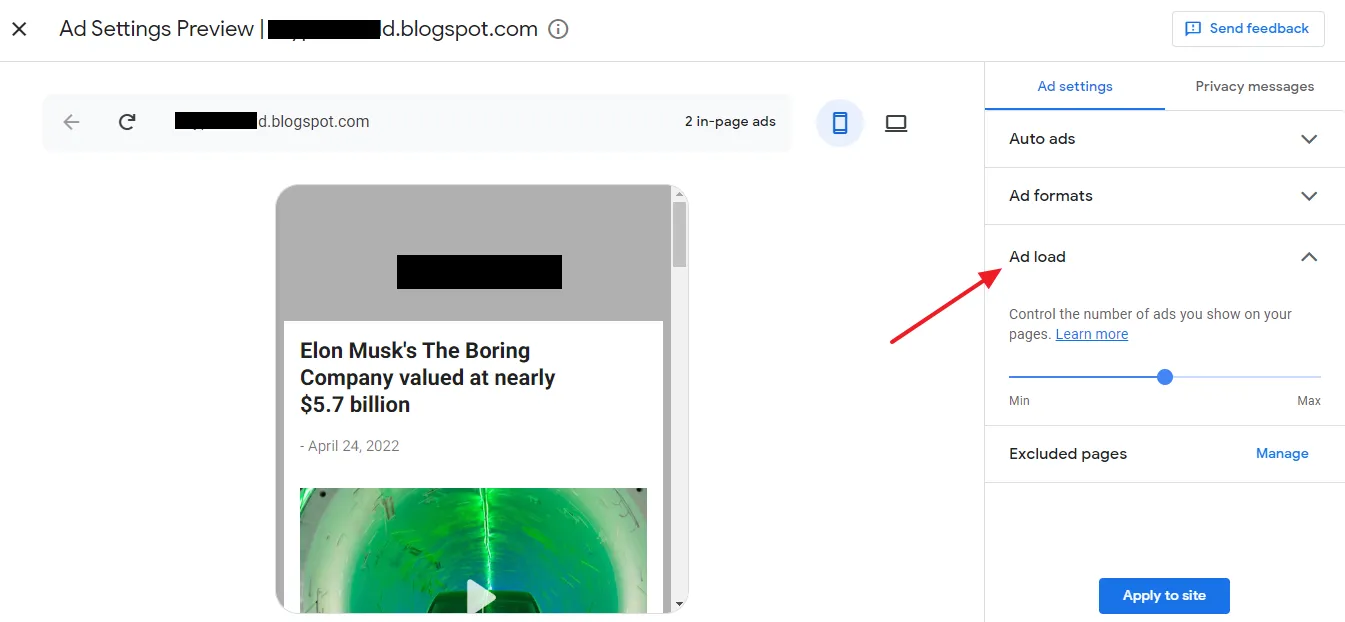
- The Ad load settings allow you to control the number of auto ads on your blog posts/pages.
- The Excluded pages settings allow you to exclude those pages on which you don’t want to display AdSense auto ads.
05. How To Add Google Adsense Gadgets on Blogger
In this section, I will guide you step-by-step on how to add Google AdSense widgets on Blogger in two different ways.
01. Using AdSense Gadget
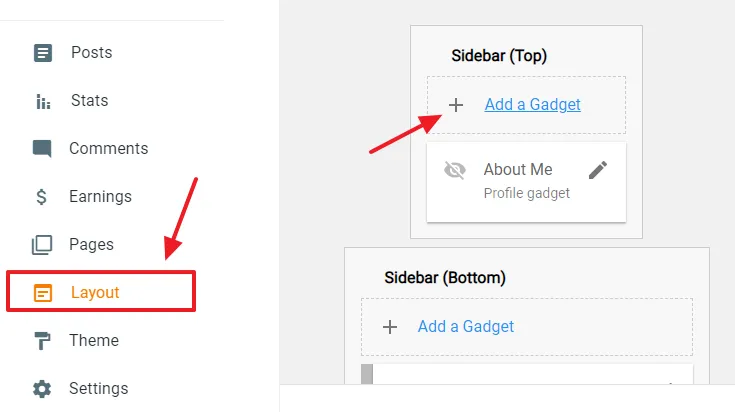
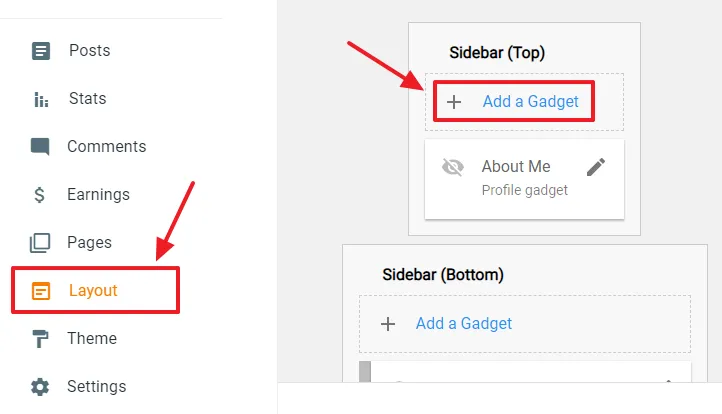
Go to your Blogger Layout from the sidebar.
- Click the + Add a Gadget link of the section on which you want to display the AdSense ad like Header, Sidebar, Footer, etc.
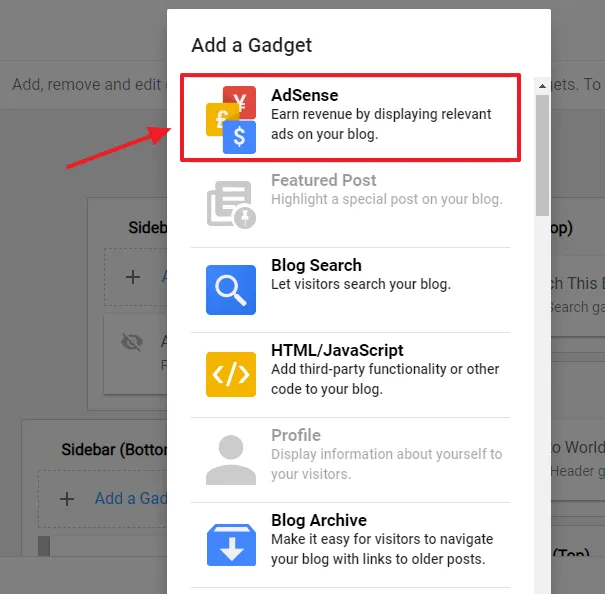
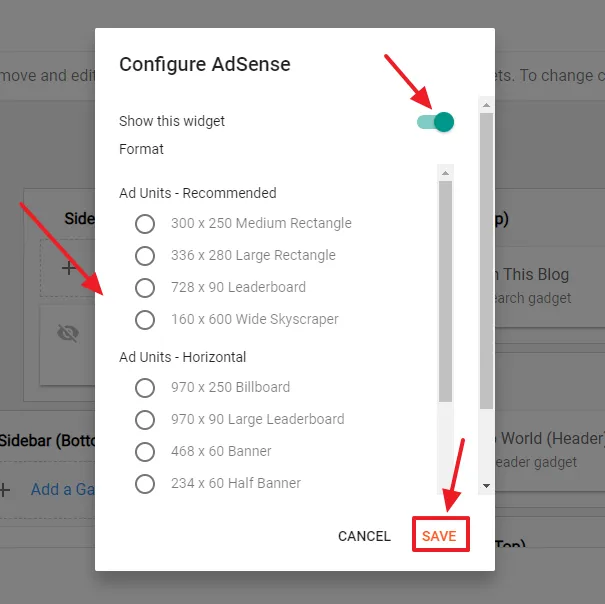
- Click the AdSense gadget.
- Turn on the Show this widget.
- Choose the size of the AdSense gadget. You can choose from different formats such as Ad Units – Horizontal, Ad Units – Vertical, Ad Units – Square, and Responsive. The Responsive ads auto adjust their size according to the layout and available space.
- Click Save.
Note: The AdSense Gadget can only be added/saved when your Blogger blog is approved for showing Google ads.
02. Using HTML/JavaScript Gadget
The other method to add Google AdSense gadget on your Blogger blog is via HTML/JavaScript gadget.
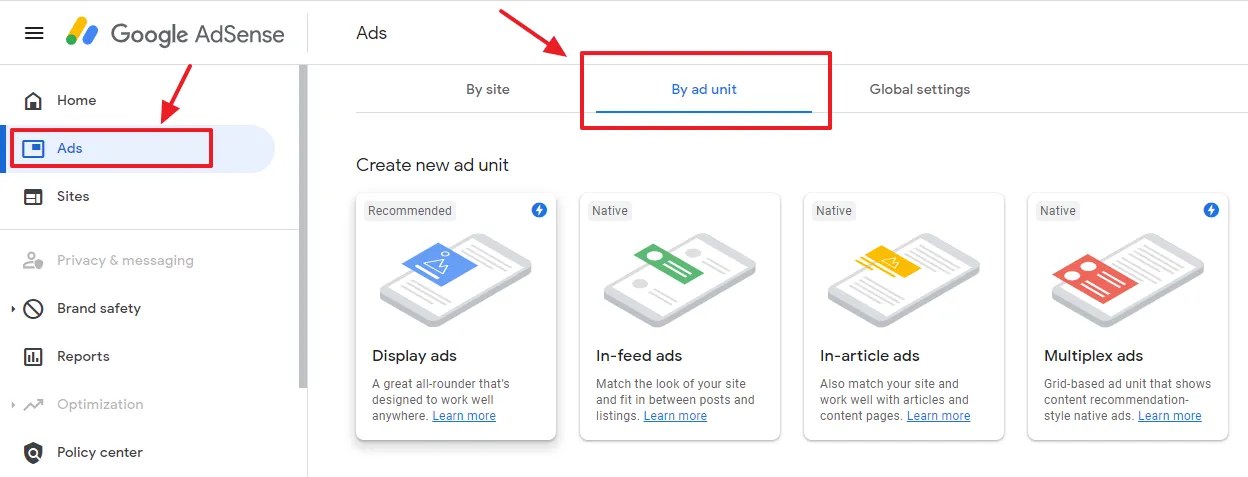
- Open your AdSense account and go to Ads from the sidebar.
- Click the By ad unit tab. There are 4 types of ad unites i.e Display ads, In-feed ads, In-article ads, and Multiplex ads. Click Learn more link or click on them to find the detail and preview about each ad unit type.
- Here I am selecting Display ads unit.
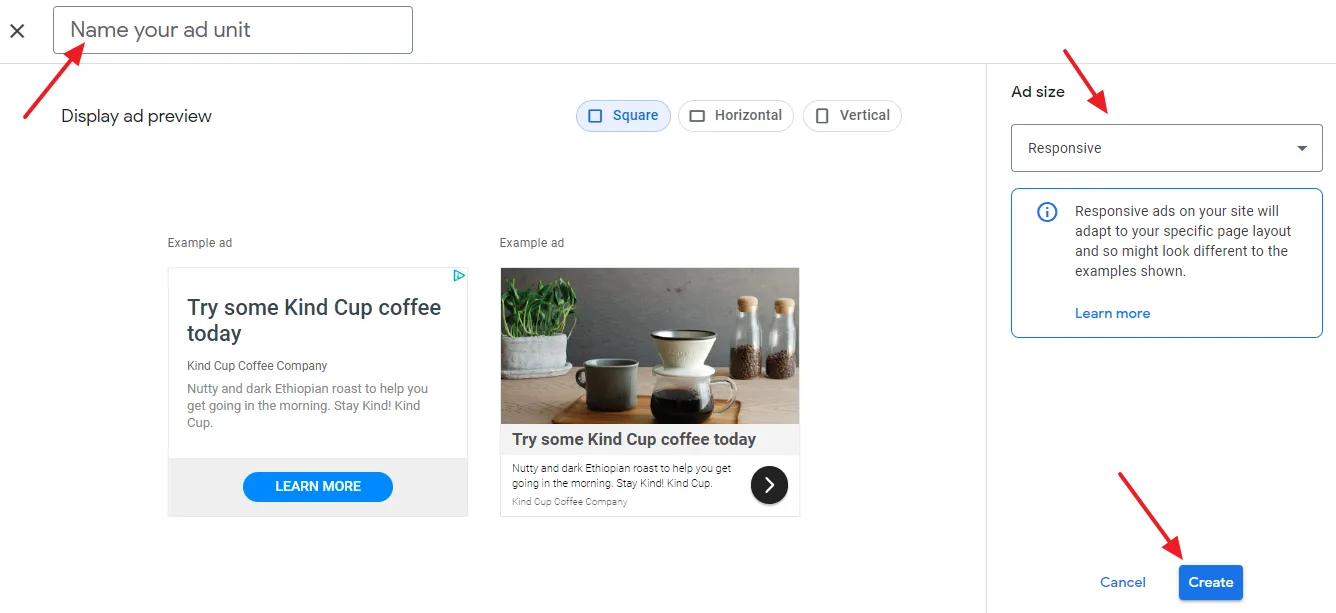
- Enter a Name for your ad unit.
- Choose Ad size. There are two options i.e. Responsive and Fixed (with predefined height and width). You can view the preview of the ad at left side.
- Click the Create button.
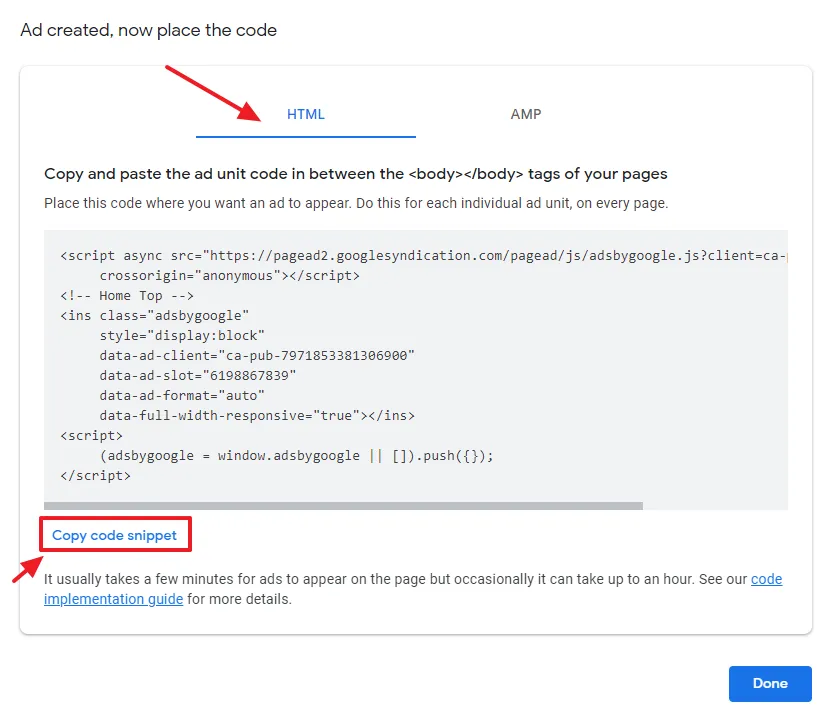
- Choose the HTML tab. AMP ads are not supported by Blogger.
- Click the Copy code snippet.
- Go to your Blogger Layout from the sidebar.
- Click the + Add a Gadget link of the section on which you want to display the AdSense ad like Header, Sidebar, Footer, etc.
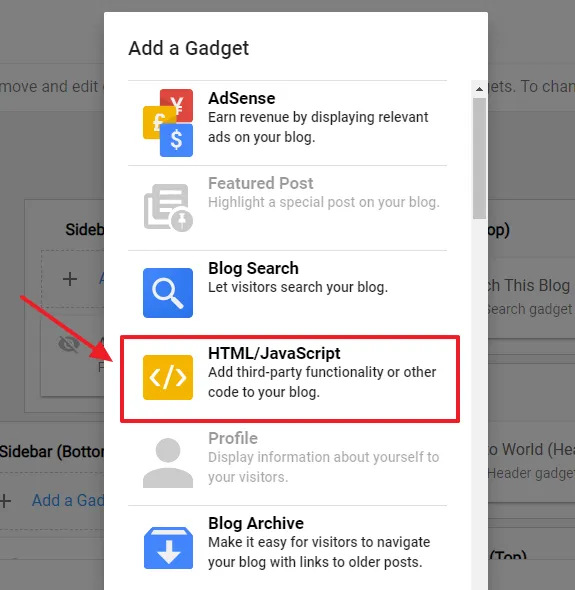
- Click the HTML/JavaScript gadget.
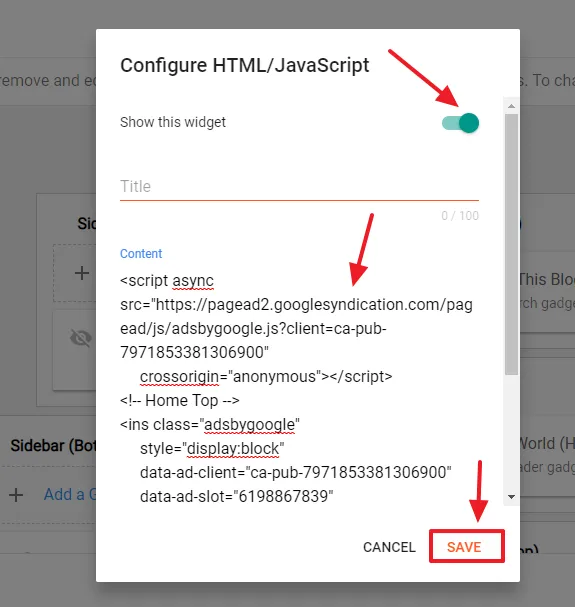
- Click Show this widget.
- Paste the Ad unit code in the Content.
- Click Save.
06. How To Configure Custom ads.txt in Blogger?
Once your blog is approved by Google Adsense for showing ads, you need to set up the custom ads.txt on your blog.
Read this tutorial to learn what is custom ads.txt and how to configure it on Blogger:
So it was all about monetizing a Blogger blog with Google AdSense ads. I hope that this tutorial will have helped you. If you like this post then don’t forget to share with other people. Share your feedback in the comments section below.
Get access to all the Blogger Tutorials.
Also Read
- How To Resolve Earnings At Risk – One Or More Of Your Sites Does Not Have An Ads.txt File On Blogger/Blogspot
- How To Change The Size Of Google Adsense Ads On Your Blog Or Website? | Blogger
- How To Add & Test Custom Robots Txt On Blogger/Blogspot | Blogger SEO
- How To Configure Google Search Console On Blogger | Add Sitemap | Inspect URL
- How To Disable/Turn-Off Google Adsense Auto Ads | Adsense Turn Off Auto Ads On Content Pages




Leave a Reply