Are you new to YouTube and want to learn how to upload a new video on your YouTube channel? You’re in the right place.
In this tutorial, I will guide you step-by-step on how to upload a new video on YouTube channel, and how to add and edit video details like Title, Description, Thumbnail, Playlist, Visibility, Audience, Age Restriction, Paid Promotion, Automatic Chapters, Tags, Category, Shorts Remixing, and many more.
To upload a video on YouTube you need a channel. If you have not created a YouTube channel yet, go through this tutorial:
Following topics will be covered in this post:
- How to Upload a Video on YouTube and Add Details
- How to Edit Video Details on YouTube
01. How to Upload a Video on YouTube & Add Details
Follow the steps to upload a new video on YouTube and add video details.
- Sign In to your YouTube channel with Gmail.
- Click on the Account icon located at your top-right corner.
- Click on the YouTube Studio. YouTube Studio is a very powerful and advanced tool that allows you to manage your YouTube channel.
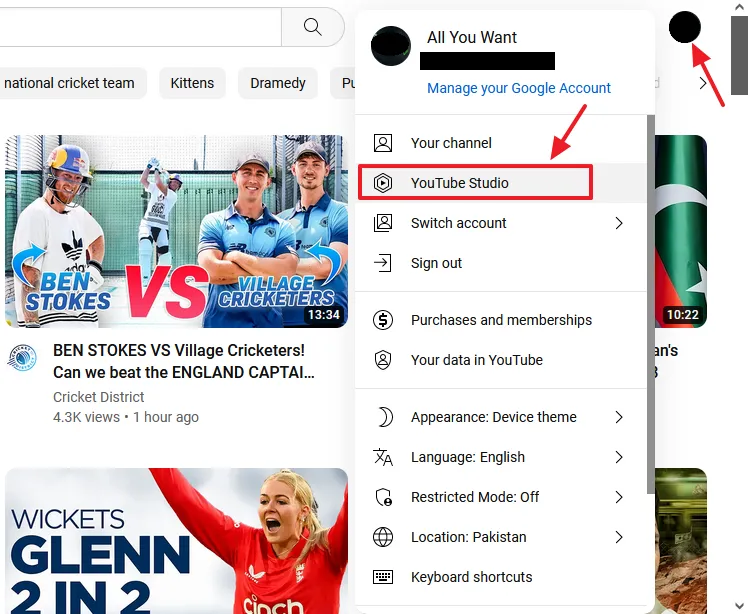
- Click on the CREATE located next to the Account icon at top-right corner.
- Click on the Upload videos.
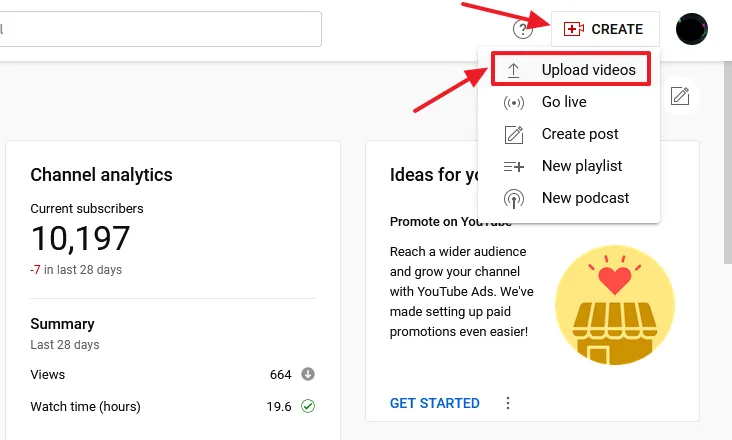
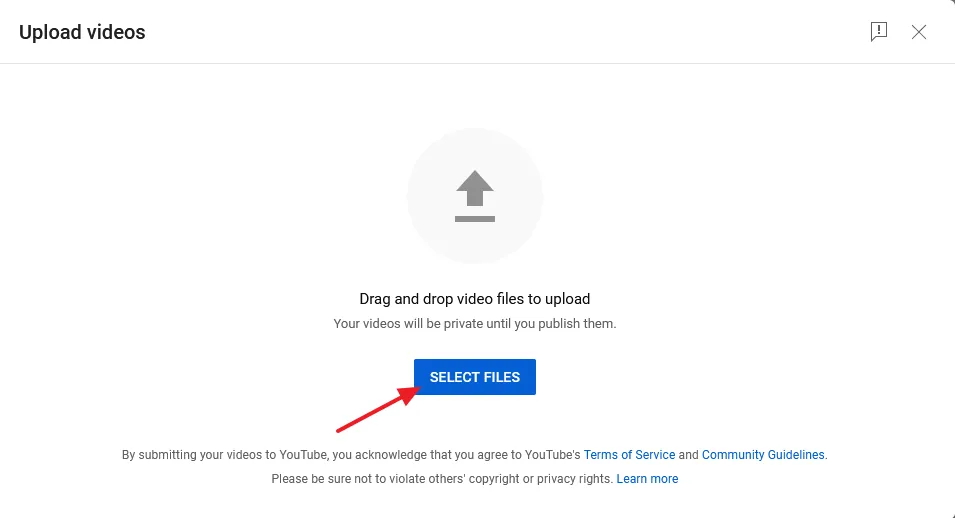
- You have options to upload videos (1) Drag and drop videos on the given space (2) Click on the SELECT FILES button to browse and upload your video.
- A video is uploaded successfully. Before uploading a video YouTube checks for issues. You can see here that there is no issue with the video.
Follow the next steps to add the video details.
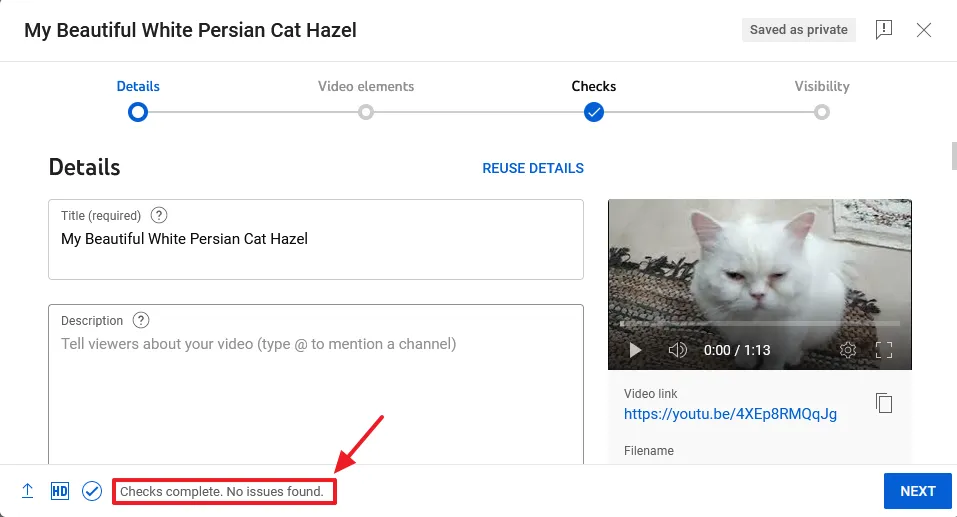
Title & Description
- Enter the Title of your YouTube video. The title shouldn’t be too long and too short. It should include the most important keywords of your video.
- Enter a unique Description of your video. The description should be meaningful and to the point because it helps YouTube, Search Engines, and visitors understand the content of the video. Include the important keywords/phrases in the description. You can also add website links and social media links so that visitors can learn more. Read: Tips for video description.
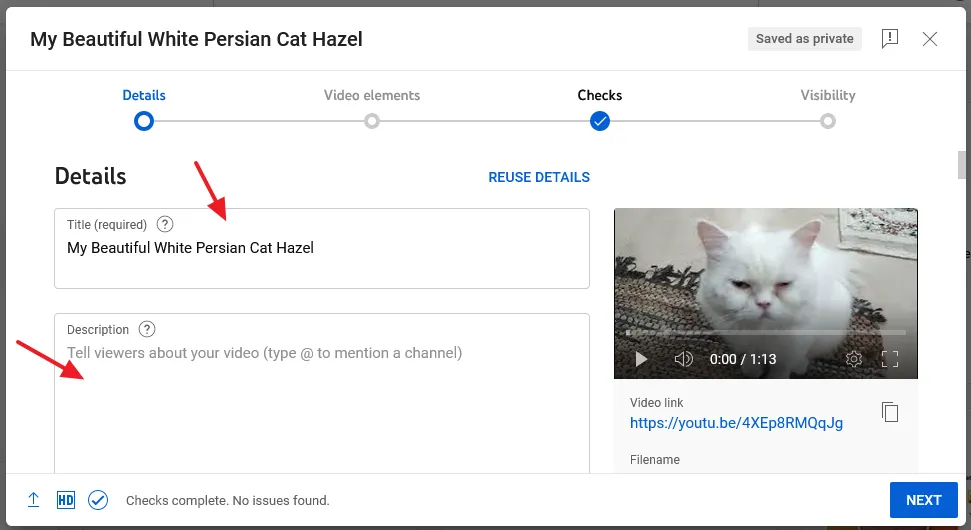
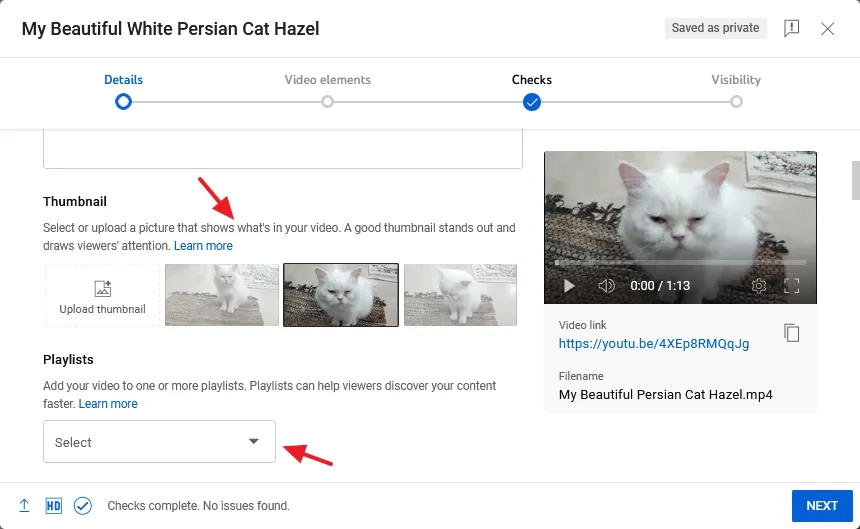
Thumbnails & Playlists
- Select an auto-generated video Thumbnail or upload a thumbnail from your computer. Do not ignore the video thumbnails because they catch viewers attention and convert impressions to clicks.
- Select a relevant Playlist(s) for your video. Playlists organize your videos by topics which helps visitors to quickly explore their desired videos on your channel. The next video in the playlist is automatically played after the current video.
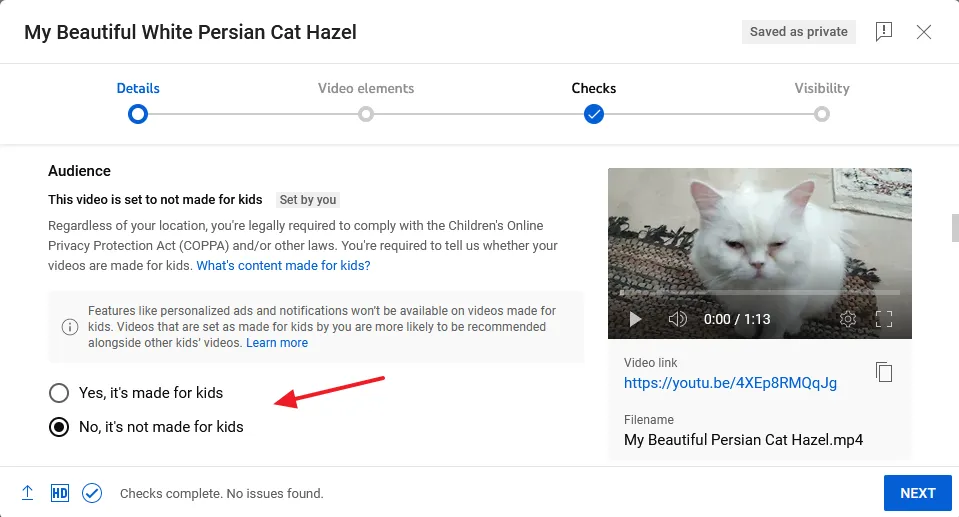
Audience
Choose whether your video is made specifically for kids or not. If the video is made for all age groups select No, it’s not made for kids.
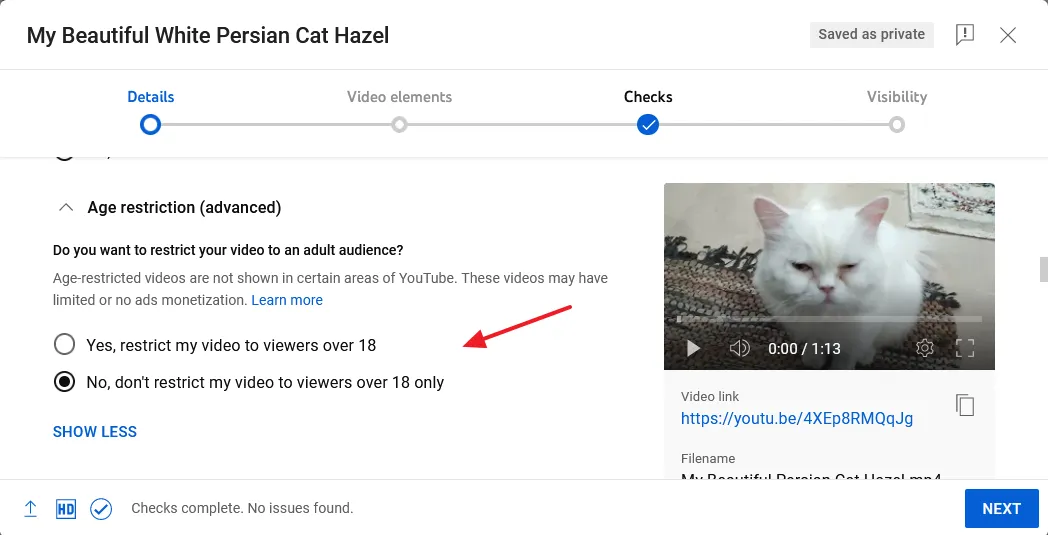
Age Restriction
- If you choose the option, Yes, it’s made for kids in the above section the Age restriction options are disabled automatically.
- If your video contains content for adults, choose Yes, restrict my video to viewers over 18, otherwise choose No, don’t restrict my video to viewers over 18 only.
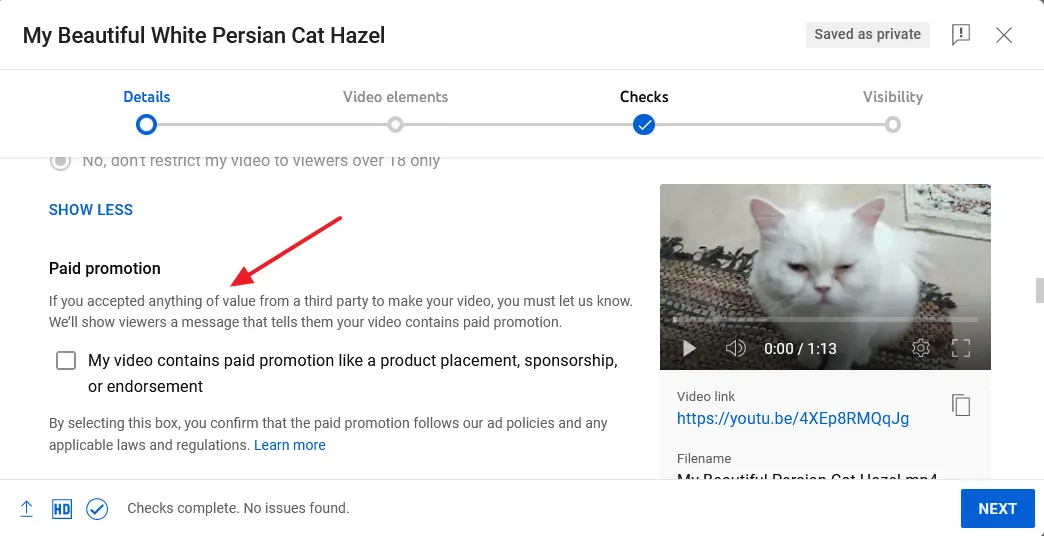
Paid Promotion
If your video contains paid/promotion/sponsored content check (tick) the option My video contains paid promotion like a product placement, sponsorship, or endorsement. It tells your video visitors that the video contains paid/promotional content.
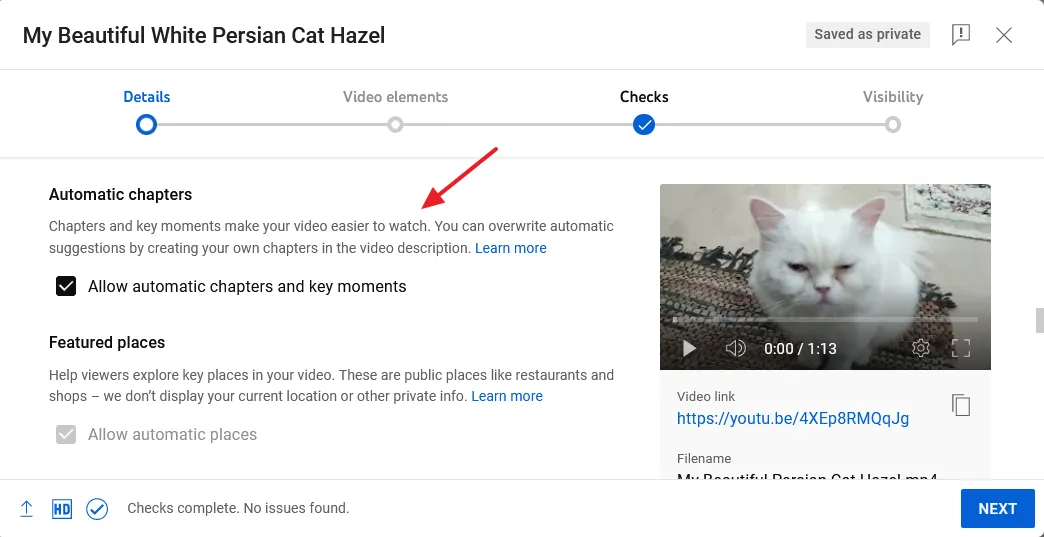
Automatic Chapters and Featured Places
The Automatic chapters makes your video easier to watch. Instead of watching whole video or dragging the slider viewers can jump to a specific part of the video in a click. You can also overwrite the automatic chapters by creating your own chapters in the video description.
- To enable the Automatic Chapters check the Allow automatic chapters and key moments.
- The Featured places are public places in your video like bus stations, restaurant, shops, etc. They help viewers to explore important places in your video. If you want to enable this feature check Allow automatic places.
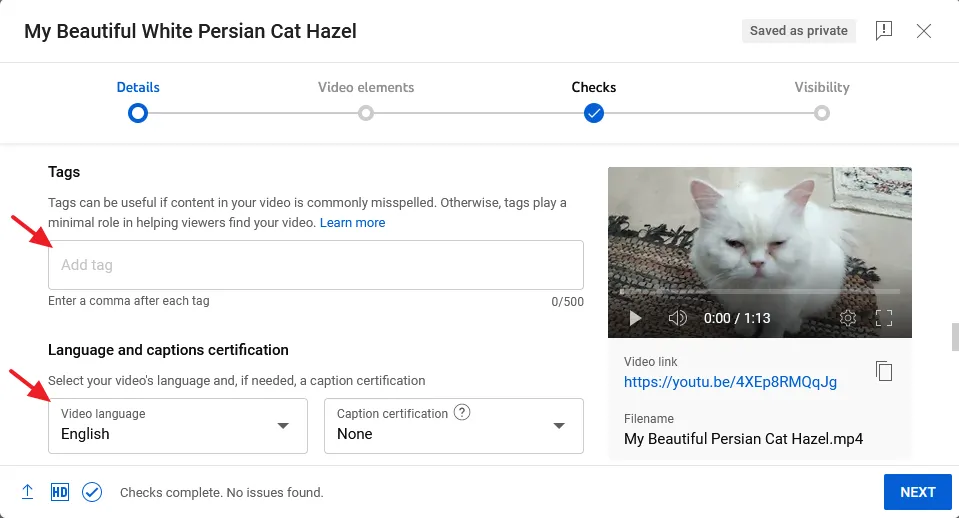
Tags | Video Language and Caption Certification
- Tags are important keywords relevant to your YouTube video. According to YouTube, tags can be useful if content in your video is commonly misspelled. Otherwise they have a very little role in helping your video to appear on search results.
- Select your Video Language.
- Choose a Caption Certification, if needed. Otherwise choose None. According to FCC (Federal Communications Commission) rules, certain material that first aired on American television on or after September 30, 2012 must have closed captions.
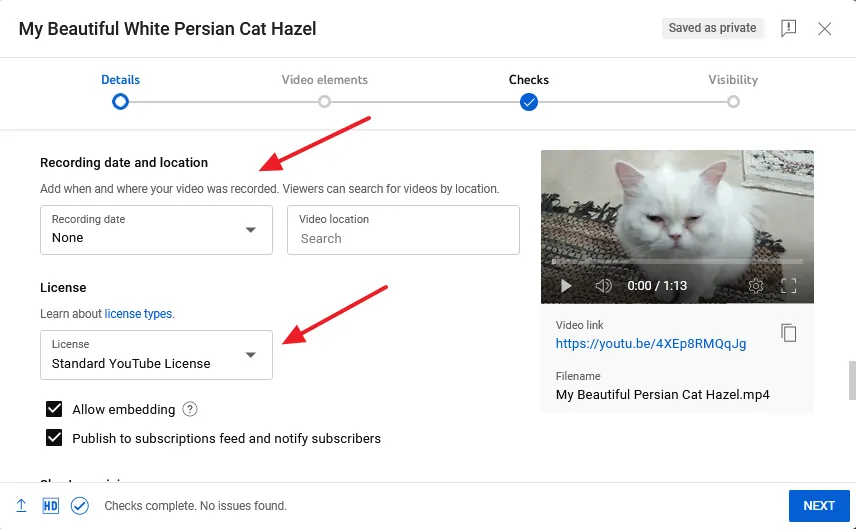
Recording data and location | License
- Add the the video Recording date and Video location. People can search for videos by location.
- YouTube has a licensing system in place to control the uploading of content in order to safeguard its users’ intellectual property. There are two types of License (1) Standard YouTube License (2) Creative Commons License.
- The Standard YouTube License gives all broadcasting rights to YouTube and allows the video creators to retain full ownership of the content. If someone uses or steal your content you can take legal action. In other words, this license gives your content copyright protection.
- The Creative Common License allows YouTube creators to grant permission to entire YouTube Community to reuse and edit your work (videos) subject to the terms of the license. You can mark your videos with a Creative Commons CC BY license. Only 100% original video can be given Creative Common License.
- The Allow Embedding option allows others to embed your videos and playlists in their websites and blogs.
- The Publish to subscriptions feed and notify subscribers shows recently uploaded video on the subscriptions feed of channel subscribers.
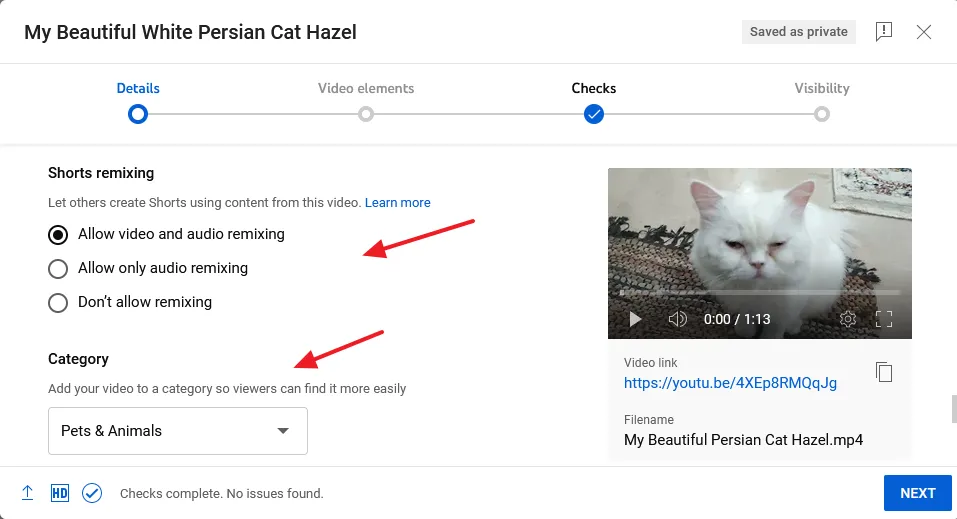
Shorts remixing | Category
The Shorts remixing allows others to create YouTube Shorts using the content from your videos. Shorts created from remixed content are credited to the original work, providing a fantastic opportunity for new viewers to find your content.
- If you want to allow Shorts remixing, select Allow video and audio remixing.
- If you want to allow only audio remixing select Allow only audio remixing.
- If you don’t want to allow Shorts remixing select Don’t allow remixing.
- Select the Category of your YouTube video so that people can find more easily.
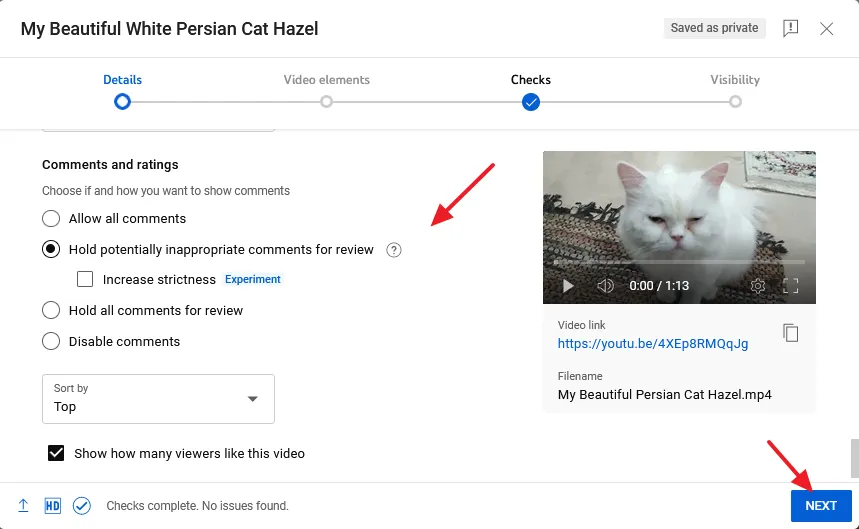
Comments and ratings
- The Allow all comments option allows the comments to be published as soon as they are posted.
- Choose Hold potentially inappropriate comments for review if you want to publish inappropriate or spam comments after a review. YouTube automatically identifies such comments.
- If you want to review all comments before publish choose Hold all comments for review.
- Choose Disable comments to disallow people to post comments.
- Check Show how many viewers like this video to show ratings of your video.
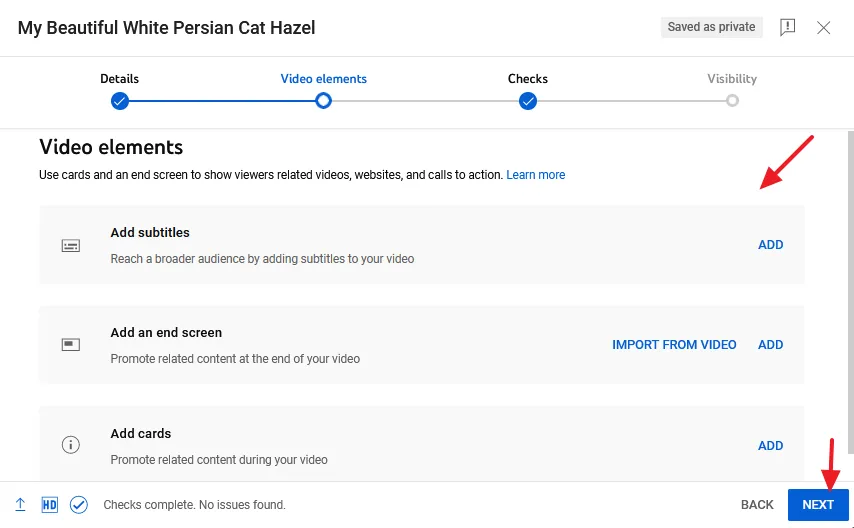
Video elements
The Video elements such as Cards, End Screen, and Subtitles, allow you to show viewers related videos, websites and calls to action.
- The Subtitles shows the text of what is said in the video. You can add subtitles for multiple languages. They help you to reach a broader audience.
- The End Screen allows you to promote other videos, encourage viewers to subscribe your YouTube channel, etc. Your video should be at least 25 seconds long. The End Screens can be added to the last 5 to 20 seconds of a video.
- The Cards also known as Info cards allow you to feature a relevant video, playlist, channel, or link in the video. Using cards you can enhance the viewer experience with relevant info.
- Click on the Next button.
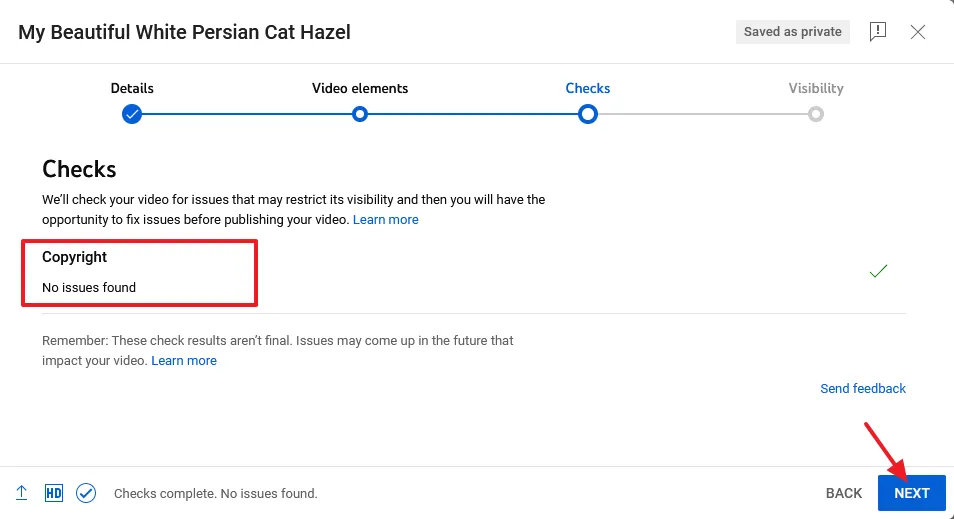
Checks
- YouTube checks for issues related to copyright. If found it may suggest you to fix the issue, otherwise YouTube may restrict video visibility. Here you can see that there are no issues.
- Click on the Next button.
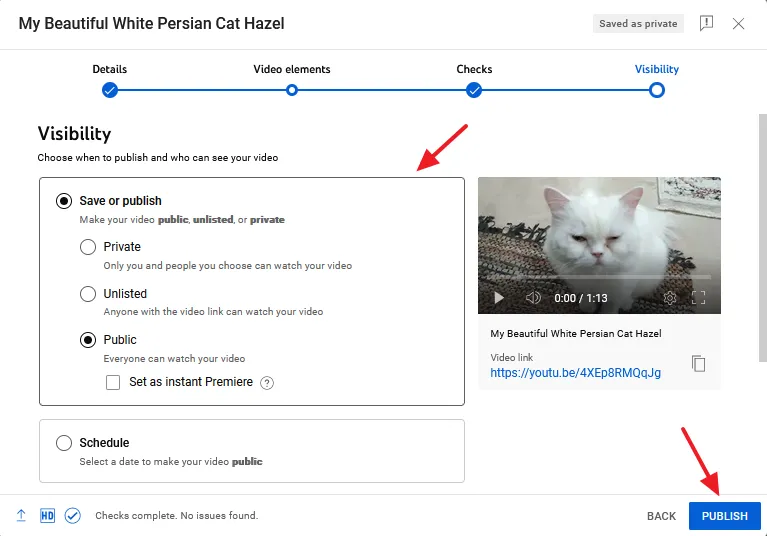
Visibility
- Select Private if you want to make your video private. No one will be able to watch and see your video except you.
- Select Unlisted if you want to allow only those people to watch your video to who you will share the link.
- Select Public if you want to publish your video to all. If you select publish option then click on the Publish button.
- The Schedule option allows you to select a date on which your video will be automatically published.
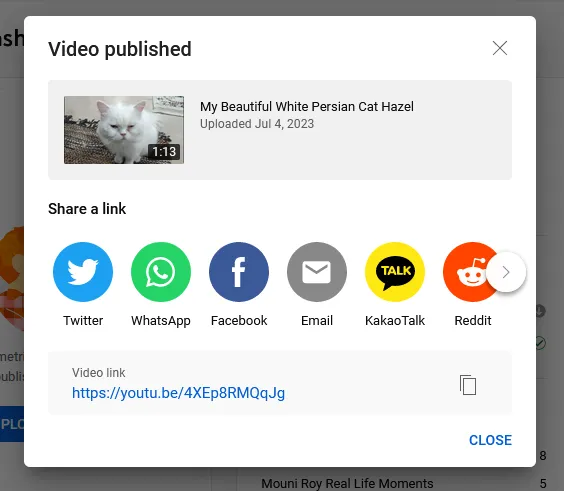
Video published
- The YouTube video is published. You can share the video link on other media platforms such as Twitter, WhatsApp, Facebook, Talk, etc.
02. How to Edit Video Details on YouTube
In the above section you learnt about how to upload a video on YouTube and add its details. Now in this section, I will guide you on how you can edit the video details on YouTube.
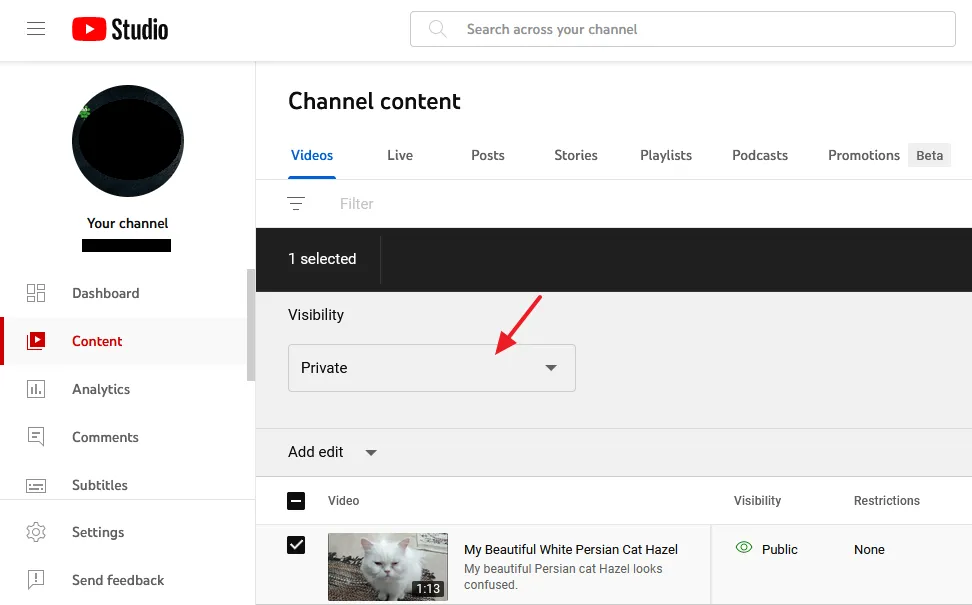
- Go to YouTube Studio, as I have shown in the above section.
- Click on the Content from Sidebar.
- Select the video that you want to edit.
- Click on the Edit dropdown list.
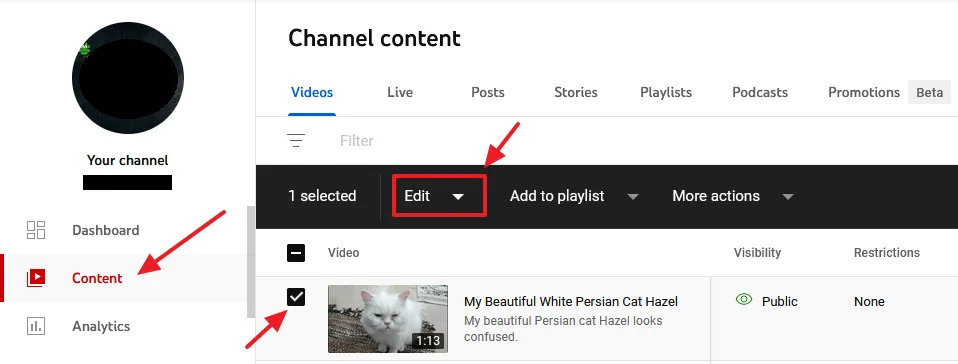
- Select the video detail that you want to edit or change like Title, Description, Thumbnail, Playlist, Visibility, Audience, Age Restriction, Paid Promotion, Automatic Chapters, Tags, Category, Shorts Remixing, and many more.
- Here I have selected Visibility.
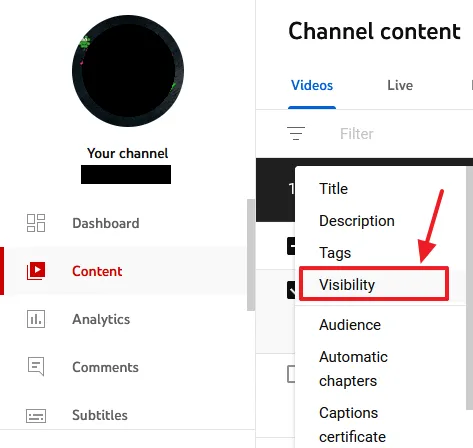
- Edit the selected video detail and update the changes. Here I have changed the Visibility status of the video from Public to Private.
It was all about uploading a new video on YouTube and adding its details. Hope you would have liked this video. If you like this post then don’t forget to share with the other people. Share your feedback in the comments section below.
Also Read



Leave a Reply