Are you new to Blogger and want to fully understand Blogger HTML Editor and Post Settings? You’re in the right place. In this tutorial, I will guide you step-by-step on How to use the elements of Blogger’s HTML Editor, their function, and How to use Post Settings.
Blogger HTML Editor is a very simple, clean, user-friendly and easy-to-use editor for creating blog posts. Once you’re familiar with its interface and features, it will be easier for you to write and create quality blog posts.
RELATED
- How to Set Up Blogger Settings | A to Z
- Introduction to Theme Customize Settings in Blogger
- How To Redirect Blogspot To Custom Domain
01. Title Bar
Title Bar is a place where you add the title of your post. Title shouldn’t be too long and shouldn’t be too short. It should also contain the main keywords of your content.

02. Blogger Editor Views
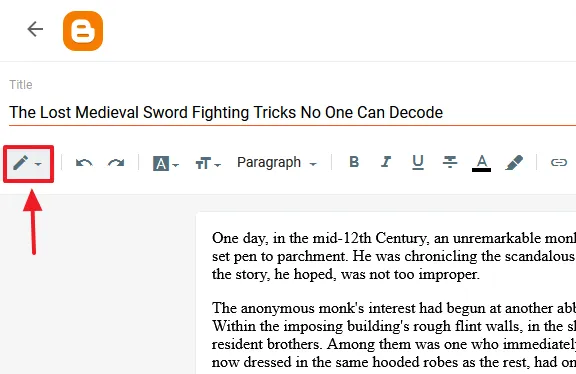
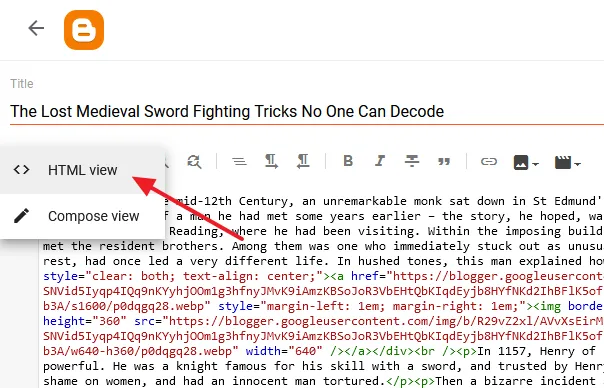
There are two views of HTML Editor i.e. Compose & HTML. Compose is a normal or front view of Post Editor where you write & compose your post. HTML view contains the HTML code of a post. You switch to HTML view when you have to add/remove code or HTML tags.
- Click the Pencil (Edit) icon at your top-left to expand the editor’s view options.
- Click the HTML view to switch from Compose view to HTML view. On HTML view you can see the HTML tags and CSS styling.
- To go back to normal view click the Compose view.
Read this post to learn basic HTML tags & CSS that are commonly used:
03. Undo/Redo
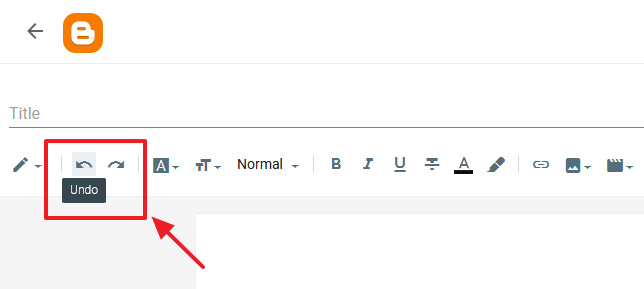
The Undo is used to cancel/remove/delete or reverse an action or text, and Redo is used do something again.
- On Blogger Editor, Left Arrow is for Undo, means to go one step back, and the Right Arrow is for Redo, means to go one step forward.
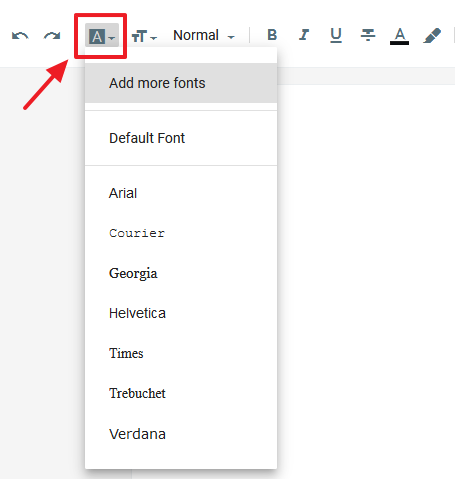
04. Font Type
Font Type lists you different type of fonts like Arial, Courier, Georgia, Times, Verdana, etc.
- Click the A icon to expand the Font Types.
05. Font-Size
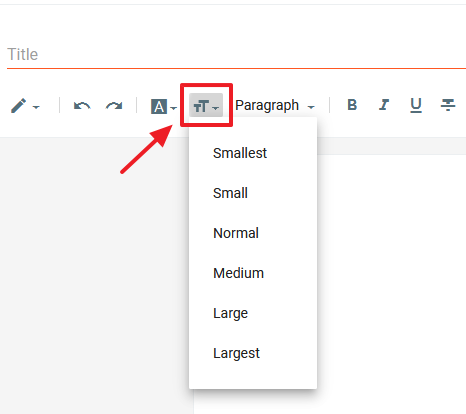
The Font-Size allows you to set different sizes for your text.
- Click the TT icon to expand the different font-sizes. Don’t use the Font-Size when you use Headings like h1, h2, h3, etc. Headings have their own standard sizes.
- If you want to apply font-size to a specific word or line, select that text before you apply the font-size.
06. Font Format
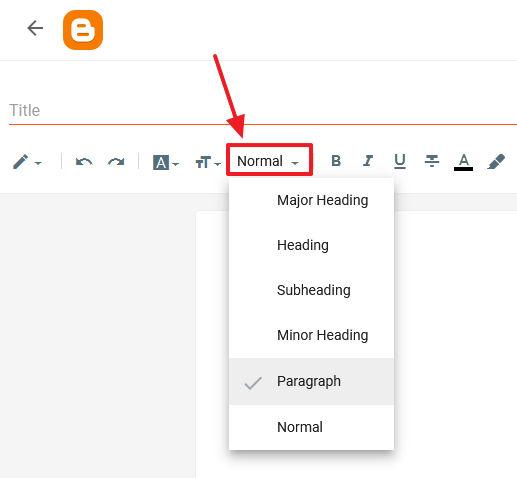
Font Formats are used to format the text of your blog posts and pages.
- Use Paragraph when you write content. The Editor puts the text inside the <p></p> tags. When you choose Normal the Editor puts the content/text/media inside the <div></div> tags.
- There are 4 formats of headings i.e. Major Heading (h1), Heading (h2), Subheading (h3), Minor Heading (h4).
07. Text Formatting
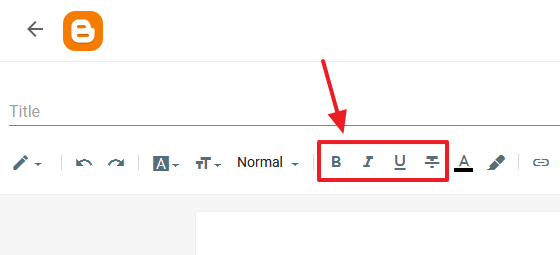
The HTML elements i.e. Bold, Italic, Underlines, and Strikethrough are used to format the text.
- B: To bold the text.
- I: To apply italic.
- U: To underline the text.
T: To apply Strikethrough. It means such words are mistakes and are not included. It adds a horizontal line on top of the selected word.
08. Pick A Text Color
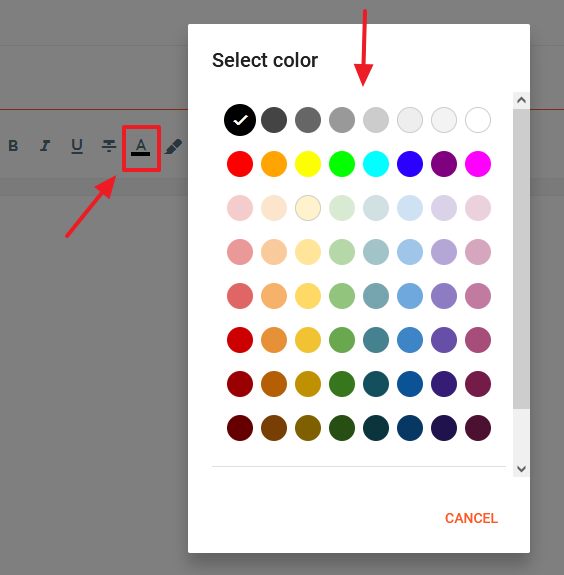
Click the “A” icon on the Editor Toolbar to pick a text color. The default color for text is black. If you want to change the color of specific line or word, select the text before you pick color.
09. Pick A Background Color
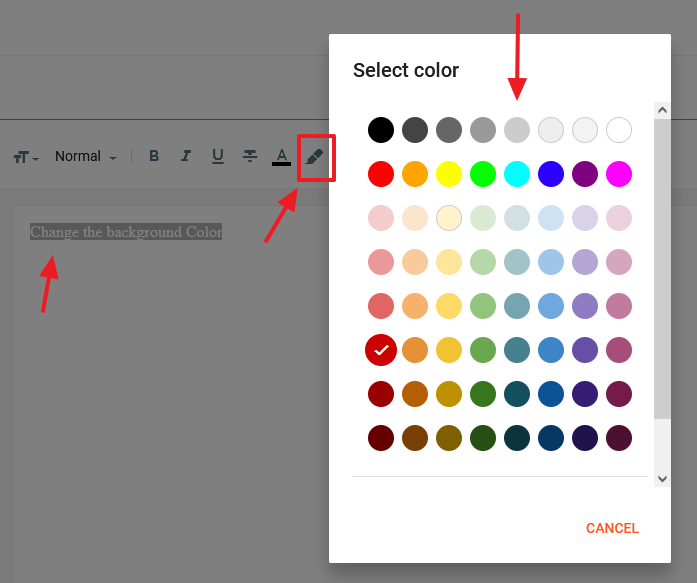
Pick a background color for your text by clicking the Text background color icon. Select the text before you pick color.
10. Insert A Link
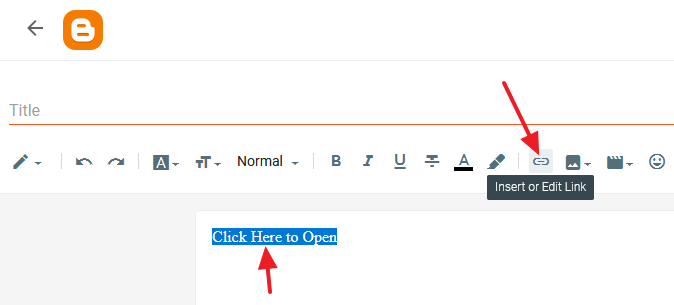
The Link icon/element allows you to link your text or image to a URL, and edit an existing link.
- To make a link, first select the text and then click Insert or Edit Link icon.
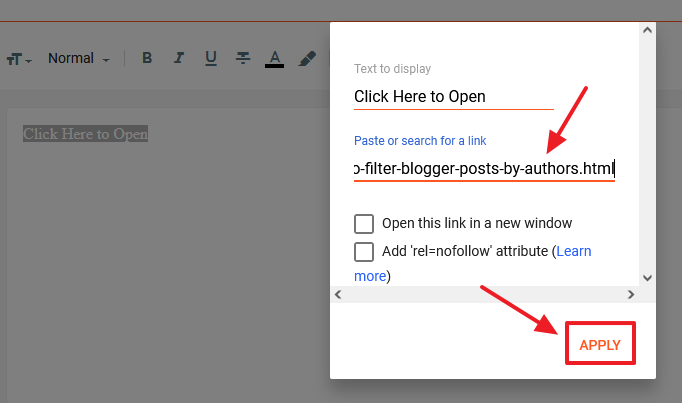
- Paste your link in the “Paste or search for a link“.
- Tick “Open this link in a new window” if you want your link to be opened on a new tab of the browser.
- The Add ‘rel=nofollow’ attribute tells search engines to not follow (crawl) the link. This option is used for sponsored links, affiliate links, and other outbound links. Read this post to know more about When to use the “nofollow”: Should We Use Nofollow & Sponsored With Affiliate Links?
- Click APPLY.
11. Insert Image
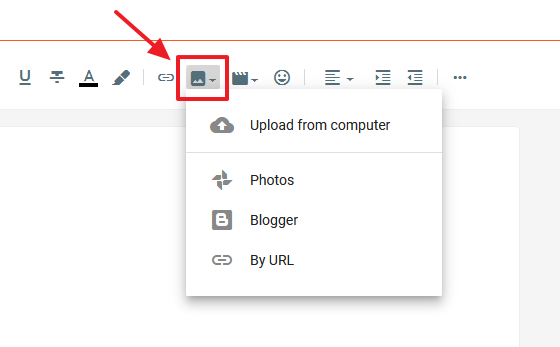
The Insert Image options allow you to insert images to your posts.
- To upload an image from your computer click “Upload from computer“.
- To insert an image from your Google Photos click “Photos“.
- To insert an image from your existing images click “Blogger“.
- To insert an image from a URL click “By URL“.
12. Insert Video
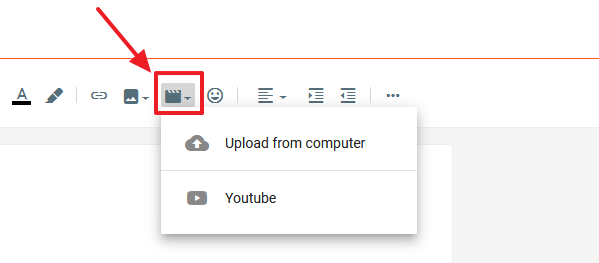
The Insert Video options allows you to insert videos in to your posts.
- Click “Insert video” icon to insert a video.
- To upload a video from your computer click “Upload from computer“.
- To insert a video from YouTube click “YouTube“, and follow the next step.
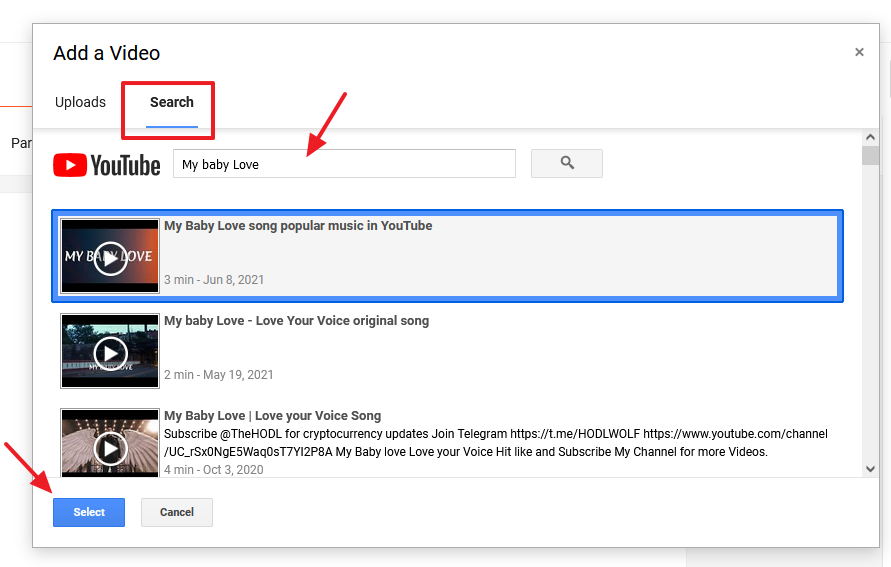
- Click the “Search” tab.
- If you have the URL of YouTube video just Paste it in the Search Bar and click Search button. Select the video and insert.
- If you don’t have the URL of YouTube video type your search keywords in the Search Bar. Click the Search button and select your desired video from the suggestions.
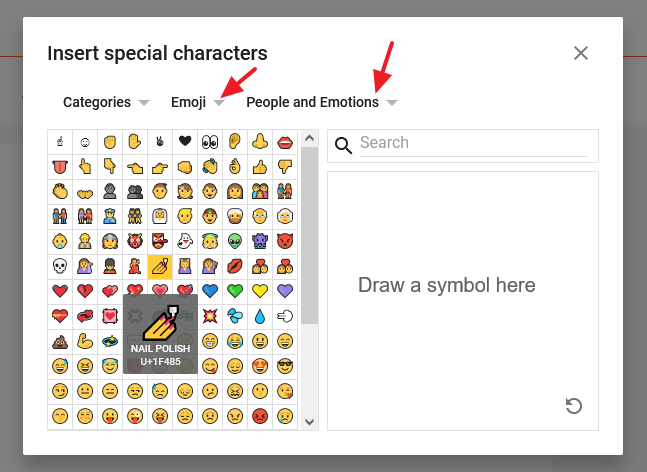
13. Insert Special Characters
Click the “Insert Special Character” icon to insert emojis, special characters, symbols, punctuation, etc.
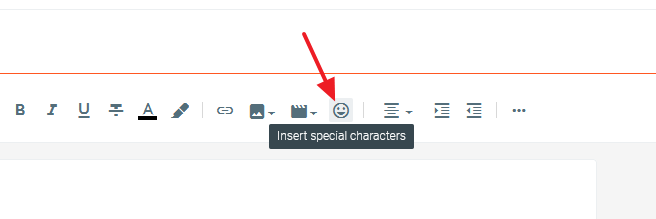
- The default special characters are emojis.
- Click the dropdown list to choose other categories. You will have plenty of options like Symbol, Punctuation, Number, Format & Whitespace, and many more.
15. Text Align
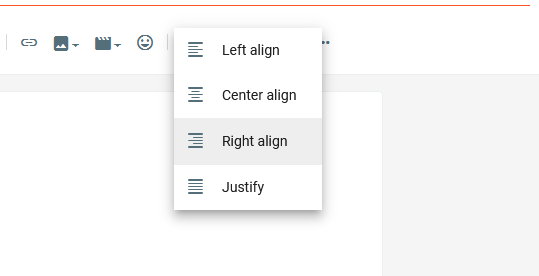
The Text Align options are used to align the text, image or video.
- Click the “Text Align” icon to expand options.

- It will show you four options i.e. Left align, Center align, Right align, & Justify.
- Select the text, image or video which you want to align and click on one of the option.
16. Increase/Decrease Indent
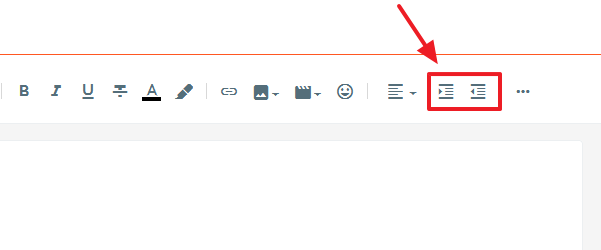
The Indent options on the HTML Editor are used to position a line of text or block of text further from the starting position of page.
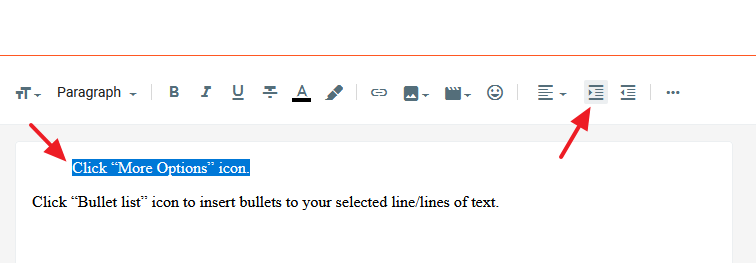
- Select the text and click “Increase Indent” icon or “Decrease Indent” Icon.
- Here you can see that I have given the “Increased Indent” to first line. It has been moved further from the second line.
17. Insert Bullets
The Insert Bullets is used to apply bulleted-list style to your selected text lines.
- Click “More Options” icon.
- Click “Bullet list” icon to insert bullets to your selected line/lines of text.

18. Insert Numbered List
The Insert Numbered List is used to apply numbered-list style to text lines.
- Click the “More Options” icon.
- Click “Numbered list” icon to insert the numbered-list style.

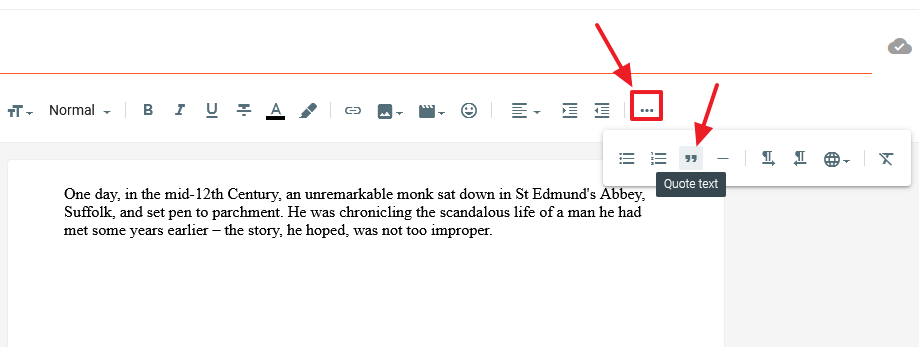
19. Quote Text
The “Quote text” is used to specify that a text is quoted from another source. In HTML, the text comes in between these tags <blockquote> </blockquote>. It increases the indent.
- Click the “More Options” icon.
- Select the text and click the “Quote text” icon.
20. Insert Read More
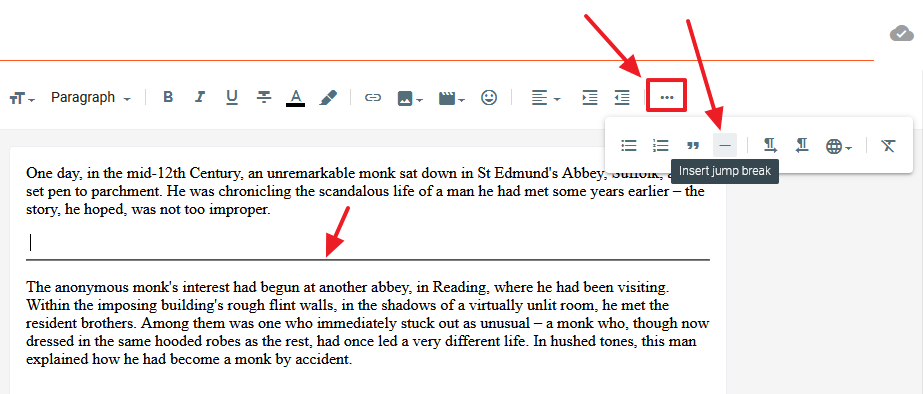
The “Insert jump Break” is used to create the “Read More” link. When you insert “Jump Break” it inserts a horizontal line in your editor. The content above the horizontal line will be visible and below will be hidden on your homepage. The horizontal line does not appear on your blog, it is converted to “Read More” link.
- In order to insert the “Jump Break” first move the cursor to the position where you want to add “Read More” link.
- Click the “More options” icon (three horizontal dots).
- Click the Read More (-) icon.
Read More About: How To Add Read More Link in Posts On Blogger.
21. Move The Text Right Or Left
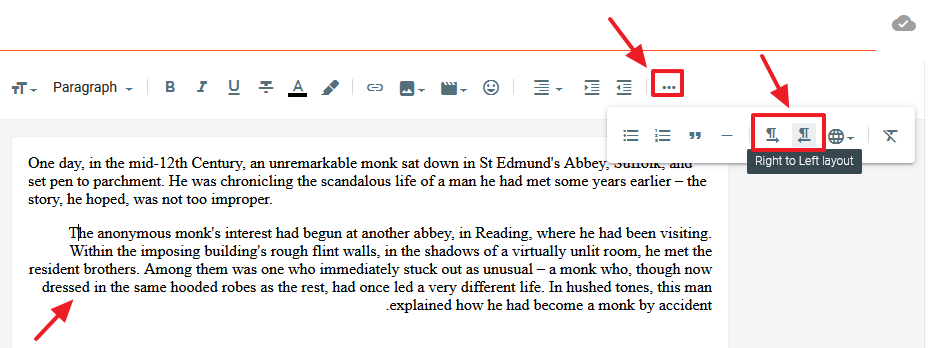
When you click “Left to Right Layout” option the text moves to left, and when you click “Right to Left Layout” the text moves to right.
- Select the text that you want to move left or right.
- Click the “More Options” icon.
- Below you can see that I have clicked the “Right to Left Layout“, the text is moved to the right side.
22. Input Tools
The Input Tools is an advanced feature that lets you type in the language of your choice. Transliteration refers to the method of mapping from one system of writing to another based on phonetic similarity.
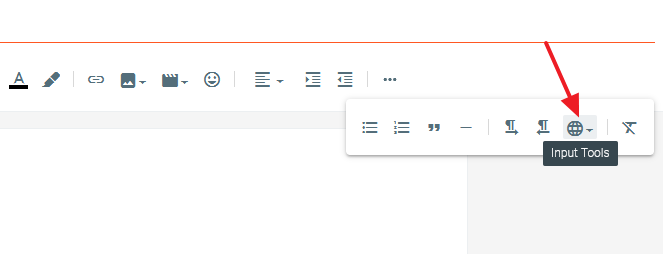
- Click the “More Options” icon.
- To expand the languages click the Input Tools (Globe) icon.
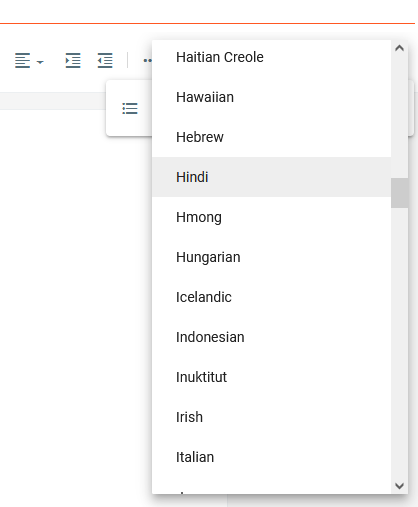
- Choose your desired language.
- Here I have chosen Hindi langauge.
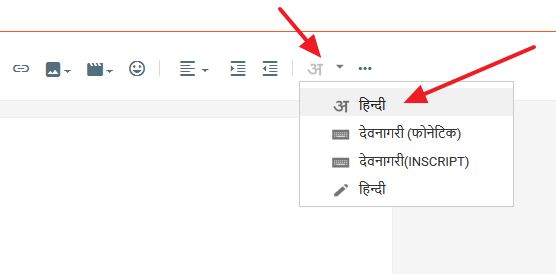
- You can see that the selected language appeared beside the “More Options” icon.
- The First Option is for mapping from one system of writing to another based on phonetic similarity. You will type the words of your langauge with English characters and it will map to your chosen language words.
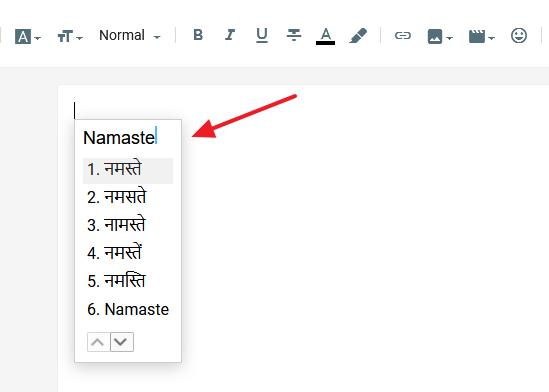
- In Hindi “Namaste” meaning is “Greetings”. I have typed the word Namaste with English alphabets. It has mapped it into Hindi and showing 5 options. Here the first suggestion is the correct option.
- Click the correct suggestion.
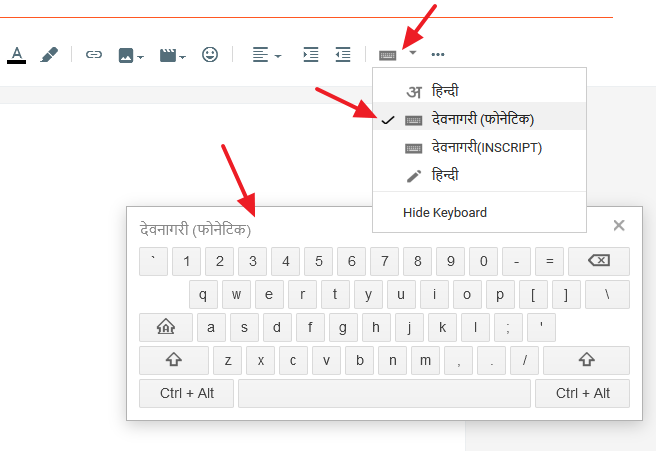
- The “Keyboard” option on “Input Tools” allows you to pick the keyboard of your chosen language so that you can type in that language.
- For most of the languages it offers you one keyboard, but for Hindi language it offers two keyboards i.e. one with English alphabets and the other with Hindi alphabets.
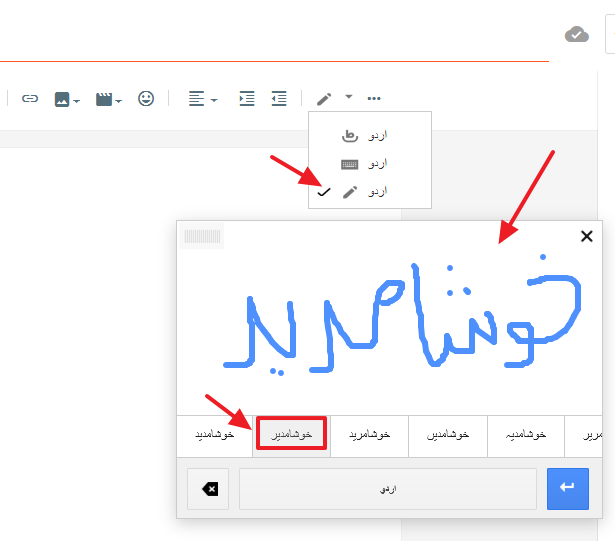
- The “Handwriting Option” allows you to write the words in your langauge by a Pencil. It shows you the close suggestions in that particular langauge.
- I have changed the language from Hindi to Urdu and write the Urdu word “Khushamdeed” means “Welcome”. It is showing different suggestions in Urdu language.
- To insert a suggested word click on it.
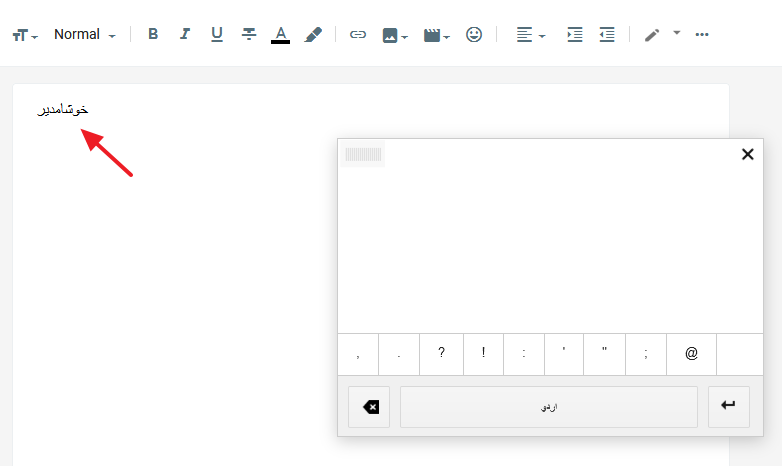
- You can see that the Urdu word “Khushamdeed” has been inserted in the Urdu language.
23. Clear Formatting
The “Clear Formatting” removes the styling or formatting of the selected text.
- Select the text of which you want to remove the style or formatting.
- To clear formatting click “More Options” icon.
- Click the “Clear formatting” icon.

- You can see that the text formatting has been removed.

Post Settings
Post Settings are located at the right side of the Blogger HTML Editor.
01. Labels
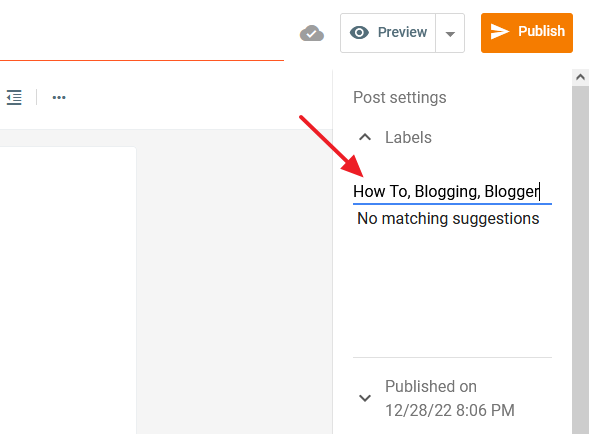
Labels are similar to categories. Post is linked to the Labels that you add in the Labels Bar. Always use Labels relevant to your post. You can add more than one Label for a post. Use comma (,) to separate one Label from the other. Use Backspace to remove a Label.
Read: What are Labels in Blogger & Their Purpose.
02. Publish Settings
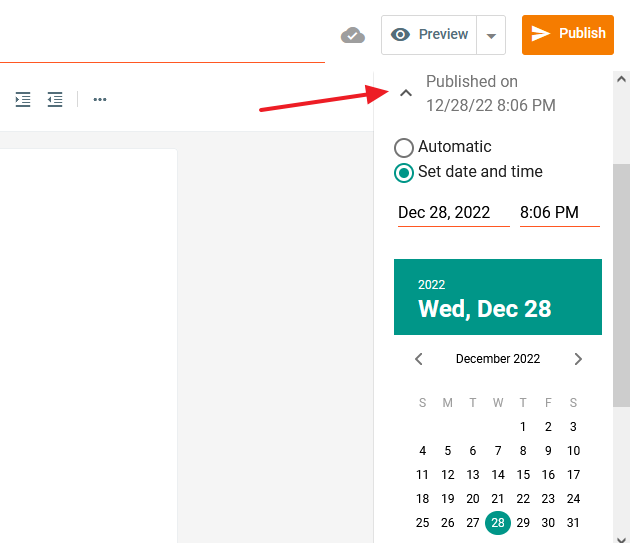
When you click the “Publish” button your post is published automatically. If you want to schedule your post to be published at some other date and time you can use “Set date and time“.
03. Permalink
The Permalink stands for permanent link of a post. It is a URL that cannot be changed once the post is published.
There are two options for Permalinks i.e. Automatic Permalink & Custom Permalink.
- Automatic Permalink means Blogger automatically generates link from the title of the post.
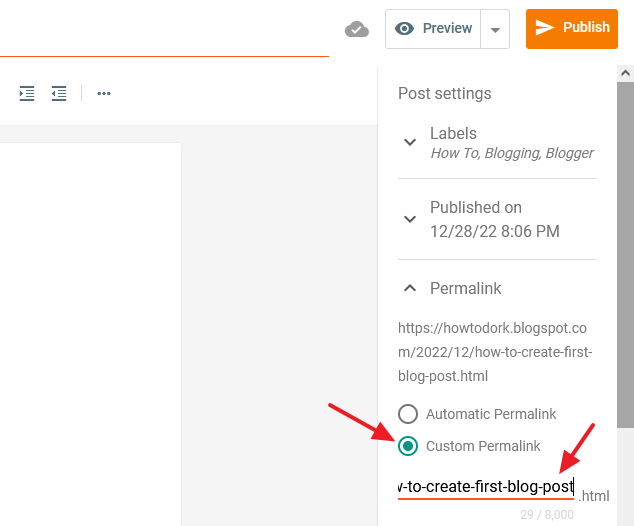
- Custom Permalink means you can add your own link or you can edit/customize the automatic permalink.
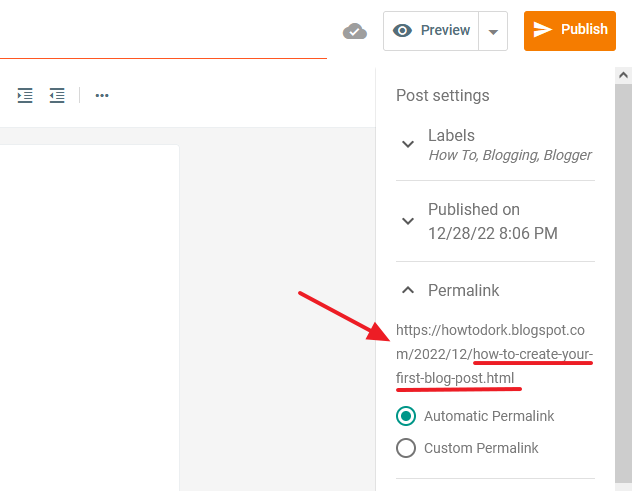
- Sometimes “Automatic Permalink” generates accurate URL, but sometimes not. So using the “Custom Permalink” you can write accurate URL of your post.
- Insert hyphen(-) after each word in the Custom URL. Don’t write characters like “a”, “the”, “an”, etc, in your Custom URL.
- You can preview your Custom URL under the Permalink.
04. Search Description
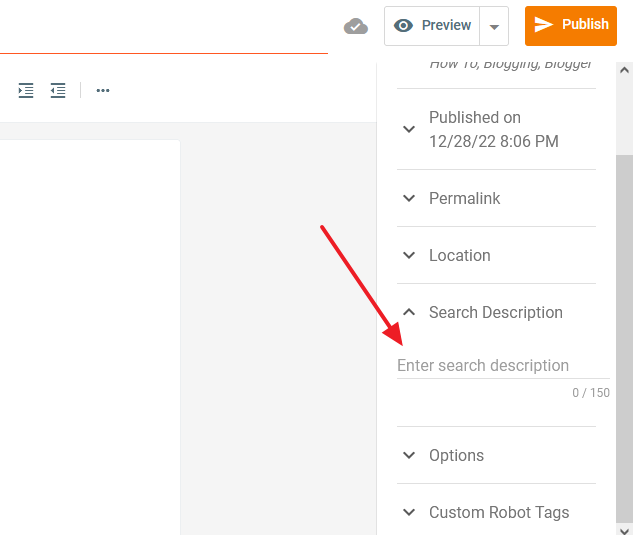
The “Search Description” also known as Meta Description of a post which is shown below the title in the search results if they can’t find the post content more relevant to a visitor’s search terms. You’re allowed to add only 150 characters.
05. Options
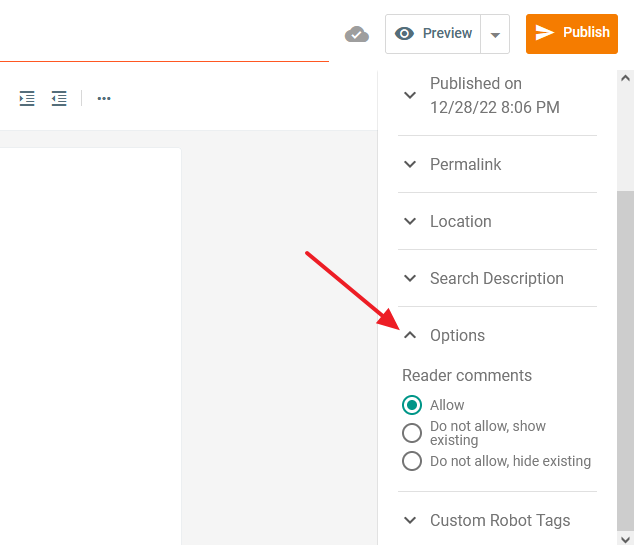
The “Options” settings are about reader comments on a post. You can choose whether you want to allow people to comment on your post or not. The default permission is “Allow”.
There are three options:
- Allow
- Do not allow, show existing
- Do not allow, hide existing
06. Custom Robot Tags
The last Post settings are “Custom Robot Tags“. The “default” option will have been selected already, you don’t need to do anything here. Go to Blogger settings and set up the “Custom Robots Tags”.
In order to know what are “Custom Robots Tags” & how to configure them on Blogger, read this tutorial:
Final Thoughts
So it was all about Blogger HTML Editor and Post Settings. I hope that this guide would have helped you to fully understand the Post Editor features and tools. If you like this post then don’t forget to share with other people. Share your feedback in the comments section below.
Recommended Post
- How To Display Google Ads On Blogger – Step By Step | Monetize A Blogger Blog | Earn Money Online
- How To Configure Google Search Console On Blogger | Add Sitemap | Inspect URL
- How To Add & Test Custom Robots Txt On Blogger/Blogspot | Blogger SEO
- Beginner’s Guide To Migrate Blogger Blog To WordPress
- How To Add A Contact Form & Create A Separate Contact Us Page On Blogger
- How to Install Custom Theme in Blogger



Leave a Reply