
Have you bought or downloaded a Blogger custom theme and don’t know how to install it in Blogger? You’re in the right place.
In this tutorial, I will guide you step-by-step on how to install a custom theme/template in Blogger using two different methods.
When you create a blog in Blogger it provides you a handful of free themes which are called Blogger builtin themes. Any theme that you buy or download from some other website or source are called custom themes or external themes.
Why you need to install a custom theme in Blogger when there are free builtin themes? Builtin Blogger themes come with limited features and designs which do not fulfill the requirements of a professional blog or a website.
Do you have a custom theme? If you don’t have a custom theme, you can find modern-day premium Blogger templates on Themeforest.
There are 2 methods to install a custom theme in Blogger.
- Install a Blogger Custom Theme Using Restore Method
- Install a Blogger Custom Theme Manually (Edit HTML)
RELATED
- How to Set Up Blogger Settings | A to Z
- How to Pick a Right Blogger Template?
- Introduction to Theme Customize Settings in Blogger
- How to Buy a Theme on Themeforest & Download
01. Install Custom Theme Using Restore Method
In this section you will learn step-by-step on how to install a custom theme in Blogger using Restore Method, which is very easy and quick.
Note: Most of the Blogger Custom themes are downloaded in the ZIP file. Extract your ZIP File before you begin the installation process.
- Open your Blogger Dashboard and go to Theme.
- Click the Downward Arrow located beside the CUSTOMIZE button.

- Click the Restore option.

- Click the UPLOAD option.

- Go to the folder of your custom theme files.
- Select the .XML file of your custom theme. All the Blogger themes are stored in an XML file. Here you can see that the theme file is Mono Version 3.0.xml.
- Click the Open button.

- If your custom theme is installed successfully you will see a message, Restored theme.
- Open your Blogger homepage and see how your custom theme looks like.
Note: If this method doesn’t work, means you get an error or some other problem, then go for the Method 2 (Install Custom Theme Manually).

- You can see that the custom theme Mono is working perfectly, everything is installed successfully.

02. Install Custom Theme Manually
In this section, I will guide you step-by-step on how to install a custom theme in Blogger manually using Custom HTML method. Use this method when you get error with Method 1.
- Open your Blogger Dashboard and go to Theme.
- Click the Downward Arrow located beside the CUSTOMIZE button.

- Click the Edit HTML option.

- Press CTRL + A keys to completely select the HTML code of your existing Blogger template.
- Press Delete key to completely remove the HTML code.

- You can see that the HTML Code of your existing template/theme has been removed completely. Now Copy the HTML Code of your custom-theme’s XML file and Paste here, as shown in the below steps.

- Right-click on the XML file of your custom theme. Here you can see the XML file of Deva theme.
- Go to Open with and click the Notepad option. The HTML Code of custom theme will be opened in the Notepad.

- Press Ctrl + A to completely select the HTML code of your custom theme.
- Right-click somewhere on the selected code and click Copy.
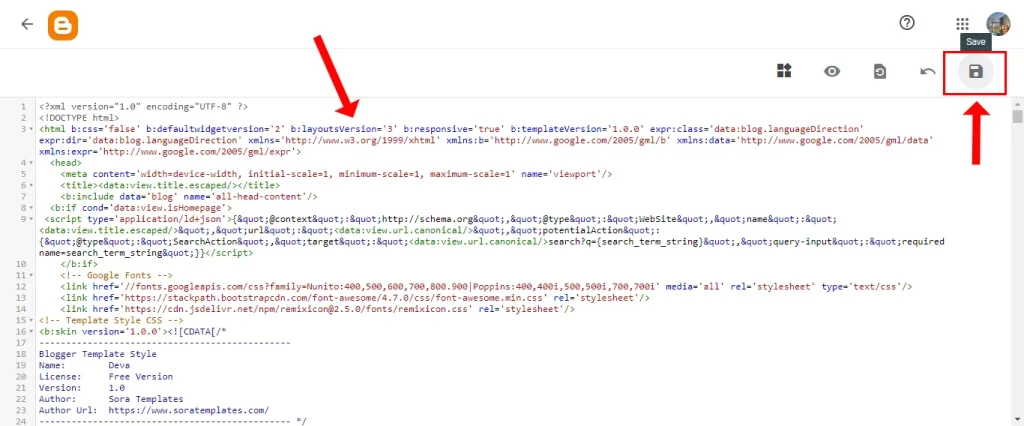
- Now go to Blogger’s Edit HTML page again and Paste this code, as shown in the next step.

- Paste the copied code in the Edit HTML and click the Save icon, located at your top-right corner.
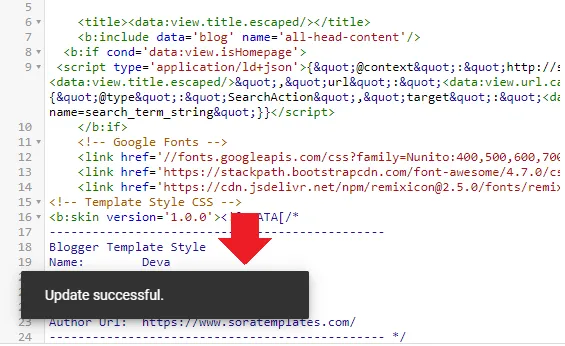
- If the custom theme is installed successfully without error you will get a message, “Update successful“.
- Now open the homepage and check whether your new custom theme is working or not.
- Here you can see that the Deva theme is successfully installed and working properly.

So it was all about installing a custom theme in Blogger using two different methods. I hope that this guide helps you. If you like this post then don’t forget to share with other people. Share your feedback in the comments section below.
Also Read


Leave a Reply