Do you want to add a contact form on a separate page in your WordPress website? You’re in the right place. In this tutorial, I will guide you step-by-step on how to add a contact form on a separate page, call it Contact Us page, in your WordPress website.
A contact form allows website visitors to quickly send message to your email directly from your website.
Though there are many contact form WordPress plugins, but the most widely used is Contact Form 7. With Contact Form 7 you can create and manage multiple contact forms. It is free & fully customizable, you can customize and configure it with great ease. The form supports advanced technologies such as Ajax-powered submitting, reCAPTCHA, etc.
By using the Shortcode of Contact Form 7 you can display Contact Form 7 in a separate page of your WordPress website, as I have shown in the tutorial.
In this post we will cover following topics:
- How To Install Contact Form 7 In WordPress
- How To Access & Configure Contact Form 7
- How To Display Contact Form 7 on A Separate Page
- How To Configure WP Mail SMTP
- How To Integrate reCAPTCHA In Contact Form 7
RELATED
01. Install Contact Form 7 In WordPress
In this section, I will guide you on how to install Contact Form 7 plugin in WordPress.
- Login to your WordPress admin section.
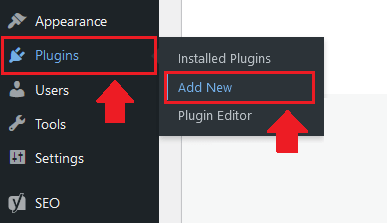
- Go to Plugins from your sidebar.
- Click on the Add New.
- In the plugins Search Bar type contact form 7.

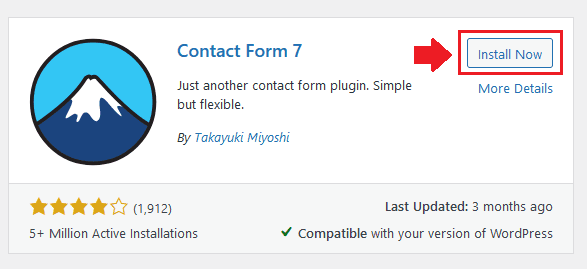
- You can find Contact Form 7 in the search results. Click on the Install Now button.
- Once the plugin is installed you can see the Activate button in the same position. Click on the Activate button to activate the Contact Form 7 in your WordPress website.
02. How To Access & Configure Contact Form 7
In this section, I will guide you on how to access and configure Contact Form 7.
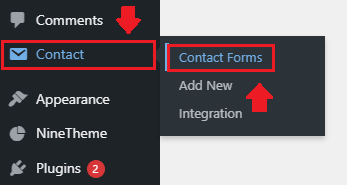
- Once the Contact Form 7 is installed and activated it will appear in your sidebar.
- Go to Contact.
- Click on the Contact Forms.
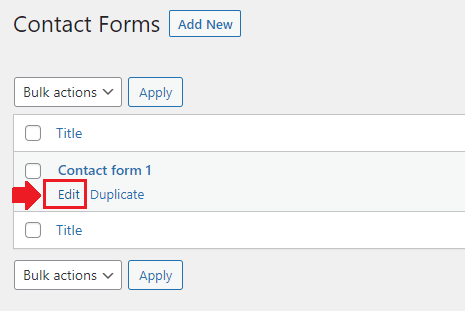
- There will be a contact form with default settings and fields. To edit or view the default fields and settings of your contact form click on the Edit link.
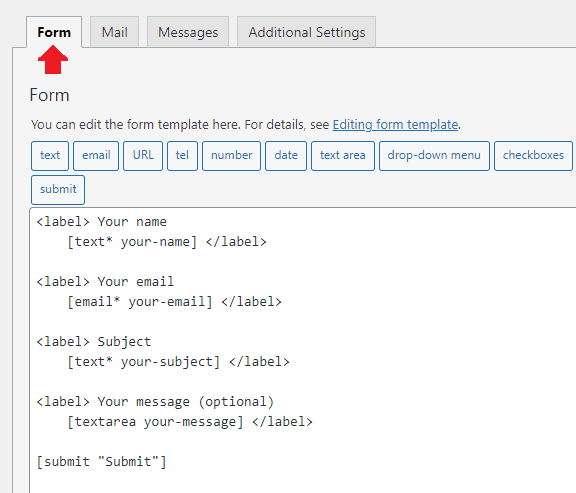
The “Form” tab contains the labels and fields that visitors can see on your website. In other words it is your main contact form that will appear on your website.
- Your name is visitors name.
- Your email is visitors email.
- Subject is the title or subject of email that visitor will write.
- Your Message is the message that visitor will write in the text area.
- Submit is the submit button of Contact Form 7.
There are plenty of other fields that you can use such as URL, tel, number, date, dropdown menu, checkboxes, file, etc, if needed.
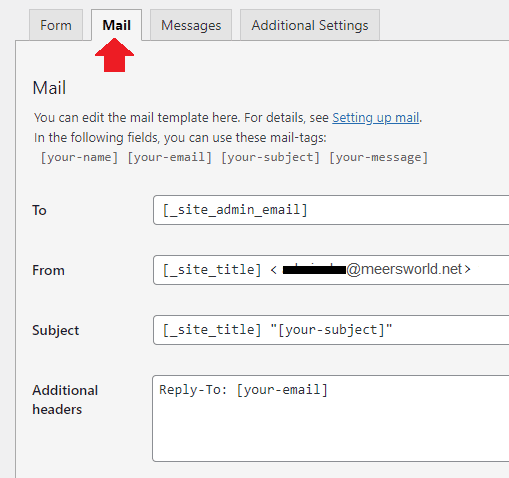
The Mail tab contains the mail template and settings.
- To: [_site_admin_email] is your email address to which emails submitted from the Contact Form 7 will be sent. Mostly it is admin@your_domain. If you want to change this email address remove [_site_admin_email] and enter the new email simply like this: contact@example.com.
- From: [_site_title] is your website name. Beside [_site_title] there will be your email ID that will be displayed next to your Site Title like this: Meer’s World <info@meersworld.net>.
- Subject: [_site_title] is your website name. “your-subject” is the subject of the email that you will receive from Contact Form 7. When you reply to an email the [_site_title] and “[your-subject]” are loaded in the “Subject” text field.
- Additional headers: It allows you to add additional message header fields such as Cc or Bcc headers to your email. To know more, read this: Adding Cc and other mail headers.
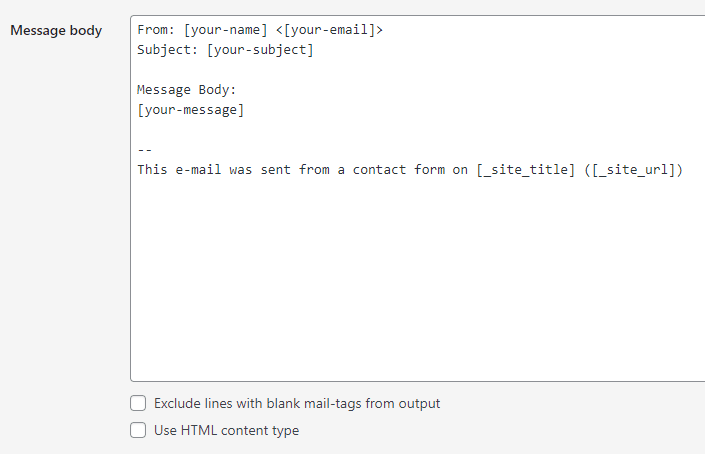
Message body: It contains the main message of email, subject and relevant information of a visitor who sent email from your Contact Form 7.
- [your-name] is the visitor name who will send email and [your-email] is the email ID of the same person who will send email from Contact Form 7.
- [your-subject] is the subject of the email that visitor will type in the Subject field of Contact Form 7.
- [your-message] is the main message that visitor will type in Your Message field of Contact Form 7.
- [_site_title] is the name of your website and [_site_url] is the URL of your website.
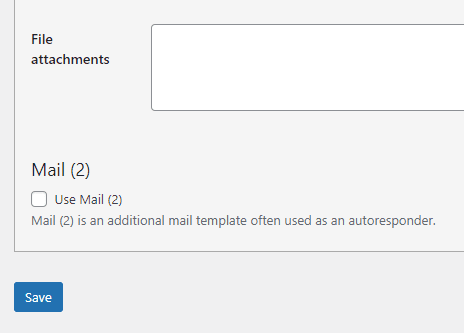
File attachments: File attachments feature allows visitors to upload files via Contact Form 7 and then an email with attachments of the files is sent to you. Normally people don’t use this feature in Contact Form and that’s why it remains empty. You can see that there is no mail tag or form tag in it.
It involves two steps (1) Add file uploading fields in your Contact Form 7 (2) Set up your mail settings to attach the uploaded files. To know more, read this: File uploading and attachment.
Mail (2): It is an additional mail template, often used as an autoresponder. Mail (2) is sent only when the primary Mail has been sent successfully. If you want to use this feature tick “Use Mail (2)”.
03. Display Contact Form 7 on a Separate Page
You have successfully created and configured a Contact Form 7, now in this section, I will guide you on how to display/add the Contact Form 7 on a separate page in WordPress.
- Go to Contact from your WordPress sidebar.
- Click on the Contact Form, as I have shown in the Section 2.
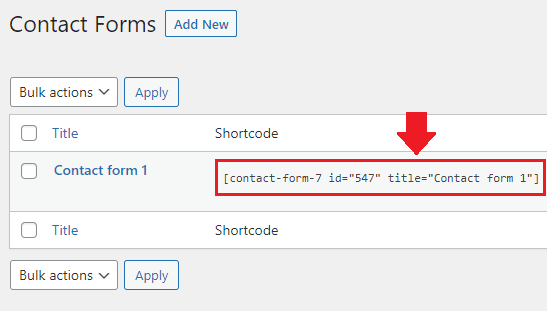
- Copy the Shortcode of your Contact Form 7.
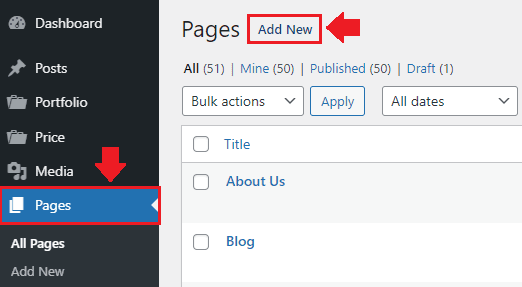
- Now go to Pages and create a new page with the Title Contact Us. If you have already created a page you don’t need to create a new one.
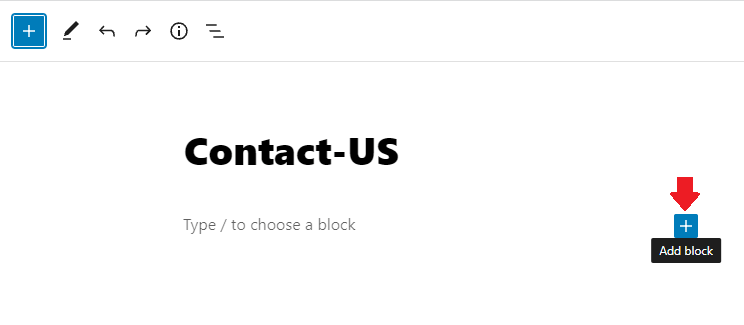
- On your Contact Us page, click on the “+” icon to add a WordPress block.
- Click on the Shortcode [/].
![Click on the Shortcode [/]. Click on the Shortcode [/].](https://www.meersworld.net/wp-content/uploads/2021/10/How-To-Add-Contact-Form-In-Contact-Us-Page-In-WordPress-13-min.png)
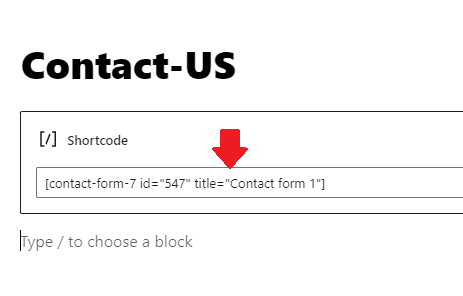
- Now Paste the Shortcode inside the box.
- You can write other content in this page. It won’t affect your Shortcode.
- Once you Paste the code, Save your page.
- This is how the Contact Form 7 looks like on the Contact Us page. You can increase/decrease the size, color, width, height, and font of labels and fields. Do remember that styling of form varies from theme to theme, it might look different in your website.
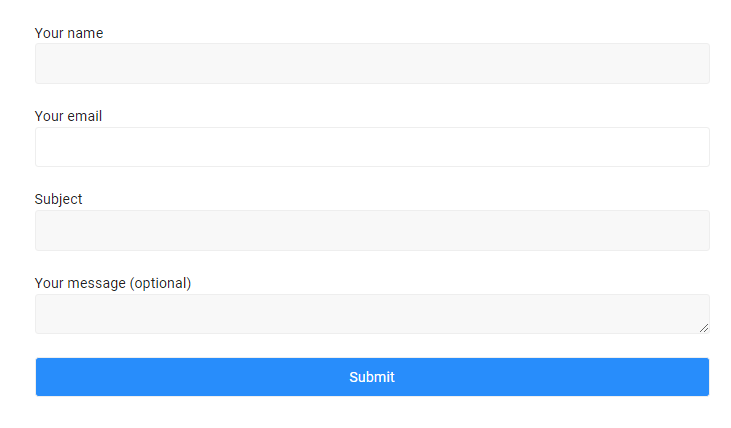
Now submit an email from your Contact Us page. If your contact form fails to send email or shows you the error, “There was an error trying to send your message. Please try again later” then go to the below section “Configure WP Mail SMTP”.
If your contact form sends email successfully skip “Configure WP Mail SMTP” section.
04. How to Configure WP Mail SMTP
In this section, I will guide you on how to configure WP Mail SMTP in your WordPress site so that you will be able to receive emails via your Contact Form 7.
By default WordPress uses PHP mail function to send emails generated by contact forms. Now the issue is that most of the WordPress hosting companies don’t have their servers properly configured for sending PHP emails.
If the proper authentication isn’t there then emails either go in the SPAM folder or don’t get delivered at all. Because of spam email issues WordPress allows to use third-party plugins like WP Mailer SMTP and mailers like SMTP.com, Sendinblue (Brevo), etc, to send emails.
I have created a separate tutorial that guides you step-by-step on how to install WordPress WP Mail SMTP plugin and How to set up the WP Mail SMTP for Sendinblue Mailer.
05. Integrate reCAPTCHA In Contact Form 7
The spam emails have always been an issue in WordPress particularly when a contact form is installed and active on your WordPress website. To deal with spam emails and unwanted form submissions Contact Form 7 is integrated with the reCAPTCHA.
reCAPTCHA is a free service from Google that helps protect websites from spam and other unwanted activities.
I have created a separate tutorial that guides you step-by-step on how to integrate reCAPTCHA v3 in Contact Form 7.
So it was all about adding a Contact Form 7 on a separate page of your WordPress website. If you like this post then don’t forget to share with other people. Share your feedback in the comments section below.

Also Read



Leave a Reply