Are you getting the error, “The uploaded file exceeds the upload_maximum_filesize directive in php.ini” while uploading a WordPress theme, image, video, text file, etc? Don’t worry, you are in the right place.
In this tutorial, I will guide you step-by-step on how to fix this error by changing the “upload_max_filesize”.
The error “The uploaded file exceeds the upload_maximum_filesize directive in php.ini” comes because the size of the file or theme that you want to upload is larger than the maximum file upload limit set in the “php.ini” file. In general, most of the web hosting service providers set the default “upload_max_filesize” to 2MB. Once you increase the upload size you will get rid of this error.
What is “php.ini” file? The “php.ini” file is the default configuration file for all those running applications that require PHP such as WordPress, Joomla, Magento, Drupal, etc. This file is used to control variables such as upload sizes, memory limit, post size, file timeouts, resource limits, etc.
The “php.ini” file is located in your website’s root directory which is called “Public_Html”. If your website is hosted on shared hosting you may not see “php.ini” file because in the shared web hosting its access is restricted, but don’t worry you can change the “upload_max_filesize” from your cPanel PHP Manager, which is much easier and safe. You won’t be required to find and edit the “php.ini” file.
Following topics will be covered in this post:
- How To Change “upload_maximum_filesize” From PHP Manager
- How To Change “upload_maximum_filesize” From “php.ini” File
- How To Change “upload_maximum_filesize” From “.htaccess” File
01. How To Change From PHP Manager
This is the recommended, safest and easiest way to change the “upload_maximum_filesize” without editing the “php.ini” file or “.htaccess” file. If this works for you then don’t go to other two methods.
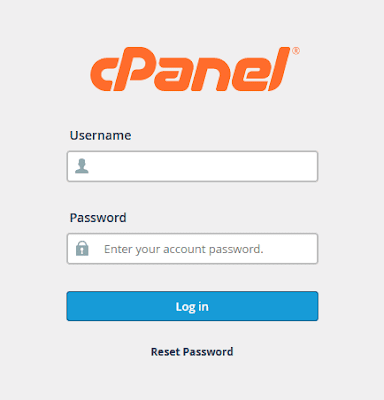
- Login to your cPanel via the URL provided to you by your web hosting provider.
- Enter your Username & Password.
- Click on the Log in button to access your cPanel Dashboard.
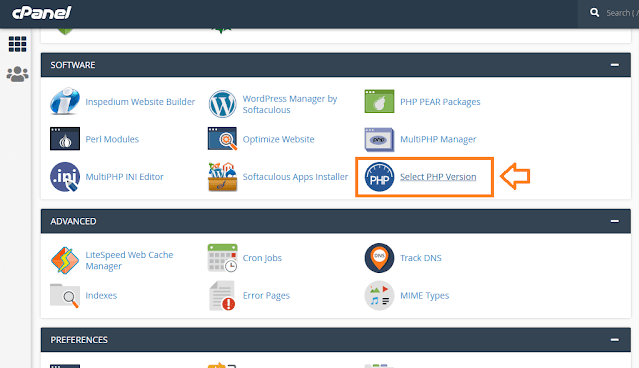
- Click on the Select PHP Version located under the SOFTWARE section. In some web-hosting’s it could be PHP Manager or MULTIPHP INI Editor.
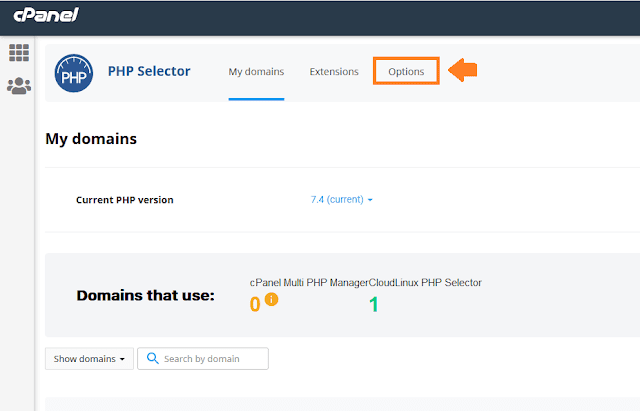
- Click on the Options tab.
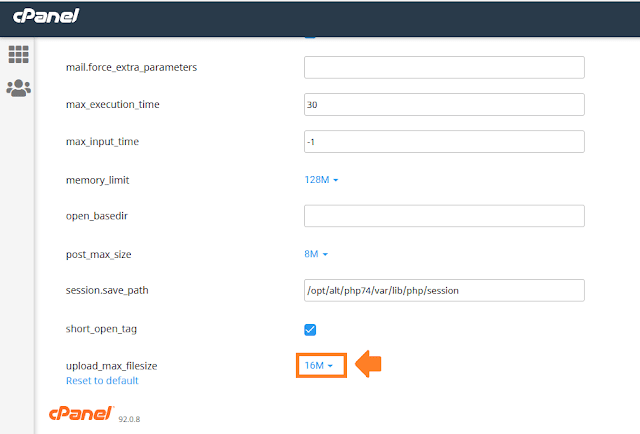
- There are lot of options here like “max-execution_time”, “memory_limit”, “post-max-size”, etc. Scroll down to upload_max_filesize.
- You can see here that the default upload size is 2MB. It means that if your theme or file is larger than 2MB it will not allow to upload.
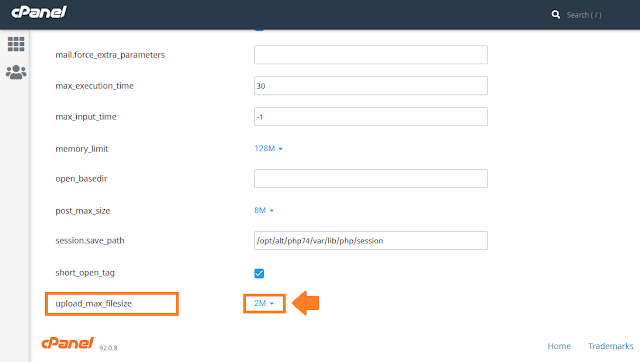
- Click on the b dropdown and choose the maximum upload file size that you want to set. Here I have set the “upload_max_filesize” to 16MB.
- Once you save the settings go back to your website admin section and check whether your files are uploading or not.
02. How To Change From “php.ini” File
As I have mentioned above that if your website is hosted on shared web hosting you won’t see the “php.ini” file, but in case your web hosting provider gives access to the “php.ini” file you can change the maximum upload filesize. Before you edit take the backup of “php.ini” file.
- The “php.ini” is located in the “Public_Html” directory.
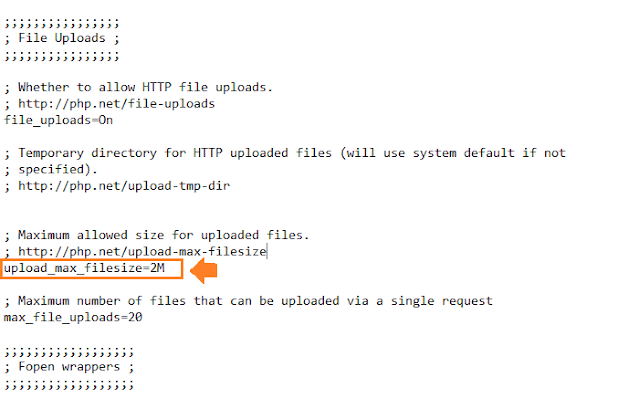
- Open “php.ini” file and search for “upload_max_filesize” variable.
- Change the size and save your “php.ini” file.
- Here “M” shows MB. If you want to change the size only change the digit not “M” like 16M.
In case if your web hosting does not give access to “php.ini” file you can create a “php.ini” file in your computer and upload at your “Public_Html” directory via FTP application such as FileZilla Or upload directly from you Control Panel account.
- Create a Notepad file on your desktop.
- Paste these three lines. You can set the size of your own choice.
upload_max_filesize = 16M
post_max_size = 13M
memory_limit = 128M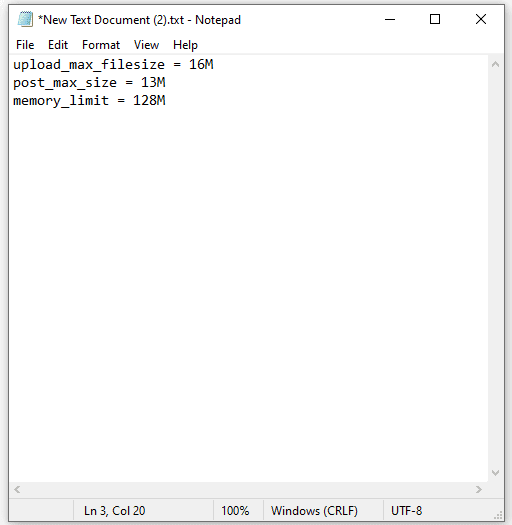
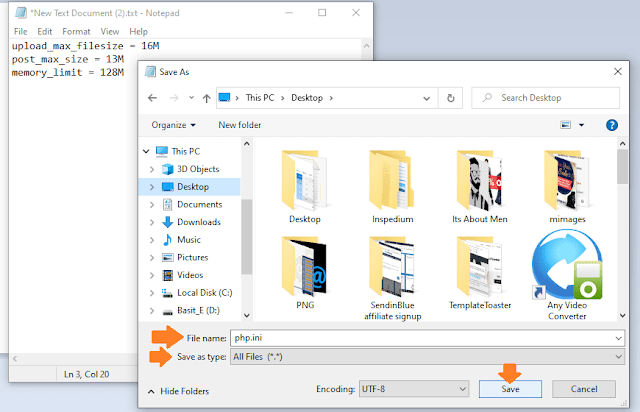
- Now save this file as .ini”.
- In the “File name:” type “php.ini”.
- In the “Save as type” choose “All Files (“.”)”.
- Now upload this file to your “Public_Html” directory via any FTP application such as FileZilla. You can directly upload this file on Public_html directory.
03. How To Change From “.htaccess”
If “php.ini” file is restricted on your web hosting you can change the “upload_max_filesize” from “.htaccess” file. The htaccess stands for “hypertext access”. Like “php.ini” it is also very powerful and sensitive configuration file. Before you modify this file take a backup.
- The .htaccess file is located in the “Public_Html” directory. It is a hidden file, so in order to edit make it visible by enabling “Show Hidden Files (dotfiles)” option in “Settings“.
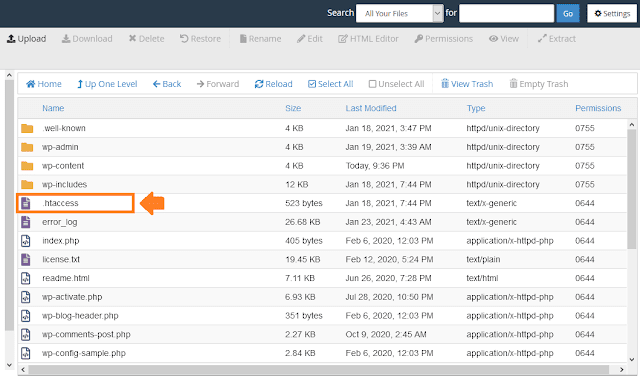
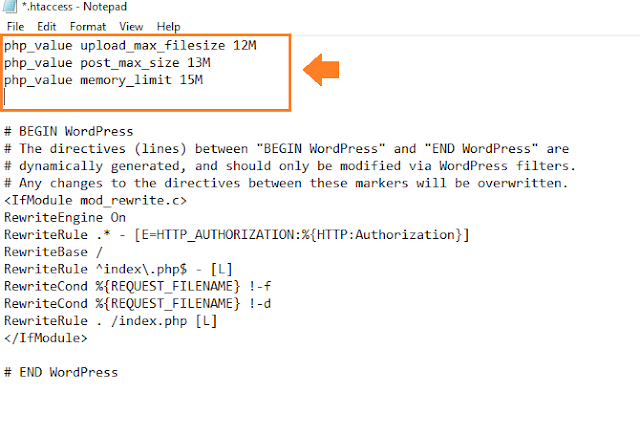
Once you open “.htaccess” file paste these lines at the top. You can the set size of your choice.
php_value upload_max_filesize 16M
php_value post_max_size 13M
php_value memory_limit 128M
After adding these lines save your “.htaccess” file.
So these were the three methods to fix the error, “The uploaded file exceeds the upload_max_filesize directive in php.ini“, hope they will help you. If you like this post then don’t forget to share with other people. Share your feedback in the comments section below.

Also Read
- How To Create Email Account With Domain Name – Business Email | For Beginners
- How To Install WordPress On Web Hosting Via cPanel – Step By Step | WordPress For Beginners
- Fixed: Update Failed Could Not Update Post in the Database
- Rest API did not Behave Correctly | Fix WordPress Block Editor
- How to Fix Your Sitemap Appears to be an HTML Page | GSC


Leave a Reply