Are you using a WordPress Block Theme such as Twenty Twenty Three, and looking for the most appropriate cache plugin to improve the performance of your website? You’re in the right place.
I have picked Breeze, one of the lightest, powerful, and easy-to-use FREE WordPress cache plugin perfect for block themes, developed by Cloudways – an innovative cloud hosting platform.
The Breeze Cache Plugin offers Cache system, Auto Cache Purge, GZIP Compression, Browser Cache, Lazy Load Images and iFrames, HTML Minify, CSS Minify, Combine CSS, Exclude CSS, JS Minify, Combine JS, Delay JS, Preload, Cache Query Strings, Database Optimization, CDN Support, Varnish Cache, and many more..
The only feature missing on Breeze Cache Plugin is the Persistent Object Cache, which is used for making your site’s database more efficient. This shortcoming of Breeze can be overcome by installing a Persistent Object Cache plugin like APCu Manager.
After installing the Breeze Cache Plugin, as I have guided below, go through this tutorial: How To Enable Persistent Object Cache On WordPress and follow the Section 2 (How to Set Up APCu Manager on WordPress).
Following topics will be covered in this post:
- Do WordPress Block Themes Need Cache Plugin?
- How to Install Breeze Cache Plugin
- How to Set Up Breeze Cache Plugin for a Block Theme
- Install Flying Scripts Plugin If Your Blog is Monetized with AdSense Ads
RELATED
- How to Migrate Domain and Hosting to Namecheap
- How to Fix AdSense Ads Break Page Layout on Block Theme
01. Do WordPress Block Themes Need a Cache Plugin?
Do you really need a cache plugin for WordPress block theme? Answer is Yes, particularly if your website is hosted on Shared Hosting. A type of hosting where server resources such as disk space, bandwidth, CPU, memory, are shared among websites.
Though WordPress block themes are very fast, extremely efficient, optimized, but you still need a cache plugin for three reasons, also recommends by WordPress Site Health i.e. (1) Page Caching (2) Browser Caching (3) Object Caching.
The Caching makes your WordPress website faster, improves user page experience, reduces server load time, and improves TTFB (Time to First Byte), thus helps your site to pass the Core Web Vitals assessment, which is one of Google’s ranking factors.
How Caching on WordPress Works & Improves Website Performance?
Caching is a process in which your visited pages are temporarily stored on a server-cache as a Static Copy. When the same pages are visited/requested again the server quickly sends the static copy of the page. If you don’t use cache plugin the user browser will send requests to your website server for sending the whole page each time a user visits a page, that can slowdown your page speed.
In Browser Caching the user’s browser cache temporarily stores the files of a visited website such as HTML code, CSS Stylesheets, Images, etc, as a static assets. When a user revisits your website the browser sends the cached files quickly without requesting your website server to load the website resources again.
In Object Caching the database queries are stored on a server cache. When the same queries are requested again the server quickly sends the content without querying the database repeatedly.
02. How to Install Breeze Cache Plugin
Follow the steps to install Breeze Cache Plugin on WordPress.
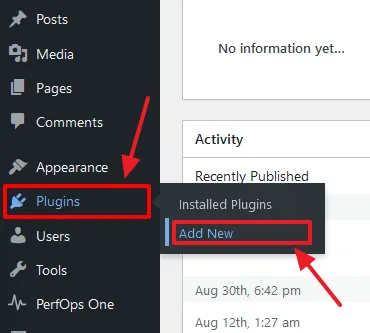
- Go to Plugins from the sidebar.
- Click on the Add New.
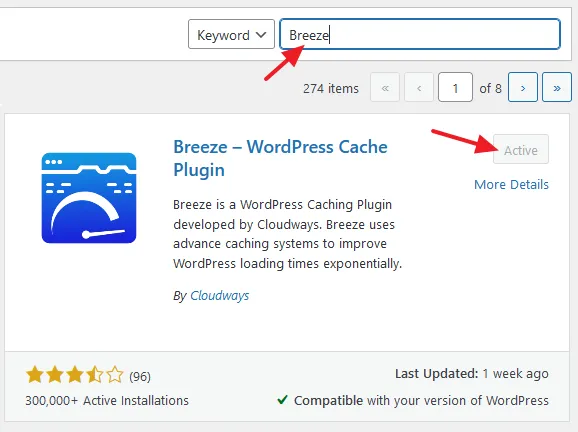
- Type Breeze in the Search Bar.
- It will appear on the search results with the title Breeze – WordPress Cache Plugin. Install and Activate.
03. How to Set Up Breeze Cache Plugin for a Block Theme
In this section, I will guide you on setting up the Breeze Cache Plugin for a WordPress block theme.
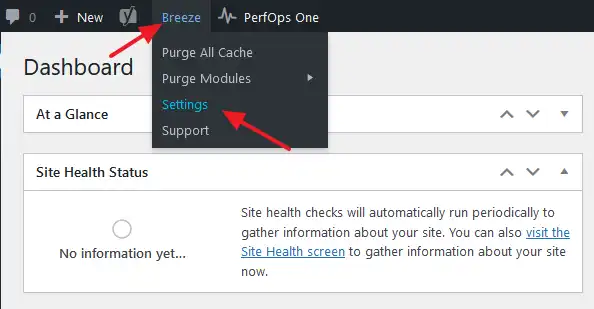
After Breeze cache plugin is installed and activated you can access it from two places i.e. Settings and Toolbar.
- Go to Breeze from Toolbar.
- Click on the Settings.
Primary Settings for a Block Theme
Most important feature required for a Block Theme is Caching. Breeze Cache Plugin offers two types of caching (1) Basic Cache (2) Varnish Cache.
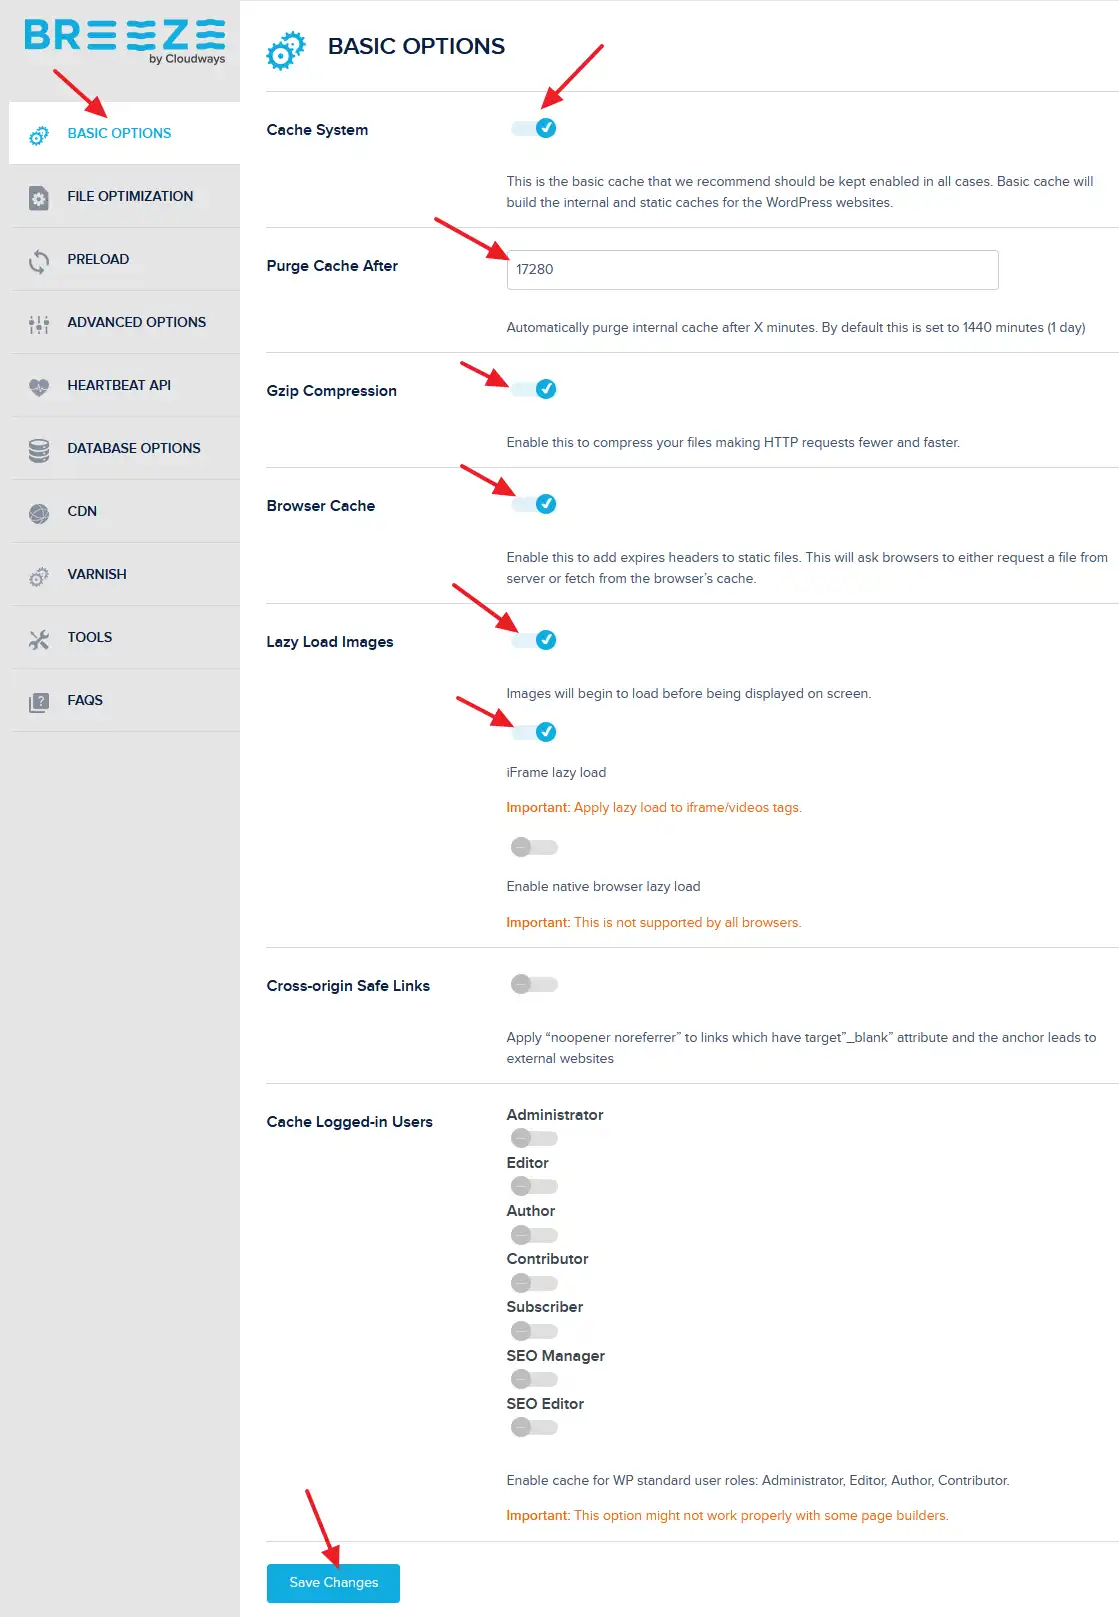
- Open the BASIC OPTIONS section.
- Enable the Cache System.
- Enter a value in Purge Cache After. This feature automatically clears/purge cache after the given minutes. The default value is 1440 minutes which is equal to 1 Day (24 hrs). I have increased the period to 12 days because I don’t want to clear my site cache after every day because it can slow down the performance of my site. You can also manually clean/purge cache, if needed.
- Enable the Gzip Compression. This feature compresses your files before sending to browser. It improves the page load time and reduce the bandwidth usage.
- Enable Browser Cache. Already explained in the Section 1.
- Enable Lazy Load Images and iFrame lazy load. Lazy Loading is an advanced feature that defers the loading of non-critical resources such as images, iframes, videos, etc, during the page load. It loads them only when user scrolls near them.
- Click on the Save Changes button.
Varnish Cache
The Cloudways offers server-level caching called Varnish or Varnish Cache that improves the performance of your website and reduces the server load to meet the high traffic.
If your website is hosted on Cloudways Server (hosting) you can get the benefit from this feature because by default Varnish is enabled on all WordPress websites hosted on Cloudways. Other Hosting Providers may not support Varnish Cache.
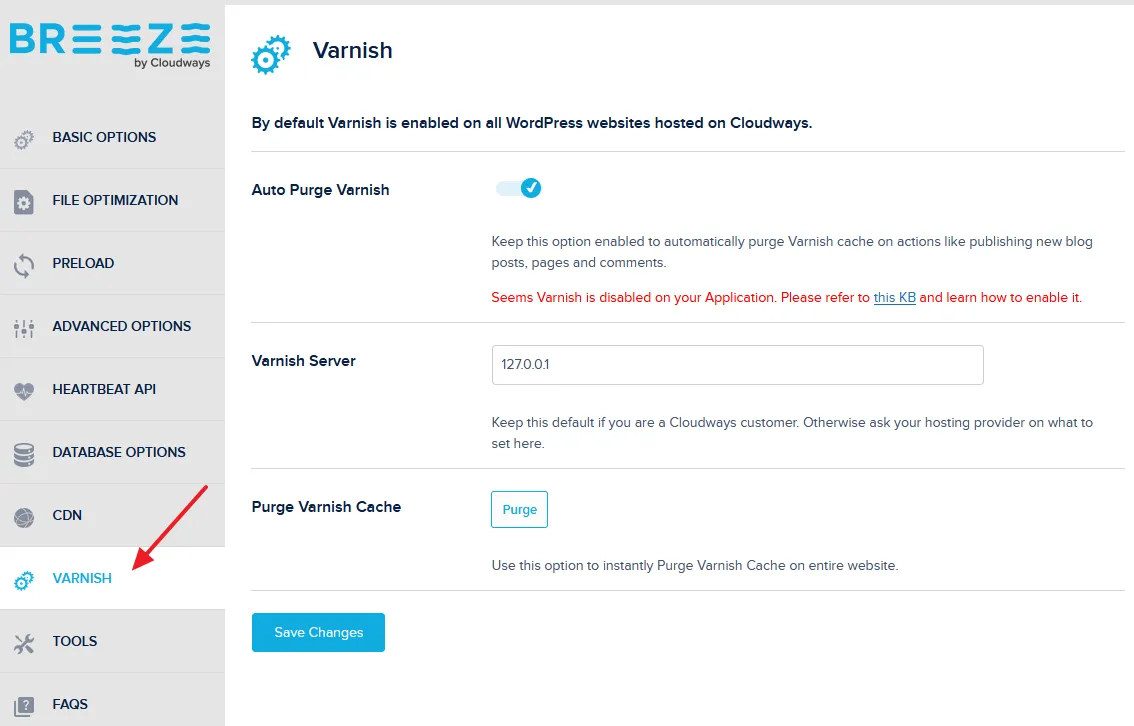
- Click on the VARNISH tab.
- Below you can see that Varnish Cache is not supported by the website hosting. It is showing the message, “Seems Varnish is disabled on your Application”.
- When you enable Auto Purge Varnish it automatically clears the varnish cache whenever you publish a new post, page, or a comment. Disable this option if you want to manually clear the Varnish Cache.
- The value of Varnish Server will remain same for Cloudways customers. You don’t have to do anything. If you hosting supports Varnish Cache you can ask them to provide the value for this field.
- The Purge button clears the Varnish Cache.
Other Features & Settings
Apart from Caching Breeze provides File Optimization features such as HTML Minification, CSS Minification, JavaScript Minification, etc, but from my experience, you don’t necessarily need File Optimization features because block themes are already built efficiently.
The File Optimization features are very useful for optimizing the Classic WordPress themes.
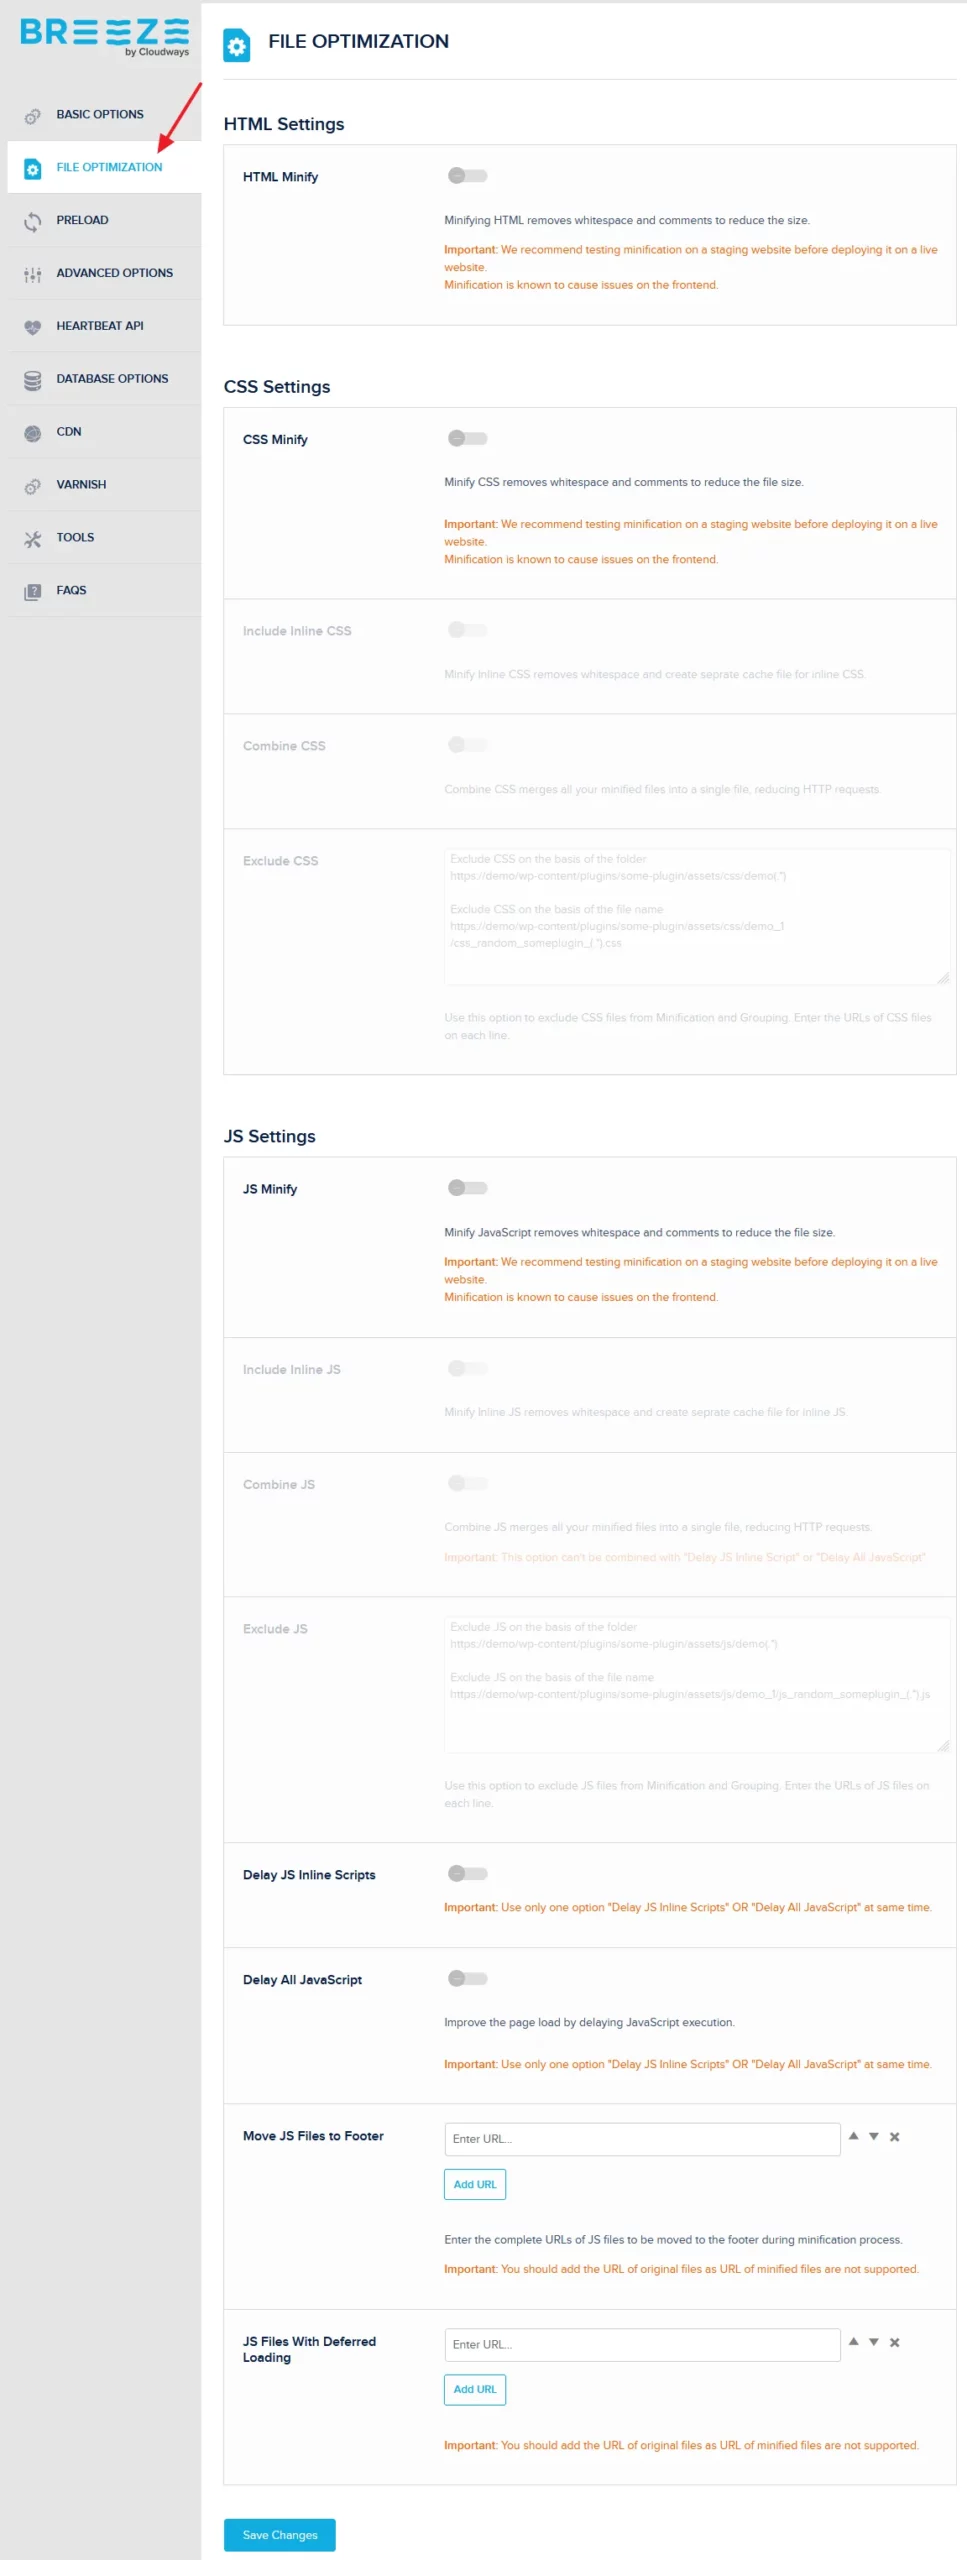
File Optimization
The FILE OPTIMIZATION provides features like HTML Minify, CSS Minify, JavaScript Minify, Deferring, etc, to improve the performance of your website.
If you want to use them enable each of the feature one by one and check whether they break your theme elements and layout on mobile and desktop devices or not because minification can break the layout or disturb the elements/sections of a page.
Don’t forget to test the score of your website pages on Google PageSpeed Insights to know whether they are improving or decreasing the performance of your pages.
PRELOAD
The Preload feature loads the important files, URLs, and links beforehand when a page is opened, to improve the page loading speed.
- On Preload Webfont you can add the URLs of web fonts. The webfonts are stored on your theme’s assets folder. For example, https://your_domain/wp-content/themes/theme_name/assets/fonts/font_name.
- Enable the Preload Links. When a user on your page hover over links, the cache is created in advance. The page will load faster upon link visiting.
- On Prefetch of DNS Request you can add the URLs of common domains like Google Analytics, Google Tag Manager, CDN (if enabled) to optimize their content load, like this:
    //www.google-analytics.com
    //www.googletagmanager.com
    //fonts.googleapis.com
    //cdn.domain.com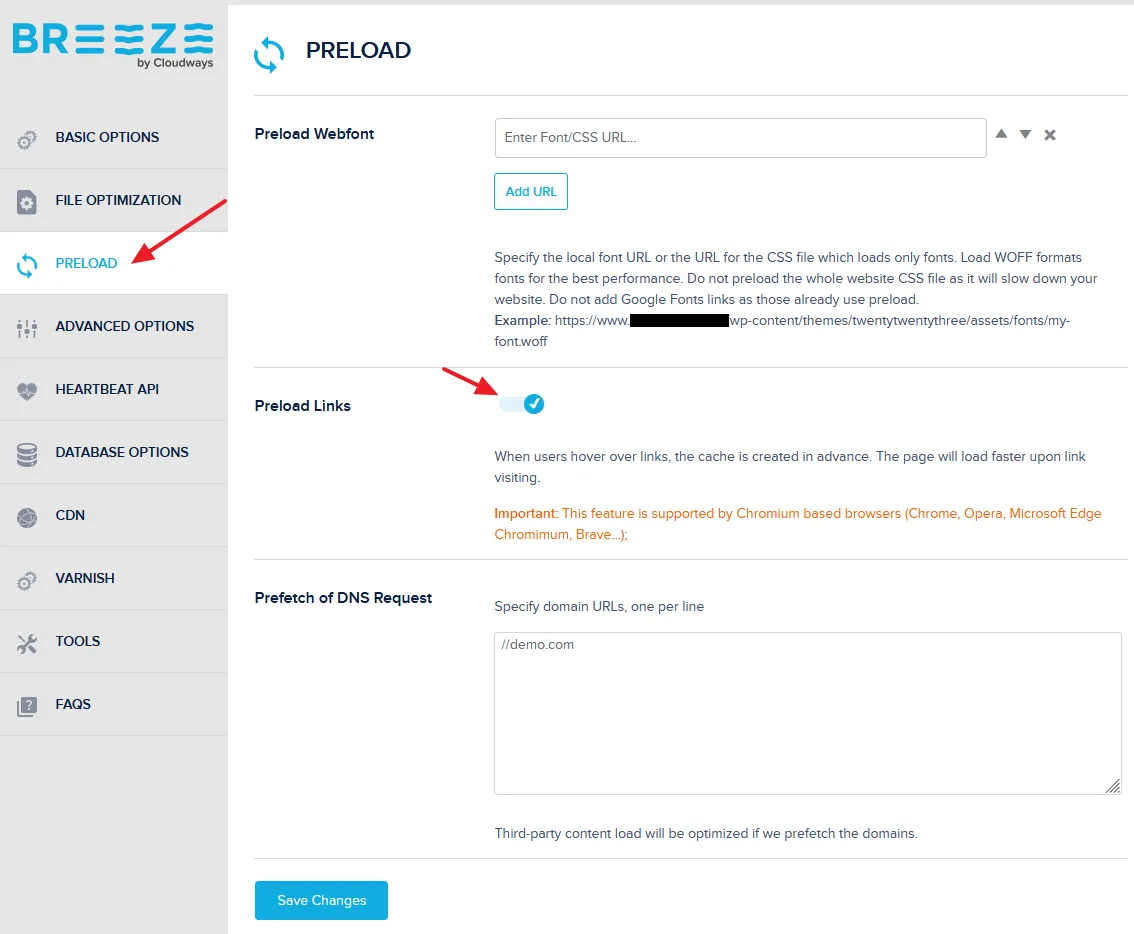
ADVANCED OPTIONS
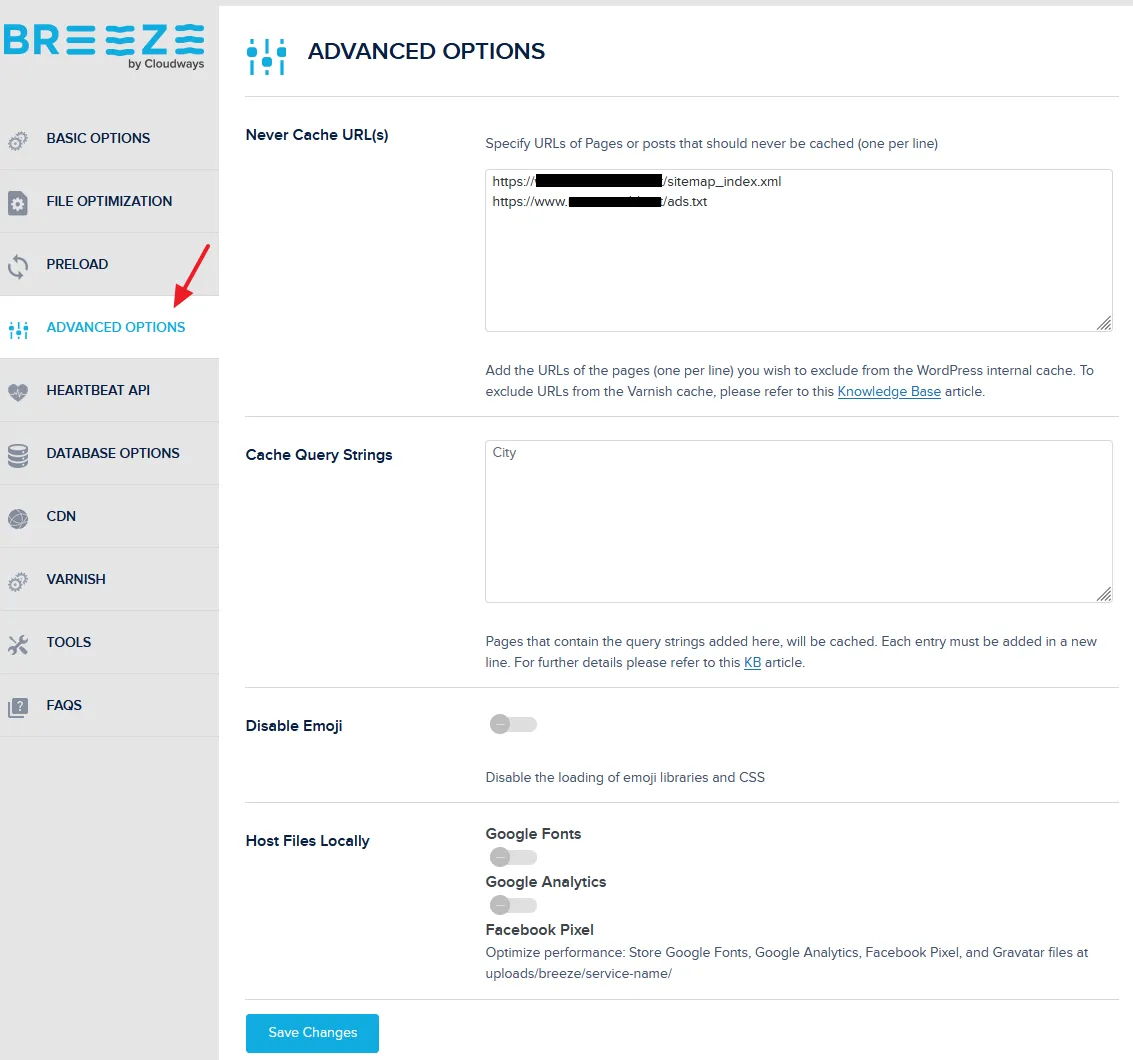
- The Never Cache URL(s) option allows you to add the URLs that you don’t want to be cached in Breeze’s internal cache.
- The Cache Query Strings option allows URLs with query strings to be cached. Breeze cache plugin does not cache query strings by default and ignores them. Example of a Query String: https://example.com/page/?s=id.
- On Host Files Locally enable the Google Fonts, Google Analytics, Facebook Pixel, and Gravatars, to store them locally to optimize the performance.
DATABASE OPTIONS
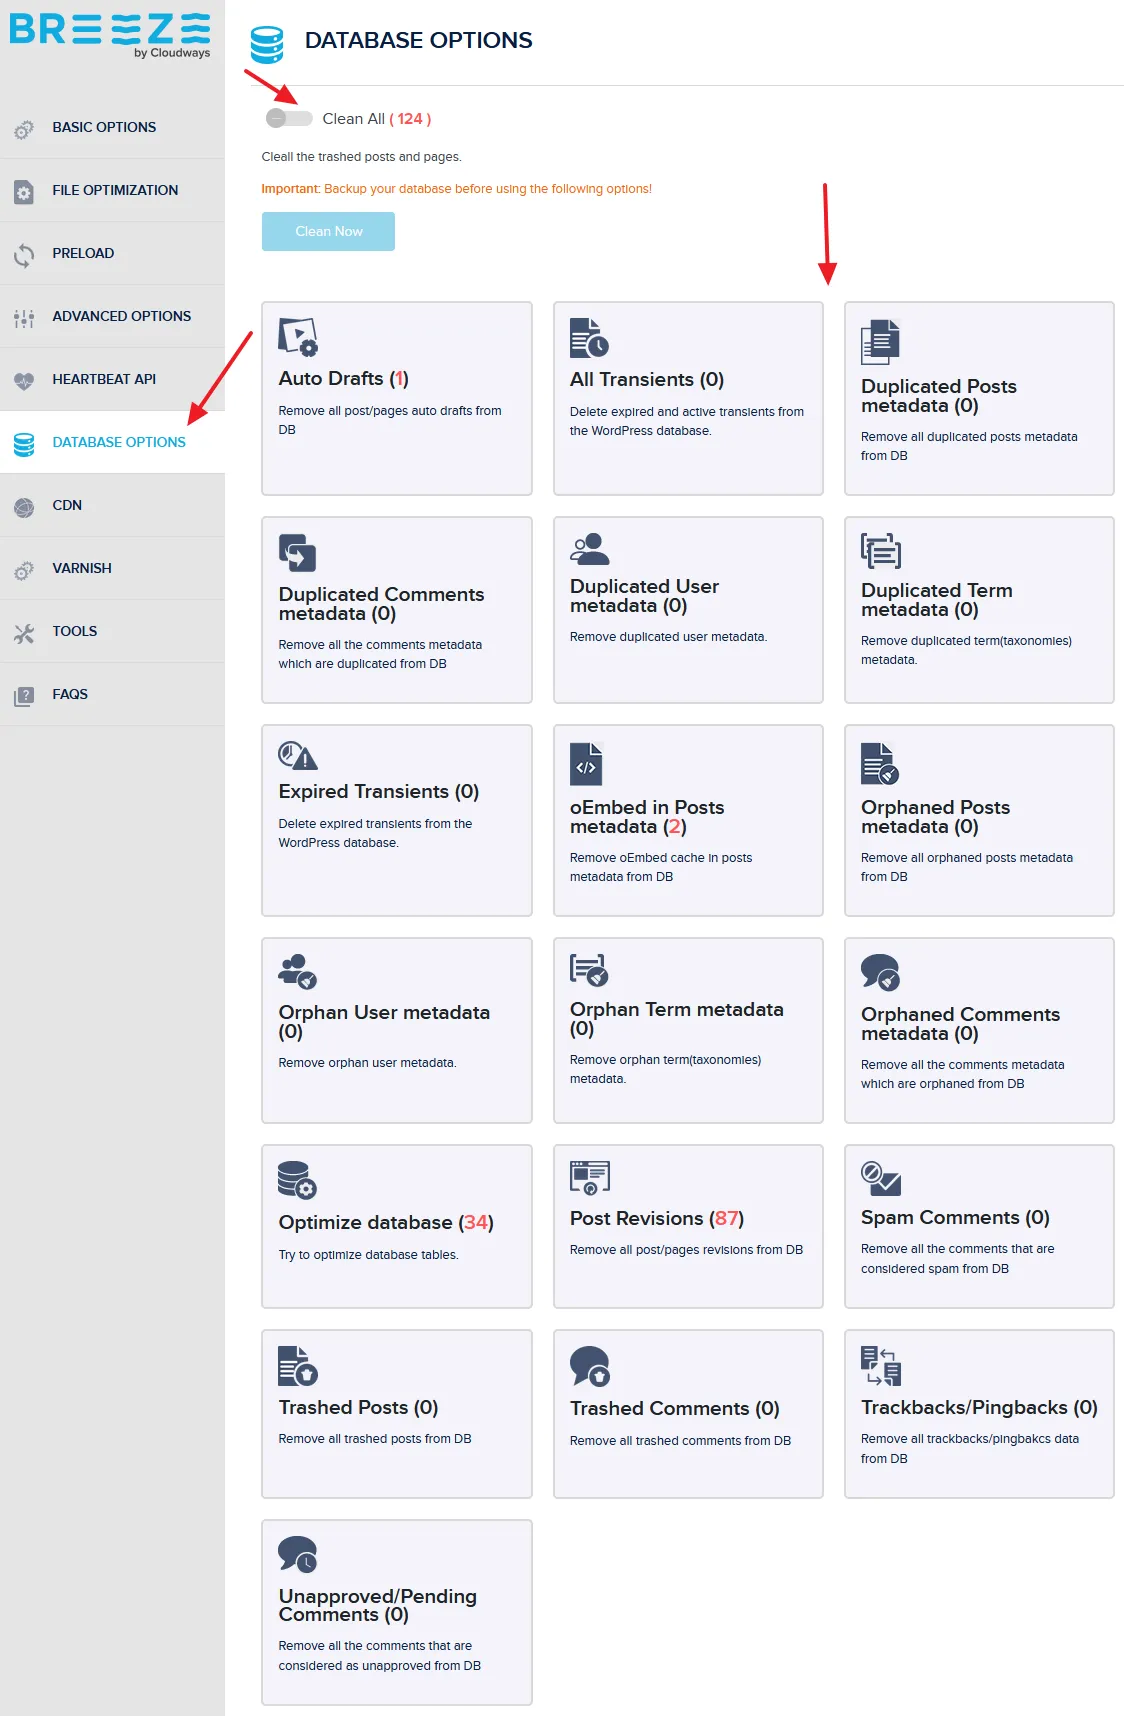
The DATABASE OPTIONS allow you to keep your database clean and light. Some information is unnecessarily remain on your database such as Auto Drafts, All Transients, Duplicated Posts metadata, Duplicated Comments metadata, Post Revisions, Spam Comments, Thrashed Posts, etc.
- Click on an item to select. You can select multiple items as well.
- After selecting the item or items enable the Clean All option.
- Click on the Clean Now button.
04. Install Flying Scripts Plugin If Your Blog is Monetized with AdSense Ads
If your WordPress blog is monetized with Google AdSense Ads you can use a lightweight free plugin Flying Scripts to delay the loading of AdSense Ads. It improves your page load speed and Google PageSpeed Insights assessment score.
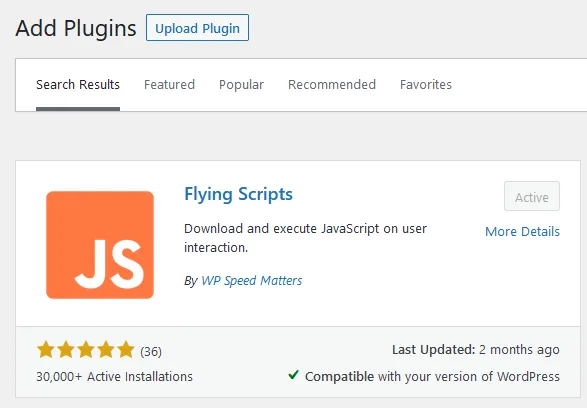
- Install and Activate the Flying Scripts plugin.
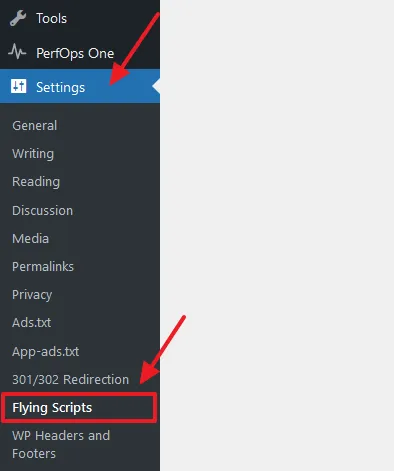
- Go to Settings from the sidebar.
- Click on the Flying Scripts.
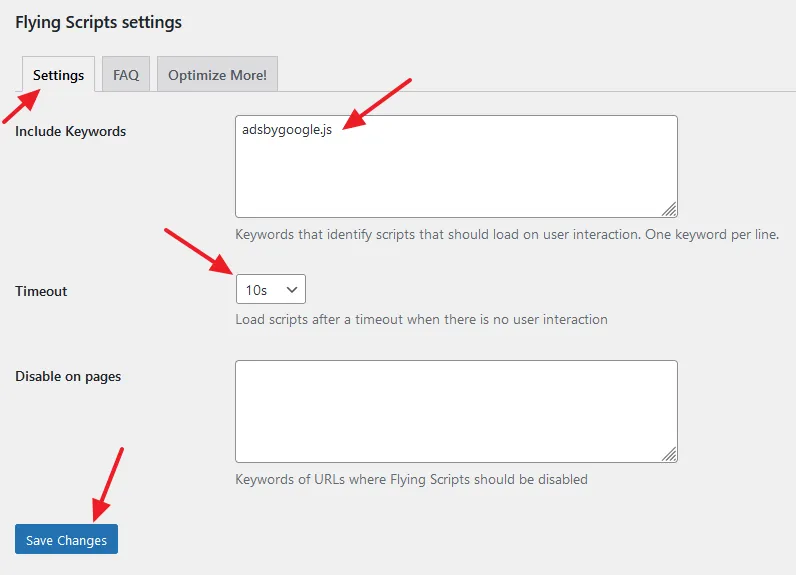
- On Include Keywords enter adsbygoogle.js. Also add analytics.js, and gtag.
- Select 10s on Timeout. When a post or homepage of your blog is opened the AdSense Ads will load after the 10s or on user interaction.
- Click on the Save Changes button.
If you like this post then don’t forget to share with other people. Share your feedback in the comments section below.

Also Read


Leave a Reply